Blondie Oreo Buttermilk Pound Cake: Velvety Crumb

- Time:15 minutes active + 75 minutes baking = Total 90 minutes
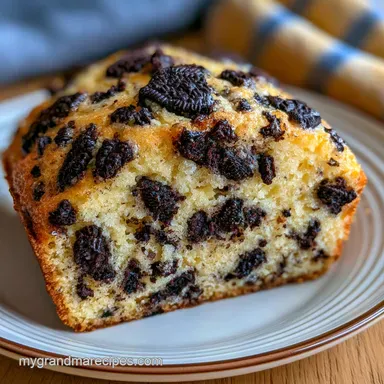
- Flavor/Texture Hook: Velvety crumb with shattering Oreo chunks
- Perfect for: Family Sunday brunches or a decadent dessert centerpiece
Blondie Oreo Buttermilk Pound Cake
The smell of browned butter and molasses hits you the second the oven door opens, filling the whole kitchen with a warm, sugary aroma. It's that specific scent that reminds me of my grandmother's kitchen in the summer, where the air was thick and the cakes were always hearty.
I remember the first time I tried to mix a traditional pound cake with the chewiness of a blondie, and I nearly ruined the batter by overmixing.
But that mistake taught me everything. I realized that the secret isn't just the ingredients, but how you treat them. This blondie oreo buttermilk pound cake isn't just a dessert, it's a bit of comfort food that feels like a hug in slice form.
It's got that heavy, satisfying weight to it, but the buttermilk keeps it from feeling like a brick.
You can expect a cake that's golden brown on the outside with a center that's almost velvety. The Oreos don't just sit there, they create these little pockets of chocolatey crunch that break up the richness of the butter. Trust me on this, once you try this version, you'll never go back to a plain vanilla sponge.
Get the Texture Right
To get this right, we have to look at what's actually happening in the bowl. This isn't a light as-air chiffon cake, it's a sturdy, old-fashioned bake.
Buttermilk Tang: The lactic acid in the buttermilk breaks down long gluten strands, which ensures the cake stays tender instead of becoming bread like.
Brown Sugar Moisture: Unlike white sugar, the molasses in brown sugar attracts water, giving us that fudgy, blondie like interior.
Fat Suspension: Beating the butter and sugar creates tiny air pockets that hold up the heavy Oreo chunks so they don't all plummet to the bottom.
Room Temp Stability: When eggs and buttermilk are room temperature, they create a stable emulsion that won't split when you add the flour.
Fresh Buttermilk vs. DIY Shortcut
| Component | Fresh Buttermilk | Lemon/Milk Shortcut | Impact on Cake |
|---|---|---|---|
| Acidity Level | Natural and balanced | Sharp and immediate | Fresh gives a smoother tang |
| Consistency | Thick and creamy | Thinner | Fresh helps the crumb hold Oreos |
| Flavor Profile | Subtle, buttery | Slightly citrusy | Fresh is more traditional |
And for those who love a good cookie based treat, you might also enjoy my Mini Oreo Cheesecakes recipe for a creamier alternative.
Component Analysis
Understanding why we use these specific amounts helps you avoid those common baking pitfalls.
| Ingredient | Science Role | Pro Secret |
|---|---|---|
| Unsalted Butter | Structure & Flavor | Soften until it yields to a finger press, not melted |
| Light Brown Sugar | Caramelization | Pack it tight in the cup for consistent moisture |
| Full Fat Buttermilk | Tenderizer | Use full fat to keep the velvety mouthfeel |
| All Purpose Flour | Framework | Spoon and level to avoid a dense, rubbery cake |
The Kitchen Arsenal
You don't need a professional bakery, but a few specific tools make this a breeze. I always use a stand mixer such as KitchenAid to get the butter truly fluffy, but a hand mixer works just fine if you've got the patience.
First, grab a 9x5 inch loaf pan. If you use a wider pan, your cake will be flatter and might overbake on the edges before the center is set. You'll also need a rubber spatula for the folding process, as a whisk will deflate all that precious air we beat into the butter.
Finally, have some parchment paper ready. I've had too many cakes stick to the pan because I trusted the grease alone. Lining the bottom ensures the cake slides out in one piece, keeping your 18 slices looking clean and professional.
Step-by-step Baking

Before you start, let's look at the flow. The prep is quick, but the bake is slow and steady.
- 1. Prep Flow
- Preheat oven, grease pan, and bring eggs/buttermilk to room temperature (15 minutes).
- 2. Cooking Flow
- Cream butter/sugar, emulsify eggs, alternate dry/wet ingredients, and fold in cookies (20 minutes).
- 3. Finish Flow
- Bake for 75 minutes, cool completely, and apply the Oreo glaze (90 minutes).
For the Cake Batter
- Preheat your oven to 325°F (160°C). Grease your pan and line it with parchment paper. Note: Low temp prevents the outside from burning before the middle cooks.
- In a large bowl, beat the softened butter and brown sugar together on medium high speed until pale, fluffy, and light. until the mixture looks like a pale cloud
- Add the eggs one at a time, beating well after each addition, then stir in the vanilla extract. Note: Adding eggs slowly prevents the batter from curdling.
- In a separate bowl, whisk the flour, baking powder, and salt.
- Alternately mix the flour mixture and the buttermilk into the butter mixture, starting and ending with flour, until just combined. until no streaks of flour remain
- Gently fold in the chopped Oreos using a rubber spatula until evenly distributed. Note: Don't overmix here or the cake becomes tough.
- Pour the batter into the pan and smooth the top with a spatula.
- Bake 75 minutes until a toothpick comes out with a few moist crumbs.
For the Oreo Glaze
- Whisk together the powdered sugar, heavy cream (or milk), and vanilla extract until smooth.
- Pour the glaze over the completely cooled cake.
- Sprinkle the finely crushed Oreo crumbs over the top until the surface is evenly coated.
Chef's Note: To get that professional look, let the glaze sit for 10 minutes before adding the crumbs so they stick without sinking.
Fixing Common Cake Issues
Even the best of us have cakes that don't go as planned. Usually, it's a temperature issue or a mixing mistake.
Sinking in Middle
This usually happens when the oven door is opened too early or the baking powder is expired. The structure collapses before it's set. Trust the timer and avoid peeking for at least 60 minutes.
Cookies at Bottom
If your Oreo chunks are all at the bottom, your batter was likely too thin or you didn't fold them in gently. Using room temperature ingredients keeps the batter thick enough to suspend the cookies.
Rubbery Texture
Overmixing the flour develops too much gluten, turning a tender cake into something resembling bread. Stop mixing the second the flour disappears.
| Problem | Root Cause | Solution |
|---|---|---|
| Cake is too dense | Overmixed batter | Use a spatula to fold the final ingredients |
| Glaze is too runny | Too much cream | Add more powdered sugar 1 tablespoon at a time |
| Edges burnt, middle raw | Oven too hot | Use an oven thermometer to verify 325°F |
Common Mistakes Checklist
- ✓ Did you use room temperature eggs to avoid splitting?
- ✓ Did you line the pan with parchment paper?
- ✓ Did you stop mixing as soon as the flour disappeared?
- ✓ Did you wait for the cake to cool before glazing?
- ✓ Did you use a low oven temp (325°F) for a steady rise?
Creative Taste Twists
Once you've mastered the blondie oreo buttermilk pound cake, you can start playing with the flavors. I love adding a pinch of cinnamon to the flour mix to give it a warmer, more autumnal feel.
2 Cookie Twists - Golden Oreo Version: Replace the standard Oreos with Golden Oreos and add a teaspoon of lemon zest for a bright, buttery flavor. - Double Chocolate: Use chocolate Oreos and swap 50g of the flour for high-quality cocoa powder.
2 Diet Swaps - dairy-free: Use a plant based butter and a homemade vegan buttermilk (soy milk + apple cider vinegar). Note: Texture will be slightly less dense. - Lower Sugar: Replace half the brown sugar with a brown sugar alternative.
Note: This may affect the "blondie" chewiness.
If you're in the mood for something equally comforting but with a different twist, my Banana Pudding Pound Cake is a fantastic choice for dessert lovers.
Storage and Waste Tips
Pound cakes are wonderful because they actually taste better the next day. The flavors have time to meld, and the moisture redistributes through the crumb.
Storage Guidelines Keep the cake in an airtight container at room temperature for up to 3 days. For longer storage, the fridge is your friend; it will stay fresh for 6-7 days.
If you're freezing it, slice the cake first, wrap each slice in parchment paper, and place them in a freezer bag for up to 3 months.
Reheating the Slices For a "fresh from the oven" feel, pop a slice in the microwave for 10-15 seconds. Or, if you want a bit of a crisp, toast it in a pan with a tiny bit of butter.
Zero Waste Ideas If you have cake scraps or "ugly" ends, don't toss them. Cube them up and toss them into a trifle with berries and whipped cream. You can also toast the scraps and use them as a decadent topping for vanilla ice cream.
Best Ways to Serve
This cake is rich, so you want pairings that cut through that density. A dollop of unsweetened whipped cream is a classic choice, but I personally love a smear of salted butter on a warm slice.
Decision Shortcut
- If you want a breakfast vibe, serve it with a strong black coffee.
- If you want a dinner party showstopper, serve it with fresh raspberries.
- If you want a midnight snack, serve it with a cold glass of milk.
- 1. Batter Temp
- The batter should be roughly 70°F (21°C) before entering the oven.
- 2. Internal Temp
- The cake is done when the internal temperature hits 200-205°F (93-96°C).
- 3. Cooling Time
- Wait at least 2 hours before glazing to prevent the frosting from melting.
Baking Truths
There are a few things people tell you about pound cakes that just aren't true. I've spent enough time in the kitchen to know what actually matters.
One common myth is that you must use a specific "pound" of every ingredient. While the name comes from that tradition, modern baking is more about the ratio of fat to flour. This blondie oreo buttermilk pound cake uses a modified ratio to get that specific fudgy texture without being overly greasy.
Another misconception is that you should always grease the pan with butter and flour. While that's old-fashioned, parchment paper is far more reliable. It prevents the "stuck bottom" tragedy that happens to the best of us.
Finally,, some say you can't use a hand mixer for pound cake. That's simply not true. As long as you beat the butter and sugar until they are truly light and fluffy, the tool you use doesn't change the chemistry of the bake. For more baking tips, you can learn from the pros at King Arthur Baking Company.
Right then, you've got everything you need to make a blondie oreo buttermilk pound cake that'll have everyone asking for the recipe. It's a bit of a labor of love, but the first bite of that velvety, cookie studded cake makes every minute worth it. Let's crack on and get baking!
Recipe FAQs
Why use room temperature eggs and buttermilk?
It ensures a stable emulsion. Cold ingredients can cause the softened butter to seize, leading to a broken batter and an uneven rise.
Can I use regular milk instead of buttermilk?
No, buttermilk provides essential acidity. For a similarly moist crumb and acid balance, try our tropical dessert.
How to prevent the center from sinking?
Avoid opening the oven door until the 75-minute mark. Sudden temperature drops can cause the cake structure to collapse before it fully sets.
How to fold in the chopped Oreos?
Use a rubber spatula to gently lift and turn the batter. Fold until the cookies are evenly distributed without overworking the gluten.
How long does the cake stay fresh?
Up to 3 days at room temperature. Keep it in an airtight container, or refrigerate it for 6-7 days to maintain maximum moisture.
Is it true that overmixing the batter makes the pound cake softer?
No, this is a common misconception. Overmixing develops too much gluten, which results in a tough, rubbery texture rather than a tender crumb.
What temperature should the oven be?
Set your oven to 325°F (160°C). This low and slow heat allows the dense cake to bake through completely without burning the exterior edges.
Blondie Oreo Buttermilk Pound Cake