Giant Reeses Peanut Butter Cup Pie: Silky and Rich
- Time: 20 min active + 4 hrs chilling = Total 4 hrs 20 mins
- Flavor/Texture Hook: Silky smooth peanut butter filling with a chocolate shatter.
- Perfect for: Family reunions, potlucks, or a serious sugar craving.
Giant reeses peanut butter cup pie
That distinct snap of a thick chocolate shell is the only way to start this story. In my house, dessert wasn't just a treat, it was the main event of every Sunday gathering. We didn't do fancy, plated desserts. We did big, oversized pies that took up half the table and left everyone in a sugar coma.
It's a cherished Southern tradition to make things bigger and bolder than necessary, and this pie fits right in with that spirit.
I remember my grandmother always saying that the best desserts are the ones that don't require you to stand over a hot stove for hours in a humid July kitchen. That's why I've always leaned toward no bake recipes.
This particular treat is a tribute to those lazy afternoons and the timeless love for chocolate and peanut butter. It's pure comfort food that feels like a hug from a relative you only see once a year.
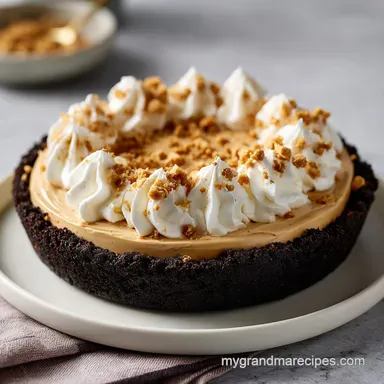
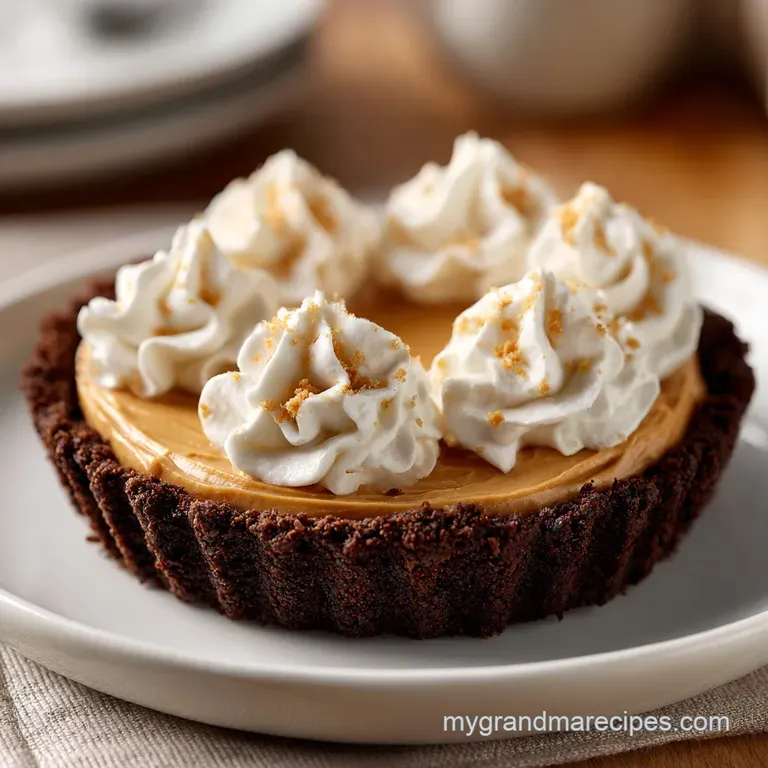
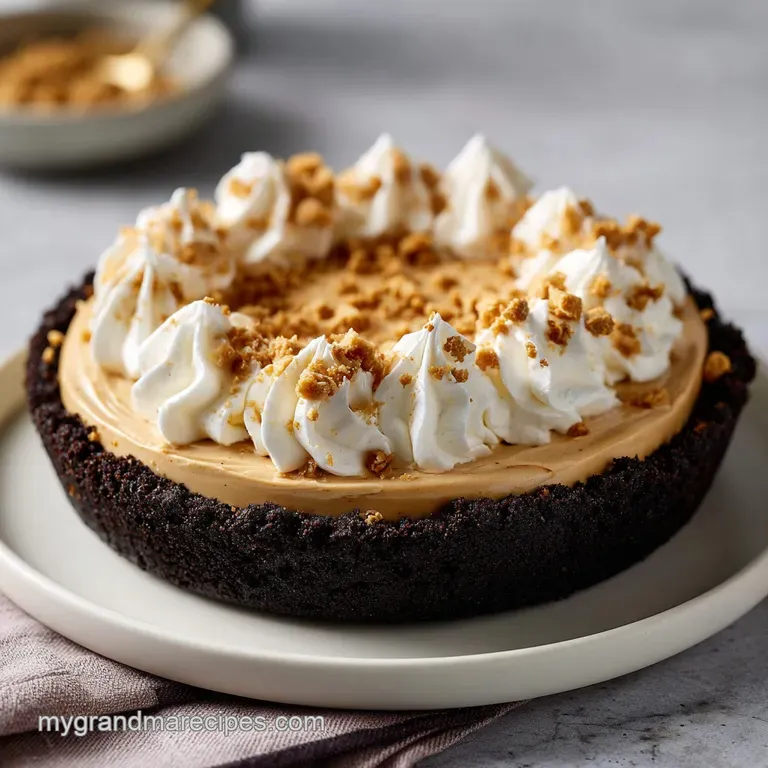
You can expect a dessert that is unapologetically rich. We're talking about a deep, chocolatey crust that holds up to a cloud like peanut butter filling, all topped with a glossy ganache.
This giant reeses peanut butter cup pie homemade style doesn't try to be healthy or refined, it just tries to be the best thing you've ever tasted. Trust me on this, one slice is usually enough, but you'll probably want two.
Secret to the Texture
Instead of just mixing things together, we're focusing on how the air and fats interact to keep the pie from feeling like a heavy brick of peanut butter.
- Fat Stabilization
- Cream cheese acts as an anchor, preventing the natural oils in the peanut butter from separating or making the filling too runny.
- Air Incorporation
- Folding in stiff peaked whipped cream adds tiny air bubbles, giving the center a cloud like lift.
- Ganache Emulsion
- Hot cream melts the chocolate chips into a stable, glossy liquid that sets firm but remains velvety on the tongue.
- Crust Compression
- Freezing the crust before filling prevents the peanut butter from soaking into the cookies, keeping that distinct shatter when you cut it.
| Feature | Homemade Fresh | store-bought Shortcut | Impact |
|---|---|---|---|
| Cookie Base | Crushed & Buttered | Pre made Graham Crust | Much deeper chocolate flavor |
| Filling | Whipped Cream/PB | Instant PB Mousse | Lighter, more balanced sweetness |
| Topping | Fresh Ganache | Melted Candy Bars | Silkier texture and better shine |
Component Analysis
Right then, let's look at what's actually happening inside the bowl. Understanding the role of each ingredient helps when you're adjusting things by instinct.
| Ingredient | Science Role | Pro Secret |
|---|---|---|
| Cream Cheese | Structural Support | Always use full fat to avoid a grainy texture |
| Heavy Cream | Aeration & Volume | Keep it ice cold for the maximum lift |
| Semi sweet Chips | Richness & Balance | Use high-quality chips to cut through the sugar |
| Peanut Butter | Primary Flavor/Fat | Room temperature PB blends faster with cheese |
What You'll Need
Gather these items before you start. I've found that having everything measured out makes this a breeze.
- 250g chocolate sandwich cookies, crushed Why this? Provides a dark, bitter contrast to the sweet filling (Substitute: Oreo crumbs)
- 70g unsalted butter, melted Why this? Binds the crumbs into a solid base (Substitute: Coconut oil for dairy-free)
- 250g cream cheese, softened Why this? Adds tang and stability (Substitute: Mascarpone for a richer taste)
- 250g creamy peanut butter Why this? The star of the show (Substitute: Almond butter, though it changes the flavor)
- 120g powdered sugar Why this? Dissolves instantly for a smooth finish (Substitute: Extra fine granulated sugar)
- 240ml heavy whipping cream, chilled Why this? Creates the fluffy texture (Substitute: Coconut cream)
- 225g semi sweet chocolate chips Why this? Base for the ganache (Substitute: Dark chocolate chunks)
- 120ml heavy cream Why this? Melts the chocolate (Substitute: Whole milk, but it's less stable)
- 12 Reese's Peanut Butter Cups, chopped Why this? Adds texture and iconic flavor (Substitute: Any PB cup brand)
Equipment Needed
You don't need a professional kitchen for this, just a few basics. I usually use a stand mixer such as KitchenAid to save my arms during the whipping process, but a hand mixer works just fine.
- 9 inch pie plate or springform pan
- Electric hand mixer or stand mixer
- Large mixing bowls
- Rubber spatula
- Microwave safe bowl for the ganache
- Offset spatula or a butter knife for smoothing
Bringing It Together
Let's crack on with the assembly. Follow these steps closely, especially the temperature cues.
Pressing the Foundation
- Combine your crushed chocolate sandwich cookies and melted butter in a bowl. Mix until it looks like wet sand.
- Press the mixture firmly into the bottom and up the sides of your 9 inch pan. Note: Use the bottom of a flat glass to get it really packed tight.
- Freeze the crust for 10 minutes until it feels solid to the touch.
Whipping the Center
- Beat the softened cream cheese and peanut butter together until the mixture is completely smooth and no lumps remain.
- Gradually mix in the powdered sugar.
- In a separate chilled bowl, whip the cold heavy whipping cream until stiff peaks form and hold their shape.
- Gently fold the whipped cream into the peanut butter mixture using a spatula. Note: Don't stir vigorously or you'll deflate all that lovely air.
- Pour the filling into the chilled crust and smooth the top with a spatula.
Pouring the Velvet
- Heat 120ml heavy cream in the microwave until it just begins to simmer.
- Pour the hot cream over the chocolate chips. Let it sit for 5 minutes without stirring, then stir slowly until the ganache is glossy and dark.
- Allow the ganache to cool to approximately 32°C before pouring it over the peanut butter layer. Note: According to Serious Eats, controlling the temperature of ganache prevents it from melting your filling.
- Top with chopped Reese's Peanut Butter Cups and refrigerate for at least 4 hours until the pie is firm and set.
Avoiding Kitchen Disasters
Even the most experienced home cooks hit a snag now and then. I once poured hot ganache directly onto the filling and it created a marbled mess instead of a clean layer. It still tasted great, but it didn't look the part.
Why Your Filling Is Runny
If your center feels more like a pudding than a pie, you've likely over beaten the cream or used cheese that was too warm. The structure depends on the air bubbles in the cream and the fat in the cheese.
Preventing Ganache Separation
When chocolate and cream split, you get oily streaks. This usually happens if the cream was boiled too hard or the chocolate was added too quickly. Stir slowly and let the heat do the work.
Stopping Crust Crumbling
A crumbly crust is usually a sign of not enough butter or not pressing hard enough. It should feel like a solid disk before you add the filling.
| Problem | Root Cause | Solution |
|---|---|---|
| Filling is too soft | Over whipped cream | Chill the pie for an extra 2 hours |
| Ganache is lumpy | Under heated cream | Gently reheat in 10 second bursts |
| Crust is soggy | Didn't freeze first | Freeze crust for 10 mins next time |
Common Mistakes Checklist
- ✓ Room temperature cream cheese (prevents lumps)
- ✓ Ice cold whipping cream (ensures stiff peaks)
- ✓ Pressing the crust firmly (prevents crumbling)
- ✓ Cooling ganache to 32°C (preserves the layers)
- ✓ Folding, not stirring, the cream (keeps it fluffy)
Mix It Up
If you want to change the vibe of this recipe, you have a few options. If you're in the mood for something smaller, try these Mini Oreo Cheesecakes for a similar flavor profile but in bite sized portions.
- For a Salty Twist: Add a pinch of flaky sea salt to the top of the ganache before adding the chopped cups.
- For a Lighter Version: Replace half of the cream cheese with Greek yogurt, though the pie will be slightly softer.
- For More Crunch: Mix some chopped peanuts directly into the cookie crust.
If you want a specific outcome, follow this shortcut: - Want it fluffier? Add an extra 60ml of whipped cream. - Want it richer? Use 70% dark chocolate chips for the ganache. - Want more "candy" feel? Double the chopped Reese's on top.
Adjusting the Size
Scaling a no bake pie is easier than baking one because you don't have to worry about oven hot spots.
Scaling Down (1/2 Batch): Use a 6 inch pan. Reduce the chilling time for the crust to 5 minutes, but keep the final set time at 4 hours. Since you can't easily halve an egg (not used here, but good for other recipes), just be precise with your grams.
Scaling Up (2x Batch): Work in batches for the whipping process. If you use a massive bowl, the bottom often stays unmixed. I recommend making two separate 9 inch pies rather than one giant one, as the center of a deeper pie takes much longer to set and can lead to a "slump" when you slice it.
Dessert Beliefs
There are a few things people get wrong about no bake treats. Let's set the record straight.
"No bake pies are always unstable." Not if you use a stabilizer. The combination of cream cheese and chilled heavy cream creates a sturdy structure that holds its shape perfectly, provided you give it the full 4 hours to chill.
"You need a double boiler for ganache." While a double boiler is the traditional way, a microwave is perfectly fine for home cooks. As long as you don't overheat the chocolate to the point of burning, the result is exactly the same.
Storage Guidelines
This pie keeps remarkably well in the fridge. Cover it with plastic wrap or store it in an airtight container for up to 5 days. If you're feeling adventurous, you can freeze it for up to 2 months. Just let it thaw in the fridge overnight before serving.
To avoid waste, if you have leftover cookie crumbs or melted butter, mix them with a bit of honey and bake them at 180°C for 5 minutes to make tiny "cookie clusters" for snacking.
Perfect Complements
This pie is an absolute powerhouse of flavor, so you want something to balance it out. A tart raspberry coulis or fresh strawberries on the side cut through the richness of the peanut butter.
For another no bake treat to serve alongside this at a party, classic no bake cookies are a family favorite and add a different kind of chewiness to the spread. If you prefer something fruity to cleanse the palate, a simple lemon sorbet is the way to go. This giant reeses peanut butter cup pie is a heavy hitter, so keep the sides light and fresh.
Recipe FAQs
Can I keep this pie in the fridge?
Yes, it lasts up to 5 days. Cover it with plastic wrap or store it in an airtight container to keep it fresh.
How to prevent the ganache from mixing with the filling?
Cool the ganache to approximately 90°F (32°C) before pouring. This ensures the chocolate doesn't melt the peanut butter layer upon contact.
Can I use a regular pie plate instead of a springform pan?
Yes, a 9 inch pie plate works perfectly. If you enjoy assembling layered chilled desserts, try applying the same method to our ice cream sandwich cake.
Is it true I can serve the pie immediately after assembling?
No, this is a common misconception. The pie must refrigerate for at least 4 hours to set, otherwise the filling will be too soft to slice.
How to get clean slices of the pie?
Dip a sharp knife in hot water and wipe dry between each cut. This prevents the chocolate ganache from smearing into the peanut butter layer.
Can I freeze the pie for long term storage?
Yes, it freezes for up to 2 months. Just let it thaw slowly in the fridge overnight before you plan to serve it.
How to ensure the peanut butter filling is smooth?
Beat softened cream cheese and peanut butter together first. Gradually mix in the powdered sugar before folding in the whipped cream to avoid lumps.
Giant Reeses Peanut Butter Pie