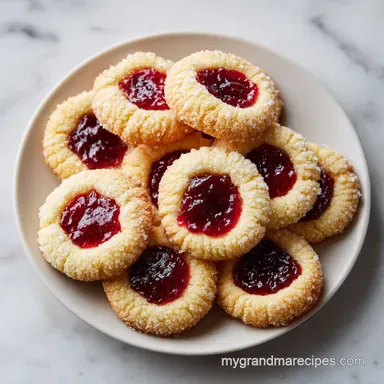
Classic Thumbprint Cookies: Buttery and Tender
- Time: Active 20 minutes, Passive 12 minutes, Total 32 minutes
- Flavor/Texture Hook: Buttery, crumbly shortbread with a sticky sweet fruit center
- Perfect for: Holiday gift boxes, afternoon tea, or beginner bakers
- Creating Perfect Thumbprint Cookies at Home
- Why This Texture Rich Recipe Works
- Component Analysis for Better Baking
- Essential Ingredients and Smart Substitutes
- Minimal Equipment for Best Results
- From Prep to Plate Instructions
- Fixing Common Thumbprint Problems
- Simple Scaling Guidelines
- Flavor Variations to Try
- Butter and Jam Myths
- Storage and Zero Waste
- Perfect Complements
- Recipe FAQs
- 📝 Recipe Card
Creating Perfect Thumbprint Cookies at Home
If you could step into my grandma’s kitchen back in Tennessee on a Tuesday afternoon, the first thing you would notice isn't the heat from the oven, but the sharp, sweet aroma of almond extract hitting the air.
It’s a scent that lingers in the curtains and makes your mouth water before you even see a baking sheet. She always said that the secret to a good cookie wasn't just the butter, but the way you treated the starch.
While everyone else was just tossing flour into a bowl, she was meticulously measuring out a bit of cornstarch, insisting it was the only way to get that delicate, velvety crumb that shatters perfectly when you take a bite.
These Thumbprint Cookies are the heart of my baking repertoire because they don't require fancy gadgets or a degree in pastry arts. You just need your hands, a few pantry staples, and a little bit of patience while the dough chills.
I remember sitting at her small wooden table, my job being the "official indenter." I’d press my small thumb into each ball of dough, feeling the cool, pliable texture against my skin. Sometimes they would crack, and she’d just laugh, showing me how to pinch the edges back together with a steady hand.
It’s that human touch that makes these cookies feel like a hug in a box.
We’re going to focus on the cornstarch today because it is truly the unsung hero of this recipe. Without it, you just have a standard sugar cookie that might be too chewy or too hard.
But with that small addition, the gluten in the flour is softened, creating a structure that is sturdy enough to hold a pool of raspberry preserves but soft enough to dissolve the moment it hits your palate.
Trust me, once you see the difference it makes in the "snap" of the cookie, you will never go back to a plain flour recipe again.
Why This Texture Rich Recipe Works
The success of these cookies isn't magic, it is just smart kitchen logic applied to simple ingredients. By understanding how the fats and starches interact, you can skip the frustration of flat, greasy cookies.
- Starch Softening: Cornstarch interferes with gluten development, ensuring the crumb stays tender and "short" rather than bread like or tough.
- Fat Stabilization: Using only the egg yolk provides enough fat to emulsify the dough without the extra water content of an egg white, which would cause too much spreading.
- Thermal Memory: Chilling the shaped dough for 30 minutes allows the butter to solidify, so it melts slowly in the oven, preserving the deep "thumbprint" well.
- The Steam Release: Pressing the centers a second time halfway through baking releases any trapped air, preventing the "belly" of the cookie from puffing up and displacing the jam.
| Feature | Fast Method | Classic Method (This Recipe) |
|---|---|---|
| Butter Prep | Melted butter | Creamed softened butter |
| Chill Time | No chill | 30 minutes minimum |
| Texture Result | Greasy and flat | Tall, tender, and crumbly |
There is a huge difference between a cookie you throw together in five minutes and one that you give a little bit of time to rest. If you are in a rush, you might be tempted to skip the chilling step, but you will end up with a jam covered pancake rather than a beautiful, domed cookie. If you love the science of how ingredients work together, you might also enjoy reading about the specific protein structures in my M and M Chocolate Chip Cookies, which use a similar fat to flour ratio for that perfect bite.
Component Analysis for Better Baking
| Ingredient | Science Role | Pro Secret |
|---|---|---|
| Unsalted Butter | Provides the "short" texture | Use high-quality butter with at least 82% fat for better flavor. |
| Cornstarch | Lowers protein content | Always whisk it into the flour first to avoid starchy clumps. |
| Egg Yolk | Emulsifier and rich fat | Cold yolks separate easier, but use them at room temperature for the dough. |
| Fruit Preserves | Concentrated flavor | Avoid "jelly"; preserves have less water and won't make the cookie soggy. |
The interaction between the butter and the sugar during the creaming process is what builds the initial air pockets. When you add the cornstarch, it acts as a buffer, making sure those air pockets stay small and delicate. This is what gives you that signature "shatter" when you bite into the edge of the cookie.
Essential Ingredients and Smart Substitutes
To get the best results, stick to these specific measurements. We are using metric weights here because accuracy is the best friend of any baker.
- 225g unsalted butter, softened: Why this? Essential for that rich, classic shortbread flavor and melt in-your mouth feel. (Substitute: Salted butter, but omit the extra salt in the recipe).
- 100g granulated sugar: Why this? Provides sweetness and helps with the slight crisping of the edges. (Substitute: Caster sugar for an even finer crumb).
- 1 large egg yolk: Why this? Adds richness and binds the dough without adding the moisture of the white. (Substitute: 1 tablespoon of heavy cream for an egg free version).
- 5ml vanilla extract: Why this? The backbone of the flavor profile. (Substitute: Vanilla bean paste for those beautiful black specks).
- 1.25ml almond extract: Why this? The "secret" ingredient that makes these taste professional and nostalgic. (Substitute: Lemon extract for a citrusy twist).
- 280g all purpose flour, spooned and leveled: Why this? Provides the structure needed to hold the jam well. (Substitute: A 1:1 gluten-free baking flour blend).
- 8g cornstarch: Why this? Softens the flour for a more tender, delicate cookie texture. (Substitute: Arrowroot powder).
- 1.5g fine sea salt: Why this? Balances the sweetness and enhances the butter flavor. (Substitute: Table salt, but use slightly less).
- 80ml fruit preserves: Why this? Raspberry, Apricot, or Strawberry work best due to their thickness. (Substitute: Lemon curd or chocolate ganache added after baking).
Minimal Equipment for Best Results
You don't need a kitchen full of gadgets to make these, which is one of the reasons I love this recipe so much.
- Large mixing bowl: For creaming the butter and sugar.
- Hand mixer or stand mixer: To get the butter pale and aerated (about 3 minutes).
- Whisk: For combining the dry ingredients thoroughly.
- Baking sheet and parchment paper: To prevent sticking and ensure even browning.
- Small measuring spoon (1/2 tsp): If you don't want to use your thumb to make the indentations.
- Wire cooling rack: To let air circulate so the bottoms don't get soggy.
From Prep to Plate Instructions

Follow these steps closely. The temperature of your butter and the chilling time are the most critical factors here.
- Cream the butter and sugar. In a large bowl, beat the 225g of softened butter and 100g of sugar on medium high speed. Do this for approximately 3 minutes until the mixture looks pale and fluffy.
- Incorporate the liquids. Add the egg yolk, 5ml of vanilla extract, and 1.25ml of almond extract. Beat until the yellow of the yolk is fully vanished into the butter.
- Mix the dry base. In a separate bowl, whisk together the 280g flour, 8g cornstarch, and 1.5g salt. This ensures the cornstarch is evenly distributed.
- Combine the dough. Gradually add the dry ingredients to the butter mixture. Use low speed and stop the moment you no longer see white streaks of flour. Do not overmix, or the cookies will be tough.
- Roll the balls. Scoop rounded tablespoons of dough and roll them between your palms into smooth, 1 inch balls. Place them on your parchment lined sheet about 2 inches apart.
- The first press. Use your thumb (or the back of a spoon) to press a deep well into the center of each ball. If the edges crack significantly, just smooth them back with your finger.
- Chill for structure. Place the entire tray in the fridge for 30 minutes. This is non negotiable for a cookie that holds its shape.
- The first bake. Preheat your oven to 175°C (350°F). Bake the cookies for 6 minutes.
- The second press and fill. Remove the tray. Use a small spoon to gently re press the centers, as they likely puffed up. Drop about 1/2 teaspoon of preserves into each well.
- Final bake. Return to the oven for another 6 minutes until the edges are just set and the jam is slightly bubbly. Let them cool on the pan for 5 minutes before moving to a rack.
Fixing Common Thumbprint Problems
Even the best bakers run into issues. These cookies are simple, but they can be finicky if the temperature isn't just right.
If Your Cookies Crack
Cracking usually happens because the dough is too cold when you try to indent it, or it’s a bit too dry. If you see deep fissures when you press your thumb down, the dough might need 5 minutes to sit at room temperature before shaping.
Alternatively, you can dampen your thumb slightly before pressing.
| Problem | Root Cause | Solution |
|---|---|---|
| Cookies spread flat | Butter was too soft or no chill time | Chill the dough for an extra 15 mins before baking. |
| Jam leaks out | Indentation wasn't deep enough | Re press the centers halfway through baking before filling. |
| Tough, hard bite | Overmixed flour or too much flour | Spoon and level flour; mix only until just combined. |
If you find that your cookies are still spreading too much despite chilling, check your oven temperature. Many ovens run cool, which allows the butter to melt before the flour structure sets. A cheap oven thermometer can be a life saver in Grandma's kitchen! For another quick bake that handles heat well, my White Chocolate Cranberry Cookies are a great alternative.
Common Mistakes Checklist
- ✓ Always use "preserves" rather than "jelly" for a stable center.
- ✓ Ensure the butter is truly room temperature (it should dent with a finger but not be oily).
- ✓ Don't skip the second "press" at the 6 minute mark.
- ✓ Let the cookies cool completely before stacking, or the jam will stick to the bottom of the next cookie.
- ✓ Use a kitchen scale for the flour; even an extra 20g can make these dry.
Simple Scaling Guidelines
If you need to make a massive batch for a bake sale or just a small treat for yourself, here is how to adjust the recipe safely.
- To Double (48 cookies): Double all ingredients exactly, but keep the salt and extracts at 1.5x the original amount to prevent them from becoming overpowering. You will likely need to work in batches to keep the dough chilled.
- To Halve (12 cookies): Beat the egg yolk in a small bowl and use exactly half of it. Use a smaller mixing bowl to ensure the butter and sugar cream together properly; otherwise, the beaters won't catch enough air.
- Baking Large Batches: Never put cold dough onto a hot baking sheet. Always let the sheet cool completely between batches or use multiple sheets.
Flavor Variations to Try
While the raspberry and almond combination is the gold standard in my house, you can easily tweak these to fit the season or your specific cravings.
- Christmas Thumbprint Cookies: Roll the dough balls in finely chopped walnuts or pecans before indenting. Fill with red currant jelly or green apple preserves for a festive look.
- Chocolate Thumbprint Cookies: Replace 30g of the all purpose flour with high-quality cocoa powder. Fill the centers with a simple chocolate ganache or a Hershey's Kiss after the cookies come out of the oven.
- The "Nutty" Thumbprint: Use a tiny bit of peanut butter in the center instead of jam, then drizzle with melted chocolate once they have cooled.
Note: If you add nuts to the outside of the cookie, you may need to bake them for an extra 1-2 minutes to ensure the nuts are toasted and the dough is cooked through.
Butter and Jam Myths
There are a few "rules" floating around the internet that I’ve found just aren't true after years of making these in Tennessee.
Myth 1: You must fill the cookies before they go in the oven. Truth: While you can, the jam often boils over and makes a mess. Filling them halfway through, after re pressing the center, keeps the jam neat, glossy, and centered.
Myth 2: Salted butter ruins the flavor. Truth: Honestly, Grandma always used whatever was on sale. If you use salted butter, just skip the fine sea salt in the dry ingredients. It won't hurt the structure one bit.
Myth 3: You can't over cream butter and sugar. Truth: You actually can! If you beat them for 10 minutes, you'll incorporate too much air, and the cookies will collapse in the oven like a sad souffle. Stick to the 3 minute rule for that perfect aerated texture.
Storage and Zero Waste
These cookies keep surprisingly well, which makes them perfect for mailing to family or keeping in a jar on the counter.
- Storage: Keep them in an airtight container at room temperature for up to 5 days. If you live in a humid area, a piece of white bread in the container will soak up moisture and keep the cookies crisp.
- Freezing: You can freeze the baked cookies for up to 2 months. Layer them with parchment paper so the jam doesn't stick. To thaw, just leave them on the counter for an hour.
- Zero Waste: If you have leftover jam in the jar, whisk it with a little bit of balsamic vinegar and olive oil for a quick fruity salad dressing. If you have extra egg whites from the yolk you used, save them in a jar for tomorrow's omelet or make a small batch of meringues!
Perfect Complements
These are "tea cookies" through and through. They are best served with a drink that isn't overly sweet so the butteriness of the shortbread can really shine. A strong Earl Grey tea or a dark roast coffee is my personal favorite.
If you are serving these at a party, they look beautiful on a platter next to something darker, like a rich brownie or a chocolate chip cookie. The bright pop of the red jam acts like a centerpiece for your dessert table. I usually put these out last because they disappear faster than anything else!
They also pair wonderfully with a small glass of cold milk if you're feeling nostalgic for those childhood afternoons in the kitchen.
Whatever you do, don't overthink it. These cookies are meant to be a little rustic and very buttery. As long as you have that cornstarch for tenderness and you remember to chill the dough, you are going to have a batch of cookies that tastes exactly like Grandma's house. Happy baking!
Recipe FAQs
Is it better to put jam in thumbprint cookies before or after baking?
Add the jam halfway through the baking process. By baking the dough for 6 minutes first, re-pressing the center, and then adding the preserves, you prevent the fruit from boiling over and maintain a clean, defined well.
What is the 321 cookie rule?
It is a classic ratio of 3 parts flour, 2 parts fat, and 1 part sugar. While this recipe uses specific measured ingredients like cornstarch for texture, if you enjoyed mastering this specific fat-to-flour ratio, see how the same principle creates a crunch in our sugar crusted lemon cookies.
What is Snoop Dogg's favorite cookie?
No, there is no official record linking a specific celebrity to this recipe. Focus instead on the quality of your preserves, as choosing a high-quality fruit filling is the primary driver of success for this traditional cookie.
What kind of jam is best for thumbprints?
Use fruit preserves rather than jelly. Preserves contain bits of fruit and pectin that provide the necessary stability to keep the filling from running off the sides of the cookie while in the oven.
How to prevent thumbprint cookies from spreading?
Chill the shaped dough for 30 minutes before baking. This rest period firms up the butter, ensuring the cookies maintain their shape and the indentation remains deep throughout the 12-minute bake time.
How to get the perfect thumbprint shape?
Use the back of a small measuring spoon to press the indentation. This creates a more uniform and consistent well than using your thumb alone, which helps keep the amount of jam balanced in every cookie.
Is it true that I should add extra flour to stop the cookies from flattening?
No, this is a common misconception. Excess flour will cause the dough to become dry and crumbly; always use a kitchen scale to measure the 280g of flour precisely to ensure the correct soft texture.
Classic Jam Thumbprint Cookies