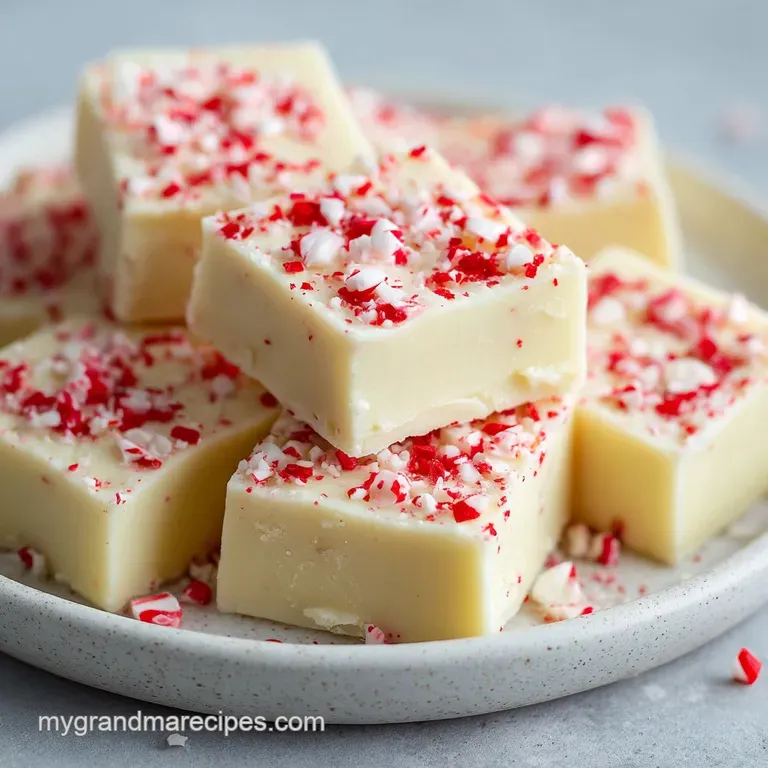
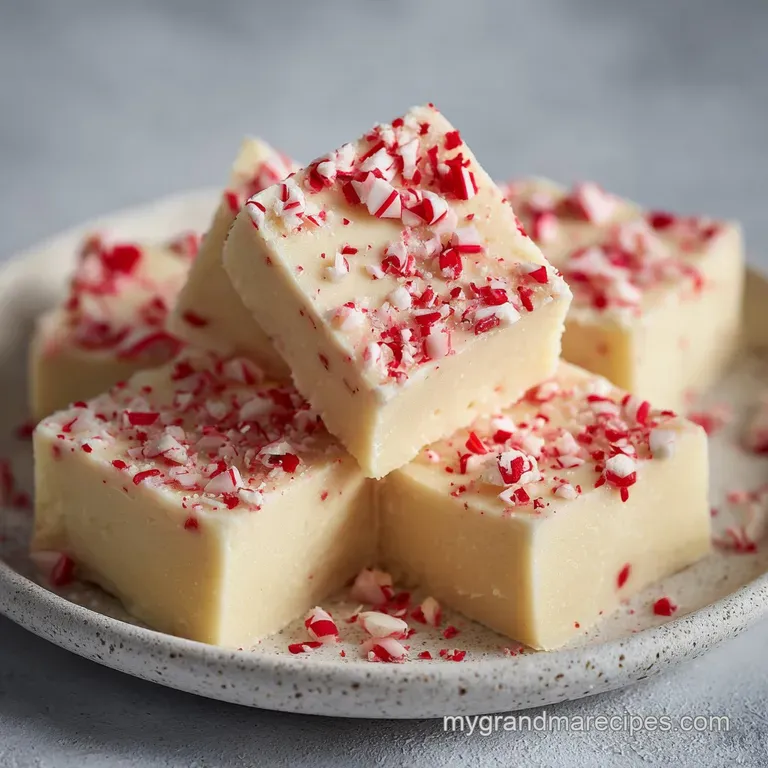
Christmas Fudge: Velvety White Chocolate & Peppermint
- Time: 5 min active + 20 min cook + 2 hrs 30 mins chilling = Total 2 hours 25 mins
- Flavor/Texture Hook: Silky ivory base with a sharp peppermint snap
- Perfect for: Holiday gift platters or last minute party treats
A Simple Way to Make Christmas Fudge
The smell of peppermint and warm sugar always takes me straight back to my grandma's kitchen in Tennessee. I can still hear the crackle of the fireplace and the sound of candy canes being crushed in a heavy bowl.
She taught me that the best holiday treats aren't the ones that take three days to make, but the ones that bring everyone into the kitchen to help.
For a long time, I was terrified of fudge. I remember one December when I tried a traditional recipe and ended up with something that had the consistency of a sidewalk brick. It was a disaster, and I almost gave up on the whole thing.
But then I discovered the magic of using condensed milk, which completely removes the guesswork.
Now, this Christmas Fudge is my go to whenever I need a win. It's a quick win because you get that rich, melt in-your mouth texture without needing a candy thermometer or a degree in chemistry.
It's a recipe that feels like a warm hug and tastes like a professional confectionery shop, but it's actually just a few simple ingredients and a microwave.
Quick Recipe Specifications
Right then, let's look at the numbers so you can plan your holiday baking. This recipe is designed for efficiency, meaning you spend very little time actually working and most of your time just letting the fridge do the heavy lifting. Trust me, the waiting is the hardest part.
If you're planning to make these for a big crowd, remember that the chilling time is non negotiable. I've tried to rush it by putting the pan in the freezer, but that can sometimes cause the edges to get too hard while the middle stays soft. Stick to the timeline, and you'll get those clean, sharp squares every time.
DIVTABLE_0
Since we're using a budget smart approach, you'll notice we aren't using expensive couverture chocolate. Standard chips work perfectly here because the condensed milk provides the necessary fat and structure to keep things silky.
The Essential Pantry Elements
Before we get started, let's talk about what's actually happening in the bowl. I like to think of this as a balance of fats and sugars. We're not just melting things together, we're creating a stable structure that holds its shape at room temperature but melts the second it hits your tongue.
The white chocolate provides the creamy bulk, while the semi sweet chocolate adds a necessary bitter edge to stop the fudge from being cloyingly sweet. The salt is the unsung hero here, cutting through the sugar and making the peppermint pop.
Component Analysis
| Ingredient | Science Role | Pro Secret |
|---|---|---|
| Condensed Milk | Sugar Stabilizer | Prevents crystallization for a smooth finish |
| Butter | Texture Modifier | Adds a velvety mouthfeel and gloss |
| White Chocolate | Structure Base | Use high-quality chips for a cleaner vanilla taste |
| Peppermint Extract | Flavor Profile | Add it last to keep the aroma from evaporating |
Ingredients & Substitutes
- 3 cups (450g) white chocolate chips Why this? Provides the creamy, sweet base for the fudge
- Substitute: White baking bars (chop finely). Note: Might require 2 extra minutes of melting.
- 1 can (14 oz / 397g) sweetened condensed milk Why this? Acts as the binder and prevents graininess
- Substitute: Evaporated milk + 1/2 cup sugar. Note: Result will be softer and less stable.
- 4 tbsp (56g) unsalted butter, cubed Why this? Creates a silky texture and prevents sticking
- Substitute: Coconut oil. Note: Adds a slight coconut flavor, melts faster.
- 1 tsp (5ml) peppermint extract Why this? The signature holiday flavor
- Substitute: 1 tbsp finely crushed peppermint candies. Note: Less intense flavor.
- ½ tsp (3g) salt Why this? Balances the intense sweetness
- Substitute: Sea salt flakes. Note: Best used as a topping rather than mixed in.
- 4 oz (113g) semi sweet chocolate Why this? Creates the beautiful contrast swirls
- Substitute: Dark chocolate (70%). Note: More bitter, more sophisticated taste.
- 2 tbsp (30ml) heavy cream Why this? Thins the dark chocolate for easier swirling
- Substitute: Whole milk. Note: Swirls may be slightly less glossy.
- ¼ cup (15g) crushed candy canes Why this? Adds a shatter like crunch and visual appeal
- Substitute: Rainbow sprinkles. Note: Changes the theme to a generic party style.
Necessary Kitchen Gear
You don't need a professional bakery to pull this off. In fact, using too many pots can actually make this harder because you'll spend more time cleaning than eating. All you really need are a few basics.
I highly recommend using a microwave safe glass bowl. Plastic can sometimes warp under the heat of the chocolate, and glass allows you to see if there are any un melted lumps hiding at the bottom. Also, don't skip the parchment paper.
If you try to grease the pan with butter or spray, you'll likely end up with a few torn squares when you try to lift the block out.
Chef Note: If you don't have parchment paper, you can use wax paper, but make sure it's the non stick kind. If you use foil, the fudge tends to cling to the corners, and you'll lose those perfect edges.
The step-by-step Method
Let's crack on with the actual making. The secret to this Christmas Fudge is patience during the melting phase. If you overheat the chocolate, it can "seize" or become grainy, which is the opposite of what we want.
Phase 1: The Melting Process
- Line an 8x8 inch square baking pan with parchment paper, leaving an overhang on the sides for easy removal. Note: This makes lifting the fudge a breeze
- In a microwave safe bowl, combine white chocolate chips, sweetened condensed milk, and butter.
- Heat in 30 second bursts, stirring in between, until the mixture is glossy and completely smooth. Note: Stop when it's almost melted and stir to let the residual heat finish the job
Phase 2: Flavor Integration
- Stir in the peppermint extract and salt.
- Mix vigorously with a spatula until the color is a uniform ivory and no streaks of butter remain.
- In a separate bowl, melt the semi sweet chocolate with heavy cream until velvety and smooth. Note: Use a low setting to avoid burning the dark chocolate
Phase 3: Creating the Festive Swirl
- Pour the white chocolate base into the prepared pan and smooth the top.
- Drop small spoonfuls of the melted dark chocolate onto the surface and use a toothpick or knife to gently swirl it into the white base. Note: Don't over mix or it will just turn light brown
- Immediately sprinkle crushed candy canes over the top.
Phase 4: The Set and Slice
- Let the fudge cool at room temperature for 30 minutes.
- Transfer to the refrigerator for at least 2 hours until firm to the touch.
- Use the parchment overhang to lift the fudge block out of the pan and slice into 24 squares.
Fudge Troubleshooting Tips
Even with a simple recipe, things can occasionally go sideways. Most fudge problems come down to temperature or agitation. If your Christmas Fudge isn't behaving, it's usually a quick fix.
Why Your Fudge Didn't Set
This usually happens if the ratio of fat to sugar is off, or if the refrigerator isn't cold enough. Since we use condensed milk, this is rare, but if it happens, just pop it back in the fridge for another hour. If it's still soft, you can actually melt it down and try again.
Getting a Grainy Texture
Graininess is usually caused by "seizing," which happens when a tiny bit of water gets into the chocolate or if it's overheated. To prevent this, make sure your bowls are bone dry. If it's already grainy, adding a tiny bit more heavy cream while reheating can sometimes smooth it out.
Why Your Swirls Blended Too Much
If your dark chocolate disappeared into the white, you likely stirred too much. The goal is a marble effect, not a solid color. For a more defined look, let the white base sit for 2 minutes before adding the dark chocolate drops.
| Problem | Root Cause | Solution |
|---|---|---|
| Grainy texture | Overheating chocolate | Melt in shorter 20 second bursts |
| Soft/Gooey | Not enough chilling time | Refrigerate for an extra 60 mins |
| Dull surface | Butter not fully integrated | Stir more vigorously before pouring |
- ✓ Use a microwave safe glass bowl to monitor melting.
- ✓ Ensure all measuring cups are completely dry.
- ✓ Stir every 30 seconds without fail.
- ✓ Don't over swirl the dark chocolate.
- ✓ Use the parchment paper overhang for lifting.
If you find yourself struggling with the microwave method, you might prefer a Baked Fudge Recipe which uses a different heat source and provides a slightly different crumb.
Customizing Your Batch
One of the best things about this Christmas Fudge is how easy it is to tweak. Once you have the base method down, you can basically put whatever holiday flavors you love into the mix.
If you want something that tastes like a sugar cookie, simply omit the peppermint extract and add a teaspoon of almond extract and a pinch of extra salt. This creates a "Sugar Cookie Fudge" that is a huge hit with kids who aren't fans of mint.
For those who want a nuttier profile, stir in some toasted pecans or walnuts right before pouring the mixture into the pan. I personally love adding a handful of crushed pistachios for a pop of green color. If you're looking for other no bake treats to pair with this, my Christmas Coconut Balls are a fantastic companion for a holiday platter.
For a more adult version, you can replace the heavy cream in the dark chocolate swirl with a tablespoon of peppermint schnapps or spiced rum. It adds a depth of flavor that cuts through the sweetness and makes the treat feel a bit more sophisticated.
Storage and Waste Tips
Fudge is surprisingly hardy, but it does have its limits. Because of the high sugar content, it resists spoiling, but it can pick up odors from the fridge if left uncovered.
Store your Christmas Fudge in an airtight container. In the fridge, it will stay fresh for about 2 weeks. If you're making these for gifts later in the month, you can freeze them for up to 3 months. Just wrap the squares individually in parchment paper and then place them in a freezer bag.
When you're ready to eat them, let them thaw in the fridge for a few hours.
To avoid waste, if you have any leftover "scraps" from slicing the edges, don't throw them away. I like to chop those bits up and use them as a topping for vanilla ice cream or stir them into a warm batch of oatmeal for a decadent breakfast.
Professional Presentation Ideas
Since we're making these for the holidays, the look is almost as important as the taste. You want people to be impressed before they even take a bite.
The easiest way to make these look high end is to focus on the cut. Use a hot knife to get those perfectly sharp, clean edges. Run your knife under hot water, wipe it dry, and then make one clean slice. Repeat this for every single cut.
For gift packaging, I love using small clear cellophane bags tied with a red velvet ribbon. You can place a small sprig of fresh rosemary or a cinnamon stick inside the bag for a rustic, Tennessee country feel. If you're serving them on a platter, alternate the fudge squares with fresh raspberries or strawberries.
The tartness of the fruit balances the richness of the Christmas Fudge and makes the ivory and red colors pop beautifully.
According to guidelines on chocolate handling from King Arthur Baking, keeping chocolate away from direct heat and humidity is key to maintaining that glossy finish, so keep your platter cool until it's time to serve.
Recipe FAQs
Is Christmas fudge different from regular fudge?
Yes, it typically features seasonal flavors. This specific version uses peppermint extract and crushed candy canes to create a festive taste and appearance.
What is the secret to a smooth, creamy fudge texture?
Avoid overheating the chocolate. Use 30-second microwave bursts and stir frequently to ensure the ingredients emulsify. If you enjoyed mastering this creamy texture here, see how the same principle works in our easy fudge recipe.
How many days before Christmas can I make this fudge?
Up to three months if frozen. Keep it in the refrigerator for two weeks or wrap squares individually in parchment and store them in a freezer bag for long term gifting.
Why did my fudge fail to set?
Usually due to insufficient chilling time. Ensure the fudge stays in the refrigerator for at least 2 hours before attempting to slice it.
How to store Christmas fudge for gifting?
Place squares in an airtight container. This prevents the fudge from absorbing refrigerator odors and keeps the candy cane topping crisp.
Is it true I must boil the sugar to get it to set?
No, this is a common misconception. This specific recipe relies on the stability of sweetened condensed milk and chocolate, requiring no stovetop boiling.
How to get clean slices when cutting the fudge?
Lift the fudge block using the parchment overhang. Use a sharp knife to cut the block into 24 equal squares once it is fully firm.
White Chocolate Christmas Fudge

