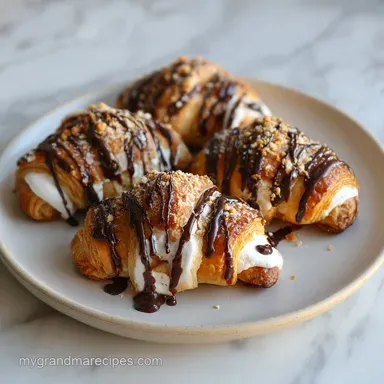
S'mores Crescent Rolls: Gooey and Golden

- Time:10 minutes active + 12 minutes baking = 22 minutes total
- Flavor/Texture Hook: Shattering pastry crust with a velvety, molten chocolate center
- Perfect for: Rainy day indoor camping or last minute sleepover treats
- Mastering the Best S'mores Crescent Rolls
- The Strategy for Balanced Baking Results
- Selecting Components for Optimal Melting
- Minimal Tools for Efficient Baking
- Layering and Folding for Success
- Solving Common S'mores Crescent Roll Problems
- Creative Twists to Customize Your Treats
- Storing and Reviving Leftover Crescent Roll Ups
- Perfect Complements for Your Dessert Spread
- Recipe FAQs
- 📝 Recipe Card
Mastering the Best S'mores Crescent Rolls
The kitchen starts to hum the moment that familiar blue canister pops open. There is something about the "thump" of the dough hitting the counter that feels like an invitation to stop overthinking and just bake something fun.
I remember the first time I tried making these; I thought I could just toss a marshmallow in dough and call it a day. I ended up with a baking sheet covered in sticky white puddles and empty dough shells.
It was a mess, but the aroma of toasted sugar was enough to keep me trying until I got the internal architecture just right.
When you pull these out of the oven, the house smells like a high end bakery met a forest bonfire. The pastry shouldn't just be brown; it needs to reach that deep mahogany shade where the butter in the dough has fully caramelized.
As you pick one up, the warmth radiates through the flaky layers, and you know the chocolate inside has reached its peak molten state. It’s the ultimate shortcut for modern kitchens where we want the nostalgia of a campfire without the smoke in our hair or the unpredictable weather.
We are going for a texture that offers a distinct "shatter" on the first bite, followed immediately by the pull of a softened marshmallow and the rich, velvety slide of milk chocolate.
This isn't about fancy techniques; it's about understanding how these three simple ingredients react to heat so you can serve a tray of treats that actually look like the pictures. Let’s get into the specifics of why this method works so well for first time cooks and busy families alike.
The Strategy for Balanced Baking Results
The secret to a successful batch lies in the temperature and the timing. We are looking for that sweet spot where the dough is fully cooked through to the center without the marshmallow completely liquefying and escaping its pastry prison. According to Serious Eats, in total, you’re looking at around 22 minutes from start to finish. Perfect for a weekend treat or a quick dessert idea that doesn't require a whole afternoon in the kitchen.
- Steam Expansion
- The moisture in the refrigerated dough turns to steam, creating those distinct, flaky layers we love.
- Sugar Insulation
- The graham cracker crumbs act as a heat buffer, slowing down the melting of the chocolate so the dough has time to set.
- Pinch Compression
- Sealing the edges tightly creates a localized pressure chamber that keeps the marshmallow lofted instead of flat.
- Surface Maillard
- The melted butter wash facilitates a faster browning on the exterior, giving us that professional grade mahogany finish.
| Servings | Ingredient Adjustments | Pan Size | Bake Time |
|---|---|---|---|
| 4 People | 4 rolls (half can), 1 bar, 4 marshmallows | Small toaster tray | 10-12 minutes |
| 8 People | 8 rolls (1 can), 2 bars, 8 marshmallows | Standard rimmed sheet | 12 minutes |
| 16 People | 16 rolls (2 cans), 4 bars, 16 marshmallows | Two large sheets | 12-14 minutes |
Giving the dough a few minutes to breathe after you unroll it helps it lose that "can shaped" tension. This makes the triangles easier to stretch slightly, which is crucial when you're trying to wrap them around a chunky marshmallow and two rectangles of chocolate.
If the dough is too cold, it snaps; if it’s too warm, it turns into a sticky mess that won't hold its shape.
Selecting Components for Optimal Melting
Choosing the right ingredients is the difference between a dessert that tastes like a childhood memory and one that feels like a grocery store afterthought. While you can use any chocolate, milk chocolate provides that classic, creamy melt that contrasts beautifully with the salty sweet notes of the crescent dough.
| Ingredient | Science Role | Pro Secret |
|---|---|---|
| Crescent Dough | Structural foundation | Keep it chilled until the very second you are ready to unroll it. |
| Milk Chocolate | Fat based flavor carrier | Use bars, not chips; bars melt into a single velvety pool. |
| Marshmallows | Aerated sweetener | Use regular size; mini marshmallows melt too fast and disappear. |
- 2 full size milk chocolate bars
- Broken into rectangles for even distribution. Why this? Bars have a lower melting point than stabilized chips.
- 8 regular sized marshmallows
- These provide the gooey "pull" in the center.
- 2 graham cracker sheets
- Finely crushed to create an internal barrier and flavor base.
- 1 tbsp unsalted butter
- Melted for the golden brown wash on top.
- 1 tbsp graham cracker crumbs
- Reserved for the final decorative crunch.
- 1 tsp powdered sugar
- For a light, snowy finish that cuts through the richness.
If you find yourself missing an ingredient, don't panic. This recipe is quite forgiving as long as you maintain the fat to sugar ratio. You could swap the milk chocolate for dark chocolate if you prefer a less sweet profile, though the "classic" s'more flavor usually relies on that milky sweetness.
| Original Ingredient | Substitute | Why It Works |
|---|---|---|
| Milk Chocolate | Semisweet Chips (1 tbsp) | Stays intact longer. Note: Less "oozy" than bar chocolate. |
| Graham Crackers | Digestive Biscuits | Similar sandy texture and wheaty flavor profile. |
| Unsalted Butter | Coconut Oil (refined) | Provides the same shine and helps crumbs stick to the top. |
A quick tip for the graham crackers: don't pulverize them into dust. You want some tiny, sandy shards. Those larger bits provide a much needed crunch that mimics the experience of eating a traditional s'more. If they are too fine, they simply disappear into the dough and lose their textural impact.
Minimal Tools for Efficient Baking
I am a big believer in the minimal tools philosophy. You don't need a stand mixer or a blowtorch to make these. A standard baking sheet is your best friend here. If you use a dark colored pan, keep an eye on the bottoms of the rolls, as they tend to brown faster than the tops.
I always recommend lining your pan with parchment paper or a silicone mat. Not only does it make cleanup a dream, but it also prevents the sugar in the dough from sticking and burning.
A small microwave safe bowl for melting the butter and a pastry brush (or even the back of a spoon) are all you need for the finishing touches. If you don't have a rolling pin to crush the graham crackers, just put them in a zip top bag and use the bottom of a heavy mug.
It’s a great way to take out any morning frustrations before you settle in for a relaxing dessert.
Layering and Folding for Success

The assembly is where the magic happens. Start by preheating your oven to 190°C (375°F). You want that heat to be consistent so the dough puffs immediately. Lay out your parchment paper on a large sheet, and let's get to work.
- Separate the triangles. Unroll the 8 oz can of dough and pull it apart along the perforated lines. Lay them out like a sunburst on your workspace.
- Apply the base layer. Sprinkle a thin layer of the crushed graham cracker sheets onto the wide end of each triangle. Note: This creates a "nest" for the chocolate.
- Position the chocolate. Place two rectangles of milk chocolate directly onto the crumbs.
- Add the marshmallow. Set one regular sized marshmallow on top of the chocolate.
- The first fold. Grab the two corners of the wide end and fold them over the filling.
- The roll up. Starting at that wide end, roll the dough toward the point. Pinch the sides firmly as you go to lock the marshmallow inside.
- Place on the sheet. Put the rolls point side down so they don't unravel in the heat.
- Brush and garnish. Use the 1 tbsp of melted butter to coat the tops, then sprinkle with the remaining graham crumbs.
- Bake the batch. Slide them into the oven for 10–12 minutes until the pastry is a deep mahogany color and the crust is firm.
- Final touch. Dust with 1 tsp of powdered sugar while they are still warm but not scorching.
When you see the dough transition from a pale tan to that rich, dark gold, you’ll know the gluten has set and the sugars have caramelized. Don't be afraid of a little "marshmallow bleed" a tiny bit of white fluff peeking out of the sides is actually quite charming and lets everyone know exactly what's inside.
Solving Common S'mores Crescent Roll Problems
Even with a simple recipe, things can go sideways. The most common issue I see with first time cooks is the disappearing marshmallow. If your oven isn't hot enough, the marshmallow has time to fully melt and soak into the dough before the pastry sets.
This is why that 190°C (375°F) temperature is non negotiable.
Why Your Marshmallows Vanished
If you bite into a roll and find a hollow cavern, it’s usually because the marshmallow overheated and dissolved. Next time, try freezing your marshmallows for 15 minutes before assembly. This gives the dough a "head start" to bake before the marshmallow reaches its liquid state.
Also, ensure your "pinch and seal" technique is solid if air can escape, the marshmallow will definitely follow.
Dealing with a Raw Middle
This happens if the rolls are too thick or the oven is too hot, burning the outside before the inside finishes. Ensure you aren't overlapping the dough too many times in one spot. A nice, even roll is key.
If you notice the tops browning too fast, you can tent a piece of foil over the tray for the last 3 minutes of baking.
| Problem | Root Cause | Solution |
|---|---|---|
| Leaking Filling | Weak side seals | Pinch the dough sides firmly like a burrito before rolling. |
| Soggy Bottom | Greased pan | Use parchment paper to wick away excess moisture and fat. |
| Pale Dough | Low oven temp | Ensure your oven is fully preheated to 190°C for at least 10 mins. |
Common Mistakes Checklist
- ✓ Don't skip the graham cracker crumb base; it absorbs melting chocolate fat and keeps the dough crisp.
- ✓ Avoid using jumbo marshmallows; they are too large for the dough to wrap around securely.
- ✓ Resist the urge to open the oven door repeatedly; the loss of heat will cause the dough to collapse.
- ✓ Let them rest for 3 minutes after baking; this allows the molten sugar to firm up slightly so you don't get burned.
- ✓ Check the "best by" date on your crescent dough; old dough doesn't have the same "oomph" in the rise.
Creative Twists to Customize Your Treats
Once you've nailed the classic version, it's fun to start playing with the fillings. If you're looking for something with a bit more depth, you might want to try adding a tiny smear of peanut butter or hazelnut spread under the chocolate.
For a more sophisticated profile, a sprinkle of sea salt over the melted butter wash can really make the chocolate pop.
If you enjoy the combination of toasted marshmallow and rich dough, you'll absolutely love my Brown Butter S'mores Cookies. They use a similar flavor profile but in a dense, chewy cookie format that stays fresh for days.
Another fun variation is the "Double Chocolate" swap. Replace the milk chocolate bar with dark chocolate and use a chocolate flavored crescent dough (if you can find it) or lightly dust the inside with cocoa powder.
For those who want a bit of a kick, a tiny pinch of cayenne pepper in the graham cracker crumbs creates a "Mexican Hot Chocolate" vibe that is surprisingly addictive.
| Method | Time | Texture | Best For |
|---|---|---|---|
| Standard Oven | 12 minutes | Evenly golden, very flaky | Large batches and parties |
| Air Fryer | 8 minutes | Ultra crispy, fast browning | Quick solo snack (3-4 rolls) |
| Toaster Oven | 15 minutes | Chewier bottom, rustic look | Small kitchens or dorms |
Storing and Reviving Leftover Crescent Roll Ups
These are undeniably best when they are about five minutes out of the oven, but life happens, and sometimes you have leftovers. To keep them from turning into a soggy mess, store them in a container that isn't completely airtight once they have cooled.
A little airflow helps keep the pastry from absorbing the moisture from the marshmallow.
- Storage
- Keep them on the counter in a loosely covered container for up to 2 days. I don't recommend the fridge, as the cold temperature makes the chocolate waxy and the dough tough.
- Freezing
- You can freeze the unbaked assembled rolls for up to a month. Bake them straight from frozen, adding about 3-4 minutes to the total time.
- Zero Waste
- If you have leftover graham cracker crumbs, stir them into your morning yogurt or use them as a topping for vanilla ice cream. Never throw away those 2 chocolate rectangles chop them up and fold them into your next batch of pancakes.
To reheat, avoid the microwave at all costs. It will turn the dough into a rubbery sponge and make the marshmallow explode. Instead, pop them back into a 175°C (350°F) oven for 4-5 minutes, or use an air fryer at 160°C for 2-3 minutes.
This restores the "shatter" to the crust and remelts the center perfectly.
Perfect Complements for Your Dessert Spread
These rolls are quite rich, so pairing them with the right drink or side can make a big difference. A cold glass of milk is the traditional choice, but a sharp, hot espresso also cuts through the sweetness beautifully.
If you're serving these at a party, consider a side of fresh strawberries or raspberries to add a hit of acidity.
If you are hosting a larger gathering and want a variety of textures, this No Bake Smores Icebox Cake is a fantastic chilled counterpart to the warm crescent rolls. Serving a hot and cold version of s'mores is a guaranteed way to impress your guests without spending all day in the kitchen.
Before we wrap up, let's debunk a couple of common myths. Some people think you need to pre cook the marshmallow don't do it! The heat of the oven is more than enough. Others believe that "low-fat" crescent dough works just as well; honestly, it doesn't have the fat content required to create those distinct, flaky layers.
Stick with the full fat version for the best results. The fat is what carries the flavor and creates the texture we’re after. Trust me on this one; your taste buds will thank you. Now, let's get that oven preheated and start rolling!
Recipe FAQs
Why can't you freeze Pillsbury Crescent Rolls?
Freezing causes the chemical leavening agents to degrade. Once the dough thaws, it loses its ability to rise properly, resulting in a flat, dense texture rather than the light, airy layers you want.
Can Pillsbury crescents be used as puff pastry?
No, they are distinct products. Crescent rolls contain yeast and are softer, while true puff pastry relies on hundreds of thin, laminated butter layers to achieve a high, crispy lift.
What can I put inside crescent rolls?
Stick to simple chocolate and marshmallows for this recipe. If you enjoyed mastering the rolling technique for these treats, the same dough sealing logic applies to our other pastry based recipes.
How to jazz up smores?
Layer a base of crushed graham cracker crumbs before adding the chocolate. This simple addition absorbs the melting chocolate and marshmallow oils, keeping the bottom of the roll perfectly crisp instead of soggy.
Is it true I can store these in the refrigerator to make them last longer?
No, this is a common misconception. The refrigerator causes the chocolate to turn waxy and makes the dough tough, which ruins the texture you worked to achieve in the oven.
How to keep the dough from collapsing while baking?
Avoid opening the oven door during the 10 12 minute bake time. Frequent checks release trapped heat, causing the delicate structure of the crescent roll to fall before it has finished setting.
How to ensure the marshmallow doesn't leak out?
Pinch the dough sides tightly while rolling from the wide end to the point. Using a standard sized marshmallow rather than a jumbo one is crucial for ensuring the dough can wrap fully around the filling to create a secure seal.
Gooey S Mores Crescent Rolls