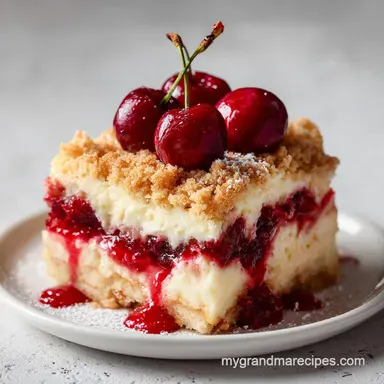
Cherry Cheesecake Dump Cake with Tart Cherries

- Time: 10 min active + 50 min baking + 15 min resting
- Flavor & Texture: Tart cherries with a buttery, crisp topping
- Perfect for: Easy family potlucks or beginner bakers
Easy Cherry Cheesecake Dump Cake
A common frustration with dump cakes is a center that stays raw or a top that looks like dry flour clumps. It happens when the fat doesn't distribute evenly or the fruit releases too much water into the batter.
This version fixes those issues. By using sliced butter pats and a structured cheesecake layer, you get a crisp, rich brown top and a center that holds its shape.
It is a true Tennessee style comfort food. You get the richness of a baked cheesecake without the stress of a water bath or a cracked surface.
Quick Recipe Specs
The flow of this dish is simple. You spend ten minutes prepping the layers and then let the oven do the heavy lifting.
The most important part happens after the timer goes off. Letting the pan sit for 15 minutes is the difference between a clean slice and a messy puddle.
Why the Layers Work
- Butter Pats: Slicing butter instead of melting it creates steam pockets for a crispier crust.
- Egg Structure: One egg binds the cream cheese so it stays as a distinct layer rather than melting into the cherries.
| Approach | Prep Time | Texture | Best For |
|---|---|---|---|
| Pie Filling | 10 mins | Consistent and glossy | Fast weeknight treats |
| Fresh Cherries | 25 mins | Chunky and tart | Special occasions |
The Ingredient List
| Ingredient | Role | If You Don't Have It |
|---|---|---|
| Cream Cheese | Richness and body | Neufchatel cheese (similar taste) |
| Yellow Cake Mix | Structural crust | White cake mix (milder flavor) |
| Cherry Pie Filling | Fruit base and moisture | Canned mixed berries (approximate) |
| Unsalted Butter | Fat for browning | Salted butter (reduce extra salt) |
- 21 oz cherry pie filling
- 8 oz cream cheese, softened Why this? Provides the tangy, creamy center.
- 1 large egg Why this? Keeps the cheesecake layer stable.
- 1/4 cup granulated sugar
- 1 tsp vanilla extract
- 1 package (15¼ oz) yellow cake mix Why this? Creates the golden, buttery topping.
- 1/2 cup unsalted butter, thinly sliced into pats
Necessary Kitchen Tools
This recipe relies on a few simple staples. Use a 9x13-inch baking pan; be aware that the center may take longer to set if your dish is deeper.
For the smoothest cream cheese, a hand mixer is ideal, but a whisk and a bit of effort work just as well in a pinch.
Making the Cake
Phase 1: Preparing the Base
Preheat the oven to 350°F (180°C) and lightly grease a 9x13-inch baking dish with cooking spray. Spread 21 oz of cherry pie filling evenly across the bottom of the baking dish, ensuring it reaches all four corners.

Phase 2: Creating the Creamy Center
In a medium bowl, use a hand mixer to beat 8 oz softened cream cheese, 1 large egg, 1/4 cup granulated sugar, and 1 tsp vanilla extract until the mixture is completely smooth. Spoon the cream cheese mixture over the cherries and spread gently with a spatula to maintain distinct layers.
This creates a velvety center that doesn't mix with the fruit.

Phase 3: Adding the Golden Crust
Sprinkle 1 package (15¼ oz) of yellow cake mix evenly over the cream cheese layer and press down slightly with fingers to adhere. Arrange 1/2 cup of thinly sliced butter pats in a grid pattern across the entire surface of the cake mix.
Phase 4: Baking to Perfection
Bake for 45 to 50 minutes until the top is dark golden, the edges are bubbling slightly, and the center is set with a slight jiggle. Remove from the oven and let the cake rest for at least 15 minutes before slicing to allow the cheesecake layer to firm up.

Common Problems and Fixes
Fixing a Soggy Middle
This usually happens if the fruit and cheese layers get stirred together. Keep the layers separate when spreading. Also, make sure the oven is fully at 350°F before you put the pan in, or the crust won't set.
Avoiding Dry Flour Pockets
If you see white patches of cake mix, the butter didn't cover that spot. Use a tight grid of butter pats. If you notice dry spots halfway through baking, you can carefully dab a tiny bit of melted butter on those areas.
Preventing a Runny Center
Don't skip the resting time. The cheesecake layer needs those 15 minutes to cool slightly and set. If you cut it immediately, the heat will make the cheese flow.
| Original Ingredient | Substitute | Why It Works |
|---|---|---|
| Yellow Cake Mix | White Cake Mix | Very similar fat content. Note: Less buttery flavor |
| Cream Cheese | Neufchatel | Lower fat but similar tang. Note: Slightly softer set |
| Cherry Filling | Blueberry Filling | Same moisture level. Note: Changes flavor profile |
Storage and Freshness
Store any remaining portions in an airtight container in the refrigerator, where they will stay fresh for 5 days.
To freeze, wrap the cooled dish securely in plastic wrap and aluminum foil; it will keep for 3 months. Thaw it overnight in the fridge. To restore the crisp topping, reheat individual slices at 300°F (150°C) in the oven for 10 minutes. Avoid using a microwave, as it will soften the crust.
Dietary Adaptations
For a gluten-free option, swap the yellow cake mix for a 1:1 gluten-free baking mix. The texture is slightly grainier but still holds up well.
If you prefer a dessert that is less tart, try a Traditional Pound Cake for a different kind of comfort.
Serving Suggestions

I enjoy adding a bit of whipped cream to balance the richness. Vanilla bean ice cream also pairs perfectly, as the frozen cream melts into the warm cherries.
For a touch of contrast, serve it with fresh mint leaves or a sprinkle of cinnamon on the crust.
Common Questions
Does this recipe follow an old fashioned dump cake style?
Yes, it uses the traditional method of layering ingredients without mixing them first. This creates a distinct contrast between the fruit and the cakey top.
How simple is it to prepare this dessert?
It is very simple and takes only 10 minutes of active preparation. For another easy treat featuring cherries, try our cherry cordial brownies.
Can condensed milk be used in the cheesecake layer?
No, this recipe relies on a mix of cream cheese, egg, and sugar for the proper consistency. Condensed milk would make the filling too sweet and runny.
Is it possible to use a no-bake cheesecake filling?
No, a no-bake filling would melt at 350°F. The egg in this version ensures the layer sets during the 45 to 50 minutes of baking.
Where should I store the leftover slices?
Keep the leftovers in a sealed box in the refrigerator. It stays fresh for up to 5 days.
Why must the cake rest before slicing?
Resting for at least 15 minutes allows the cheesecake layer to firm up. This prevents the filling from running when you slice the cake.
Buttery Cherry Cheesecake Dump Cake