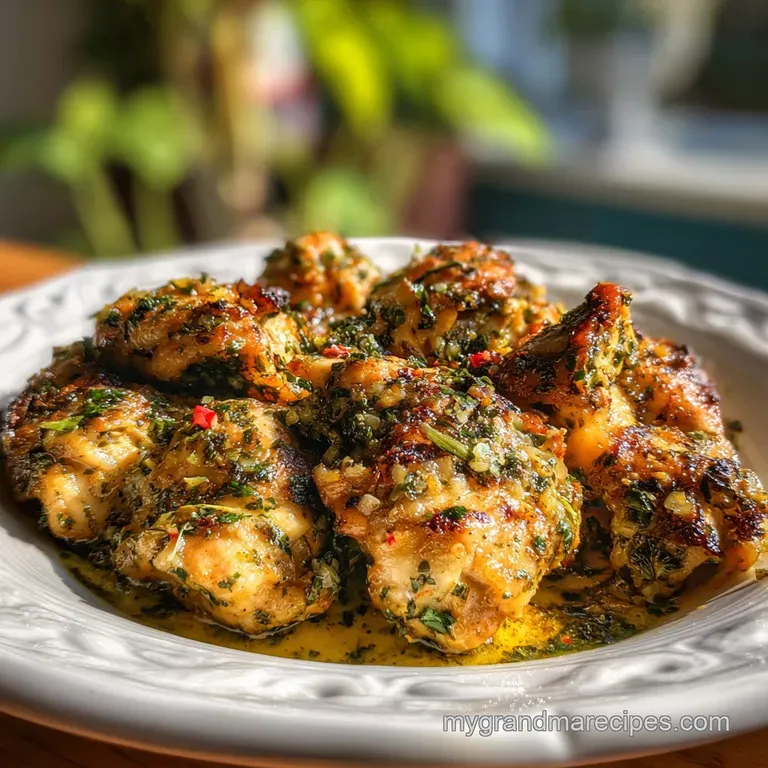
Garlic Butter Chicken
- Time: Active 15 minutes, Passive 10 minutes, Total 25 minutes
- Flavor/Texture Hook: Silky, garlic laced butter glaze with crispy, caramelized edges
- Perfect for: Busy weeknight dinners or a quick, impressive date night meal
- How to Make Great Garlic Butter Chicken
- The Science of Searing Aromatics
- Component Analysis and Pro Secrets
- Pantry Staples and Smart Substitutions
- Tools for a Flawless Sear
- Step by Step Cooking Guide
- Common Mistakes and Kitchen Fixes
- Scaling Batches and Busting Myths
- Storage Tips and Zero Waste
- Best Sides for This Meal
- Garlic Butter Chicken FAQs
- 📝 Recipe Card
How to Make Great Garlic Butter Chicken
Listen, if there is one sound that brings me right back to my grandma's kitchen in Tennessee, it is the aggressive sizzle of chicken hitting a hot cast iron skillet. I spent years trying to figure out why her kitchen always smelled like a five star bistro while mine just smelled like... well, burnt garlic and sadness.
It turns out, I was rushing the process and treating the butter as an afterthought rather than the star of the show.
This Garlic Butter Chicken is the solution to every dry, bland chicken breast you have ever suffered through. We are using thighs because they have enough fat to stand up to the high heat, and we are layering the garlic in two different ways to make sure the flavor actually sticks to the meat.
No more picking pieces of charred garlic out of your pan; we are going for a velvety, golden finish that coats every single bite.
You do not need a culinary degree or a pantry full of rare spices to pull this off. It is about the rhythm of the pan and knowing when to pull back the heat. We are going to walk through this together, from the moment that oil starts to shimmer to the final squeeze of lemon that brightens the whole dish.
Trust me, once you master this pan sear, you will never look at a plain chicken dinner the same way again.
The Science of Searing Aromatics
The Science of Why it Works: The Maillard reaction occurs when the chicken's surface reaches high temperatures, creating hundreds of new flavor compounds, while the butter's milk solids undergo caramelization to add a nutty depth.
Grating the garlic increases the surface area exposed to heat, releasing allicin more rapidly for an intense, pungent aroma that infuses the fat.
- High Smoke Point Searing: Using avocado oil allows the chicken to reach 400°F without the oil breaking down, which is essential for that shatter crisp exterior.
- Fat Soluble Infusion: The aromatic compounds in thyme and garlic are fat soluble, meaning they transfer their flavor most effectively when steeped in warm butter.
- Carryover Cooking: Removing the chicken just as it hits 160°F allows it to reach the safe 165°F through residual heat, preserving the internal moisture.
- Acidic Balance: The lemon juice acts as a surfactant, breaking up the heavy fat molecules on your tongue so the garlic flavor can shine through without feeling greasy.
Component Analysis and Pro Secrets
| Ingredient | Science Role | Pro Secret |
|---|---|---|
| Chicken Thighs (1.5 lbs) | High connective tissue/fat | Pat them bone dry with paper towels to prevent steaming instead of searing. |
| Unsalted Butter (4 tbsp) | Emulsifier and flavor base | Use cold butter at the end to create a thicker, more stable emulsion for the sauce. |
| Smashed Garlic (4 cloves) | Infuses the frying oil | Leave the skins on during the initial oil infusion to prevent the cloves from scorching. |
| Chicken Stock (2 tbsp) | Deglazing agent | Use bone broth for extra gelatin, which gives the sauce a more velvety mouthfeel. |
When I first started cooking, I used to just throw everything in the pan at once. I learned the hard way that garlic is a fickle friend. If you put it in too early, it turns bitter and black before the chicken is even halfway done. Grandma used to say that garlic needs to be treated like a guest, not a prisoner.
You invite it in late and let it stay just long enough to make an impression.
Pantry Staples and Smart Substitutions
To get started, gather your 1.5 lbs of boneless skinless chicken thighs. Cut them into consistent 1 inch pieces so they all finish cooking at the same time. You will also need 1 tsp kosher salt and 0.5 tsp cracked black pepper for the initial seasoning.
Don't skip the 2 tbsp of avocado oil for the over high heat sear, as butter alone will burn far too quickly. For the aromatics, we are using 4 cloves of garlic, smashed, and 2 cloves of garlic, finely grated.
For the sauce, you'll need 4 tbsp of unsalted butter, 1 tbsp fresh parsley, 1 tsp fresh thyme, 1 tbsp fresh lemon juice, and 2 tbsp chicken stock. Having everything prepped before you turn on the stove is vital because this recipe moves fast once the pan is hot.
| Original Ingredient | Substitute | Why It Works |
|---|---|---|
| Avocado Oil (2 tbsp) | Ghee (Clarified Butter) | High smoke point with a rich, buttery flavor profile. |
| Chicken Stock (2 tbsp) | Dry White Wine (Sauvignon Blanc) | Adds a sophisticated acidity and depth to the pan sauce. |
| Fresh Thyme (1 tsp) | Dried Oregano (0.5 tsp) | Offers a different herbaceous note. Note: Dried is more potent, so use less. |
| Fresh Lemon Juice (1 tbsp) | Apple Cider Vinegar (2 tsp) | Provides the necessary acid to cut through the butter fat. |
If you are looking for a different kind of comfort, this flavor profile reminds me a lot of the savory base we use in our Chicken and Dumplings recipe. The key is always in how you handle the fat and the aromatics.
Tools for a Flawless Sear

The most important tool in your arsenal for this dish is a heavy bottomed skillet. A 12 inch cast iron skillet (like a Lodge) is my absolute favorite because it retains heat like a champ. When you drop that chicken in, the temperature of the pan won't plummet, which is the secret to getting that beautiful brown crust.
If you don't have cast iron, a heavy stainless steel pan works too, but avoid non stick if you want a real sear.
You will also want a microplane or a fine grater for those two cloves of garlic. Grating the garlic turns it into a paste that melts right into the butter sauce, ensuring you get garlic flavor in every single molecule of the dish.
A good pair of tongs is also essential for turning the chicken pieces individually rather than just stirring them, which helps in achieving even browning on all sides.
Chef's Tip: Freeze your butter for 10 minutes before you start. Cold butter emulsifies more slowly into the pan juices, creating a thicker, more luxurious sauce that clings to the chicken rather than just puddling at the bottom of the plate.
step-by-step Cooking Guide
Preparation and Searing
Start by drying your 1.5 lbs of chicken thighs thoroughly. Season them evenly with 1 tsp kosher salt and 0.5 tsp cracked black pepper. Heat your 2 tbsp of avocado oil in the skillet over medium high heat until it begins to shimmer and a tiny wisp of smoke appears.
Add the chicken in a single layer, making sure not to crowd the pan. Cook for 5 to 7 minutes without moving them until the bottoms are deeply golden and release easily from the pan.
The Garlic Infusion
Flip the chicken pieces over to sear the other side. Toss in the 4 cloves of smashed garlic. Note: Smashing the garlic releases the oils without exposing the delicate flesh to direct high heat. Move the garlic around the pan so it seasons the oil but doesn't sit in one spot for too long.
Continue cooking for another 4 to 5 minutes until the chicken is cooked through and the smashed garlic is fragrant and lightly browned.
Deglazing and Emulsifying
Reduce the heat to medium low. Add the 2 tbsp chicken stock to the pan, scraping up all those brown bits (the fond) from the bottom. Once the liquid has mostly evaporated, add the 4 tbsp of butter and the 2 cloves of finely grated garlic.
Note: Adding the grated garlic now ensures it cooks just enough to lose its raw bite without burning. Stir constantly for 1 to 2 minutes until the butter is foaming and smells intensely of garlic and herbs.
The Finishing Touches
Stir in the 1 tsp fresh thyme and 1 tbsp fresh parsley. Squeeze the 1 tbsp fresh lemon juice over the top and give everything one final toss. The sauce should look glossy and slightly thickened, coating each piece of chicken like a velvety blanket.
Remove from the heat immediately to prevent the butter from separating or the herbs from losing their vibrant green color. Serve it right out of the pan while it is still sizzling.
Common Mistakes and Kitchen Fixes
One of the biggest issues people have is the chicken "stewing" in its own juices instead of searing. This usually happens because the pan wasn't hot enough or you crowded the chicken. If you see liquid pooling in the pan, turn the heat up and stop stirring. Let that liquid evaporate so the searing can finally begin.
It might take a minute or two longer, but it will save the texture of your meal.
Another common problem is the garlic burning and turning the whole sauce bitter. If you see the garlic turning a dark, acrid brown, the only real fix is to wipe the pan and start the sauce over. It’s a pain, I know, but bitter garlic will ruin the entire 1.5 lbs of chicken.
This is why we add the grated garlic at the very end when the heat is low.
| Problem | Root Cause | Solution |
|---|---|---|
| Chicken is tough/rubbery | Overcooking past 175°F | Use a meat thermometer and pull the chicken at 160°F. |
| Sauce is greasy/separated | Heat was too high when adding butter | Remove pan from heat before whisking in the cold butter. |
| No golden crust | Chicken was damp or pan was cold | Pat chicken dry and wait for the oil to shimmer before adding meat. |
If you find yourself making a lot of poultry dishes, you might notice that the technique of deglazing the pan is universal. I use a very similar method when I am making the base for my Chicken Noodle Soup recipe, where those browned bits at the bottom of the pan provide all the soul of the broth.
Scaling Batches and Busting Myths
If you need to feed a crowd and want to double this recipe to 3 lbs of chicken, you must work in batches. If you try to cram all that meat into one skillet, you will end up with gray, boiled looking chicken instead of golden nuggets.
Sear half the chicken, remove it to a plate, sear the second half, then add everything back in when it's time to make the butter sauce. You only need to increase the stock and lemon juice by about 50 percent, but you can double the butter and garlic for maximum impact.
For smaller portions, like a single serving, you can easily halve the recipe. Use a smaller 8 inch skillet and reduce the initial searing time by about 20 percent since a smaller pan heats up and stays hot more efficiently.
Be careful with the salt; it's easy to over season smaller batches, so start with a pinch and add more at the end if needed.
One of the most persistent myths I hear is that you should always use extra virgin olive oil for everything. For this Garlic Butter Chicken, that is a big mistake. Olive oil has a low smoke point and will start to taste "off" at the temperatures we need for a proper sear. Stick with avocado oil or grapeseed oil.
Also, searing does not "seal in juices." That’s an old wives' tale. Searing is strictly for flavor and texture; the moisture is preserved by not overcooking the meat.
Fresh vs Shortcut Comparison
| Feature | Fresh Garlic & Thyme | Jarred/Dried Substitutes |
|---|---|---|
| Aroma | Pungent, bright, and floral | Muted, slightly medicinal, or salty |
| Texture | Grated garlic melts into sauce | Jarred bits remain chunky and tough |
| Finish | Vibrant green and fresh | Brownish and less visually appealing |
Storage Tips and Zero Waste
You can store leftovers in an airtight container in the fridge for up to 4 days. When you go to reheat it, do not use the microwave if you can avoid it. The microwave will turn the chicken rubbery and make the butter sauce break into a greasy mess.
Instead, put it back in a skillet over low heat with a splash of water or chicken stock. Cover it for 2 minutes to let the steam warm the meat, then uncover and toss until the sauce becomes creamy again.
For freezing, this dish holds up surprisingly well for about 2 months. Make sure it is completely cool before putting it in a freezer bag. To serve, thaw it overnight in the fridge and reheat in a pan as mentioned above.
I don't recommend freezing the sauce separately; it's best when the chicken and butter are frozen together.
To keep your kitchen zero waste, don't throw away those parsley stems or the lemon rinds. Throw the herb stems into a bag in your freezer to use for making stock later. The lemon rinds can be tossed into a jar of white vinegar for a week to make a fantastic, grease cutting kitchen cleaner.
If you have extra garlic butter left in the pan, don't wash it down the sink! Swipe a piece of crusty bread through it or toss some leftover pasta into the pan to soak up every last bit of that liquid gold.
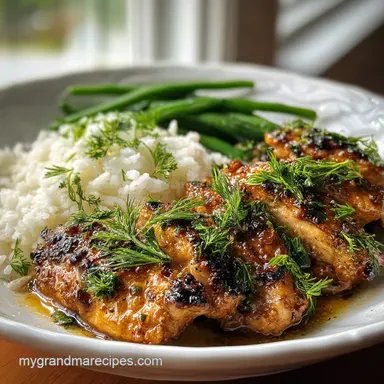
Best Sides for This Meal
Since this Garlic Butter Chicken is quite rich, you want sides that can either soak up that sauce or provide a sharp contrast. A pile of fluffy mashed potatoes is the classic choice, but I personally love serving this over a bed of lemon zest rice. The rice grains act like little sponges for the garlic butter.
If you want to keep things lighter, a simple roasted broccoli or sautéed green beans with a splash of vinegar works wonders.
If you are in the mood for something truly indulgent, you could even serve this alongside a creamy pasta. The butter sauce from the chicken can double as the start of a quick alfredo. Sometimes I even just serve it with a big hunk of sourdough bread for dipping.
- Decision Shortcut List:
- If you want a low carb meal, serve this over zoodles or cauliflower mash.
- If you want a hearty dinner, pair it with roasted baby potatoes and carrots.
- If you want a fresh contrast, serve it alongside a crisp arugula salad with a balsamic vinaigrette.
Whatever you choose, just make sure you have enough bread to clean your plate. In my house, leaving a drop of that garlic butter behind is considered a minor tragedy. Right then, I think you are ready to hit the kitchen. Let's crack on and make some magic happen in that skillet!

Garlic Butter Chicken FAQs
Can you put garlic in butter chicken?
Yes, absolutely. Garlic is a foundational flavor in many variations of butter chicken, especially those aiming for a more pungent and layered taste profile. It's often infused into the butter or oil used for searing the chicken, and sometimes added in grated form to the sauce itself for an extra punch.
What is the secret to the best butter chicken?
Layering flavors and achieving a velvety sauce. This means properly searing the chicken for caramelization, infusing the fat with aromatics like garlic and spices without burning them, and creating a stable emulsion with butter and liquid. If you enjoyed mastering flavor layering here, see how the same principle of building depth works in our Slow Braised Beef Roast with Cranberry Balsamic Glaze: Fork Tender.
What goes with garlic butter chicken?
Fluffy rice, crusty bread, or a simple green vegetable. Plain basmati or jasmine rice is perfect for soaking up the rich sauce. Crusty bread is excellent for dipping, and sides like steamed broccoli or roasted asparagus provide a fresh contrast. For a complete meal, consider pairing it with a side salad or something like our Green Bean Casserole From Scratch: Velvety Mushroom Velouté for a comforting touch.
What are some common butter chicken mistakes?
Burning the garlic and overcrowding the pan. Burning garlic leads to bitterness, so it's crucial to add it at the right time and temperature. Overcrowding the pan prevents proper searing, resulting in steamed, rather than browned, chicken, which compromises texture and flavor.
How do I prevent my chicken from being dry?
Use chicken thighs and don't overcook. Thighs have more fat and connective tissue, making them more forgiving and less prone to drying out than breast meat. Cook chicken until it just reaches an internal temperature of 165°F (74°C), as residual heat will continue to cook it slightly after removal from the pan.
How can I make the butter sauce richer?
Incorporate cold butter at the end and deglaze properly. Whisking in small pieces of cold butter off the heat helps create a stable emulsion, resulting in a thicker, glossier sauce.
Deglazing the pan with a little chicken stock or wine captures all the flavorful browned bits (fond) from the bottom, adding immense depth.
Can I make garlic butter chicken ahead of time?
Yes, the chicken can be seasoned and seared ahead. You can prepare and sear the chicken up to a day in advance and store it in the refrigerator. Reheat it gently in a pan and then proceed with making the butter sauce, or reheat the fully cooked dish in a skillet over low heat to maintain texture.
Garlic Butter Chicken
Ingredients:
Instructions:
Nutrition Facts:
| Calories | 524 kcal |
|---|---|
| Protein | 31.6 g |
| Fat | 43.8 g |
| Carbs | 2.4 g |
| Fiber | 0.3 g |
| Sugar | 0.2 g |
| Sodium | 645 mg |
