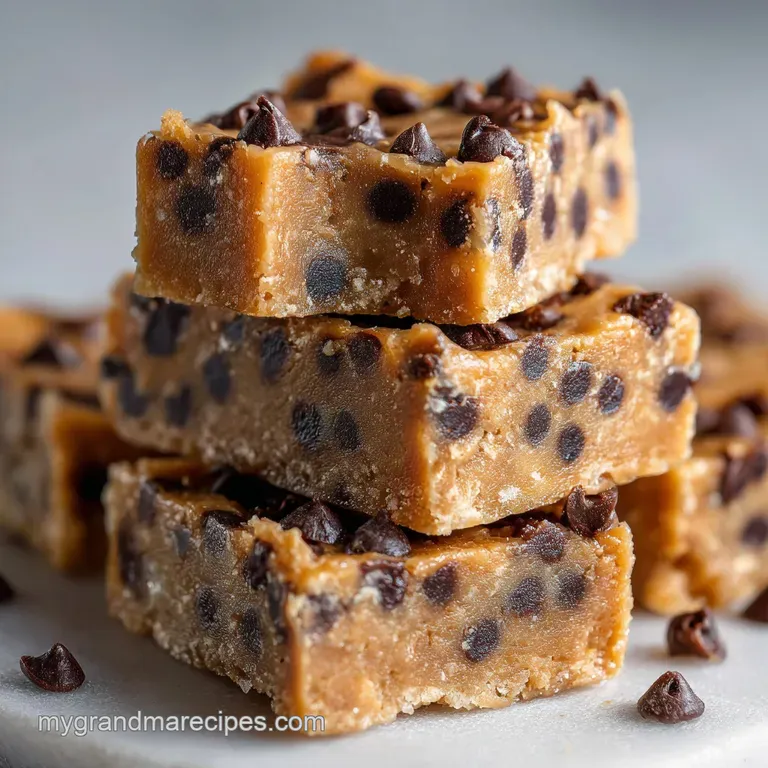
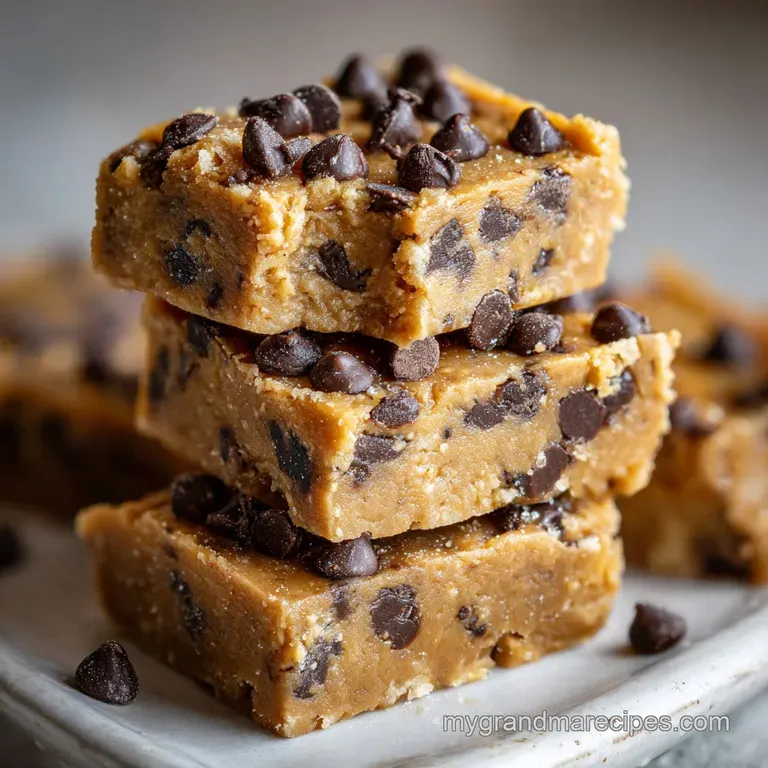
Healthy No Bake Cookie Dough Bar with Chocolate Chips (Gluten-Free, Vegan)
- Time: Active 15 minutes, Passive 1 hours, Total 1 hours 15 mins
- Flavor/Texture Hook: A velvety, melt on-the tongue dough base topped with a dark chocolate shell that offers a satisfying shatter in every bite.
- Perfect for: Sunday meal prep, a post workout refuel, or satisfying late night cravings without heating the house.
- The Ultimate Healthy No Bake Cookie Dough Bar with Chocolate Chips (gluten-free, Vegan)
- Why This Works
- Component Deep Dive for Best Results
- Must Have Equipment for Modern Kitchens
- Detailed Methodology for Your No Bake Treat
- Technical Refinements and Texture Solutions
- Adaptable Swaps for Diet Requirements
- Maximizing Freshness Through Smart Storage
- Elegant Plating and Serving Techniques
- Recipe FAQs
- 📝 Recipe Card
The Ultimate Healthy No Bake Cookie Dough Bar with Chocolate Chips (gluten-free, Vegan)
Imagine biting into a cold, dense square of cookie dough that doesn't just taste like a "healthier version" but actually rivals the real thing. This recipe makes a delicious and healthy no bake cookie dough bar, complete with chocolate chips and free from gluten and animal products.
I remember the first time I tried a no bake bar at a local cafe and it was basically a brick of dry oats; I knew there had to be a way to get that silky, buttery mouthfeel using better ingredients.
We are skipping the eggs and the heat treated flour, opting instead for a blend of almond and oat flours that provide a naturally sweet, nutty foundation. It’s the kind of treat you keep tucked in the back of the fridge for those moments when you need a quick win.
Trust me, once you see how the dark chocolate topping settles into a glossy, professional looking finish, you'll be hooked.
We’ve all been there trying to find a snack that satisfies a sweet tooth without the sugar crash. These bars are my go to because they feel indulgent while being packed with healthy fats and fiber.
Plus, they are incredibly forgiving for first time cooks who might be intimidated by traditional baking ratios or oven temperatures.
Why This Works
The secret to this recipe isn't just the ingredients; it's how they interact without heat. Much like my favorite Chocolate Chip Cookies Recipe, the balance of fats and solids determines whether the bar stays together or crumbles into a mess.
- Cold Emulsification: When you whisk the maple syrup into the cashew butter, the sugars and fats create a stable emulsion that binds the dry flours without needing gluten or eggs.
- Starch Hydration: The superfine almond flour and oat flour absorb the moisture from the syrup over the one hour chill time, resulting in a cohesive, non grainy texture.
- Fat Stabilization: Adding a touch of coconut oil to the chocolate topping lowers the melting point slightly, ensuring the chocolate has a velvety snap rather than being rock hard and difficult to bite through.
- The Science of Why it Works: The lack of heat prevents protein denaturation in the nut butter, keeping the fats in a semi solid state for a fudgy consistency. Meanwhile, the lipids in the almond flour provide a lubricating mouthfeel that mimics traditional butter based doughs.
Comparison of Chilling Methods
| Method | Time | Texture Outcome | Best For |
|---|---|---|---|
| Room Temp | 4 hours | Soft, fudge like, slightly oily | Immediate snacking |
| Refrigerator | 1 hours | Firm, chewy, stable | Meal prep / Lunchboxes |
| Freezer | 20 minutes | Hard, candy bar snap | Urgent cravings |
This timeline is your best friend when you’re in a rush. If you're looking for something even faster, you might enjoy my Protein Ball Recipe, which uses a similar flavor profile but requires zero setting time.
Component Deep Dive for Best Results
Choosing the right ingredients is half the battle when you aren't using an oven to mask textures. Since we aren't cooking these, every flavor is front and center. I always tell friends to use the best vanilla they can find because it truly carries the "cookie dough" aroma.
| Ingredient | Science Role | Pro Secret |
|---|---|---|
| Cashew Butter | Primary binder and fat source | Use "creamy" or "smooth" varieties; roasted adds a deeper, toasted flavor profile. |
| Superfine Almond Flour | Bulk and structure | Sift it if you see lumps; this ensures a silky, non sandy mouthfeel in the finished bar. |
| Maple Syrup | Liquid sweetener and humectant | Grade A Dark Color provides a richer, caramel like undertone than Amber syrup. |
| Refined Coconut Oil | Texture modifier for chocolate | Refined oil has zero coconut scent, allowing the dark cacao notes to shine through. |
Choosing "superfine" almond flour is non negotiable here. Regular almond meal is too coarse and will make the bars feel gritty. It's a small detail that makes a massive difference in whether your friends believe these are actually "healthy."
Must Have Equipment for Modern Kitchens
You don't need a high end stand mixer for this, which is a relief. I usually just use a sturdy spatula and a bit of elbow grease. However, a few specific tools will make the process much less messy and give you those sharp, clean edges you see in professional bakeries.
- 8x8 inch (20x20cm) Square Pan: This is the gold standard for bar depth. A larger pan will make the bars too thin and prone to breaking.
- Parchment Paper: Leave an "overhang" on two sides. This acts as a sling so you can lift the entire block out once it's set without digging into the corners.
- Offset Spatula: Perfect for smoothing the chocolate topping into a glass like surface. If you don't have one, the back of a large spoon works too.
- Digital Kitchen Scale: While I've provided cup measurements, weighing your 168g of almond flour ensures the bars aren't too dry or too soft.
Chef's Tip: To get those incredibly clean cuts, run a sharp chef's knife under hot water for 30 seconds, wipe it dry, and then slice through the chilled bars. The heat from the blade melts the chocolate just enough to prevent cracking.
Detailed Methodology for Your No Bake Treat
Follow this flow to ensure your bars set correctly. The most common mistake is rushing the mixing process; you want the dough to be completely homogenous before you even think about pressing it into the pan.
- Prep the Pan. Line an 8x8 inch square baking tin with parchment paper, ensuring there is a 2 inch overhang on the sides for easy removal.
- Mix the Wet Base. In a large mixing bowl, combine 0.5 cup (128g) of creamy cashew butter, 0.33 cup (80ml) pure maple syrup, and 2 tsp vanilla bean paste. Note: Whisk until the mixture looks like thick caramel and no oil separation is visible.
- Incorporate the Salt. Stir in 0.25 tsp sea salt. Note: This balances the sweetness of the syrup and enhances the nuttiness of the flours.
- Add the Flours. Fold in 1.5 cups (168g) superfine almond flour and 0.5 cup (60g) gluten-free oat flour. Mix until a stiff dough forms and no white streaks remain.
- Fold in the Chips. Gently stir in 0.5 cup (90g) mini vegan chocolate chips. Note: Using mini chips ensures you get chocolate in every single bite without compromising the structural integrity of the bars.
- Press the Dough. Transfer the mixture to the prepared pan. Use the bottom of a flat glass or a measuring cup to press the dough into an even, compact layer.
- Melt the Topping. Using a double boiler or a microwave in 30 second intervals, melt 0.75 cup (135g) vegan dark chocolate chips with 1 tbsp (15ml) refined coconut oil until glossy and completely liquid.
- Spread and Finish. Pour the melted chocolate over the dough base. Tilt the pan to let the chocolate reach the corners, then sprinkle with a pinch of flaky sea salt.
- Chill to Set. Place the pan in the refrigerator for at least 1 hours until the chocolate shell is firm and the base is solid.
- Slice and Serve. Lift the bars out using the parchment sling and cut into 12 even squares.
Technical Refinements and Texture Solutions
Even with a simple recipe, things can go sideways. If your dough feels too crumbly, it's usually because the almond flour was packed too tightly in the measuring cup. On the flip side, if it’s too sticky, your nut butter might have been extra runny (common with natural brands).
Why Your Dough Bars Are Crumbly
If the bars fall apart when you lift them, the flours haven't hydrated enough or there wasn't enough "glue." This often happens if you use a very dry, bottom of-the jar almond butter.
| Problem | Root Cause | Solution |
|---|---|---|
| Crumbly Base | Insufficient moisture or cold nut butter | Add 1 tsp of maple syrup at a time until the dough holds together when squeezed. |
| Cracked Chocolate | No fat in the topping | Always include the coconut oil; it keeps the chocolate flexible enough to slice. |
| Sticky Surface | Under chilling | Ensure the bars spend at least 60 minutes in the fridge before attempting to slice. |
Common Mistakes Checklist
- ✓ Ensure your nut butter is at room temperature before mixing (makes emulsification easier).
- ✓ Don't skip the oat flour; it provides the "chew" that almond flour lacks on its own.
- ✓ Press the dough down firmly; air pockets are the enemy of a sturdy bar.
- ✓ Use refined coconut oil if you want to avoid a tropical flavor in your chocolate.
- ✓ Wipe your knife between every single cut for those "Instagram ready" clean edges.
Adaptable Swaps for Diet Requirements
I love this recipe because it’s a canvas. If you're out of cashew butter, don't panic. You can swap ingredients as long as you keep the fat to dry ratio consistent. For instance, if you want a version that feels more like a single serving, you could look at this Edible Cookie Dough recipe for inspiration on scaling down.
| Original Ingredient | Substitute | Why It Works |
|---|---|---|
| Cashew Butter | Creamy Peanut Butter | Similar fat content. Note: Adds a much stronger, distinct nutty flavor to the bars. |
| Maple Syrup | Agave Nectar | Similar viscosity. Note: Slightly sweeter than maple syrup; you may want to add an extra pinch of salt. |
| Oat Flour | Coconut Flour (reduce by 50%) | High absorbency. Note: Coconut flour is very thirsty; use only 1/4 cup instead of 1/2 cup oat flour. |
If you want X, do Y
- If you want a protein boost, replace 1/4 cup of almond flour with a neutral flavored vegan protein powder.
- If you want a nut free version, use Sunflower Seed Butter (SunButter) and swap almond flour for more oat flour, though the texture will be denser.
- If you want a "Double Chocolate" version, add 2 tablespoons of unsweetened cocoa powder to the dough base.
Maximizing Freshness Through Smart Storage
Because these bars contain no preservatives and rely on temperature sensitive fats, how you store them is everything. If you leave them on the counter on a hot day, they will turn into a delicious but messy puddle.
- Refrigerator: Store in an airtight container for up to 7 days. I prefer glass containers as they don't retain odors from other foods in the fridge.
- Freezer: These freeze beautifully! Wrap individual squares in parchment paper and place them in a freezer bag for up to 3 months.
- Zero Waste Tip: If you have leftover crumbs from slicing the edges, don't toss them! They make an incredible topping for vanilla vegan ice cream or can be stirred into morning oatmeal.
If you find yourself with extra chocolate chips after this project, you might want to try making a batch of Chocolate Peanut Clusters recipe to clear out the pantry. It’s another great no bake option that uses similar pantry staples.
Elegant Plating and Serving Techniques
When it's time to serve, presentation can make these feel like a high end dessert. I love serving them on a dark slate board or a white ceramic plate to make the dark chocolate pop. The flaky sea salt on top isn't just for flavor; it catches the light and looks beautiful.
Debunking Cookie Dough Myths
A common misconception is that "no bake" means "no structure." Many people think you can just stir and eat, but the chilling stage is actually a chemical necessity for the fats to solidify and the fibers in the oat flour to soften. Another myth is that you must use coconut oil in the chocolate.
While you can skip it, the chocolate will likely shatter into shards when you bite it, making the experience less "velvety" and more "crunchy."
Three Step Execution Timeline
- Minute 1-10: Whisk the wet ingredients and fold in the flours. This is your "engineering" phase where you ensure the dough is the right consistency.
- Minute 11-15: Press the dough and melt the chocolate. This is the "finishing" phase where you create that smooth top layer.
- Minute 16-75: The "patience" phase. Let the refrigerator do the heavy lifting. Do not try to cut them before the 60 minute mark!
Right then, you're all set! These bars are honestly a staple in my house now. They are less intimidating than a full baking project but deliver all the satisfaction of a gourmet treat. Let me know if you swap out the cashew butter for something else I’m always looking for new variations to try!
 - No-Bake : PIN FOR LATER")
Recipe FAQs
Can I use peanut butter instead of cashew butter?
Yes, peanut butter works. It offers a similar fat content and binding ability, though it will impart a stronger peanut flavor to the bars.
What is the best way to store these no bake bars?
Refrigerate for up to 7 days or freeze for up to 3 months. Because they contain no preservatives and rely on temperature sensitive fats, they need to be kept chilled to maintain their texture and prevent melting.
How do I get clean cuts on the bars?
Run a sharp knife under hot water, wipe it dry, and slice. The heat from the blade slightly melts the chocolate, preventing it from cracking and allowing for very clean, professional looking cuts.
Why are my bars crumbly instead of holding together?
This is usually due to insufficient moisture or too cold of a nut butter. Add another teaspoon of maple syrup at a time until the dough holds together when squeezed, ensuring your nut butter is at room temperature.
Is it true I need to use refined coconut oil for the chocolate topping?
No, it's not strictly necessary, but highly recommended for flavor. Unrefined coconut oil will add a coconut flavor, while refined oil is neutral and allows the dark chocolate notes to shine, similar to how we achieve pure flavor in our Dark Chocolate Hot Chocolate.
Can I make these bars nut-free?
Yes, you can make them nut-free by using sunflower seed butter and swapping almond flour. Use sunflower seed butter (SunButter) and replace the almond flour with an equal amount of oat flour, though note the texture will be denser.
How long do I need to chill the bars before slicing?
Chill for at least 1 hour until the chocolate shell is firm and the base is solid. Rushing this step can lead to crumbly bars or a cracked chocolate topping, as the fats need time to set properly.
No Bake Cookie Dough Bar

Ingredients:
Instructions:
Nutrition Facts:
| Calories | 291 kcal |
|---|---|
| Protein | 6.5 g |
| Fat | 19.6 g |
| Carbs | 26.8 g |
| Fiber | 3.1 g |
| Sugar | 14.2 g |
| Sodium | 52 mg |
