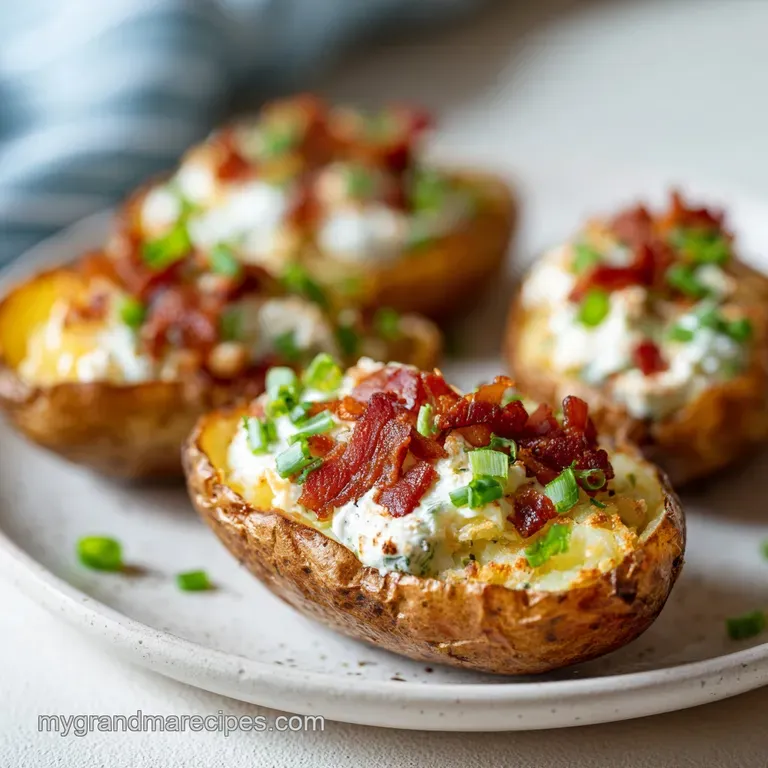
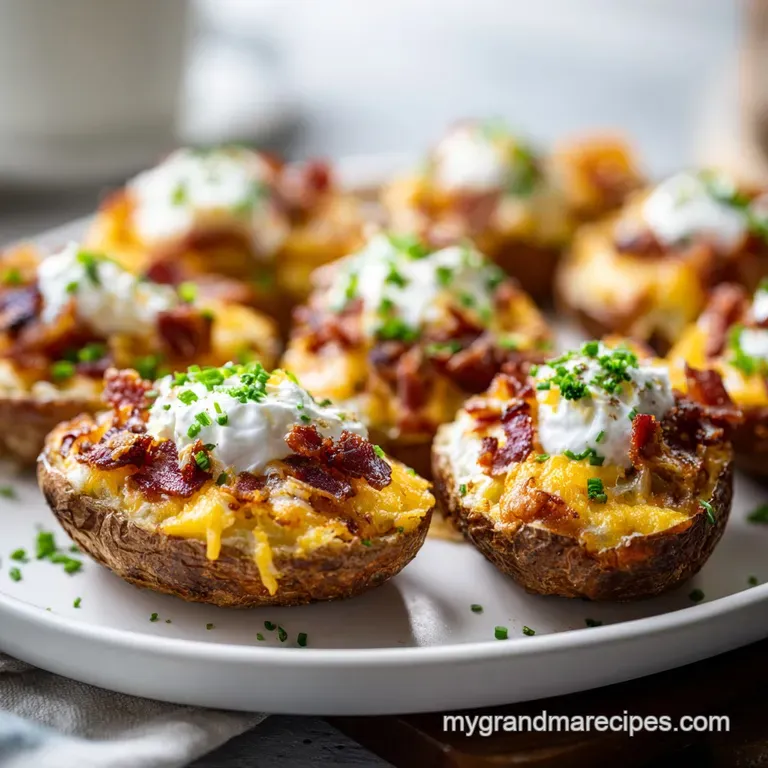
Loaded Potato Skins: Ultra Crispy and Golden
- Time: Active 10 minutes, Passive 25 minutes, Total 35 minutes
- Flavor/Texture Hook: A shatter crisp exterior with a velvety cheese melt and smoky bacon crunch.
- Perfect for: Game day gatherings, cozy family movie nights, or a classic Tennessee style appetizer.
- Why These Loaded Potato Skins Shatter With Every Single Bite
- Vital Specs for Managing Your Time in the Kitchen
- Essential Components for the Ultimate Comfort Food Snack
- Minimal Tool Kit for Maximum Potato Crispiness
- Mastering the Technique for Golden Brown Potato Shells
- Avoiding Common Pitfalls for the Most Reliable Results
- Simple Ways to Adapt This Recipe for Everyone
- Keeping Your Leftovers Fresh and Perfectly Reheated
- Creative Pairings to Turn Appetizers Into a Meal
- Recipe FAQs
- 📝 Recipe Card
Why These Loaded Potato Skins Shatter With Every Single Bite
The smell of these hitting the table always takes me right back to my grandma’s kitchen in Tennessee during the holidays. There’s something about the way the salt crusted skins sizzle when they come out of the oven that just screams comfort. You know that sound, right?
It’s a rhythmic crackle that lets you know the fat has done its job and turned a humble root vegetable into something almost decadent. These aren't those soggy, sad skins you get at a chain restaurant; these have real backbone and a crunch that you can hear from across the room.
I remember the first time I tried to make these on my own. I thought I could just toss them in the oven and wait. Big mistake. They came out chewy and weirdly tough. After a few chats with the best cooks I know (mostly my aunts), I realized the secret wasn't just in the heat, but in how you handle the starch.
You need that over high heat blast to transform the skin, but you also need to make sure you aren't steaming the potato from the inside out. It's a balance of moisture and fat that we're going for here.
We’re using a shortcut that would make any busy home cook smile. By using the microwave for the first stage, we’re cutting down the wait time without sacrificing a single bit of that "old fashioned" quality.
The microwave vibrates the water molecules inside the potato, softening the flesh quickly so we can get straight to the good part the roasting. It’s a reliable trick that preserves the integrity of the skin while making sure the inside stays light.
Starch Dehydration: High heat in the oven evaporates surface moisture from the potato skin, allowing the starch molecules to bond and create a rigid, crispy structure.
Fat Absorption: Using bacon fat instead of just oil allows the porous skin to soak up smoky flavor while frying the exterior of the potato cell by-cell.
Structural Integrity: Leaving exactly a quarter inch of flesh provides a "thermal buffer" that keeps the skin from becoming brittle while supporting the weight of the cheese.
| Method | Time | Texture | Best For |
|---|---|---|---|
| Oven Only | 1 hour 15 mins | Extra thick crust | Slow weekend prep |
| Microwave + Oven | 35 minutes | Crisp and airy | Busy weeknights/Game day |
| Air Fryer | 25 minutes | Ultra crunchy | Small batches (3-4 potatoes) |
Choosing the right method really depends on how much time you've got on your hands. I personally swear by the microwave to oven transition because it gives you the best of both worlds. You get that deep, mahogany colored crust without having to wait over an hour for the potatoes to bake.
Plus, it frees up your oven for other things while the potatoes are doing their initial softening.
Vital Specs for Managing Your Time in the Kitchen
In my kitchen, timing is everything, especially when you have a hungry crowd waiting. This recipe is designed to be efficient. You spend about 10 minutes of active time mostly scrubbing, scooping, and brushing. The rest is just waiting for the magic to happen behind the oven door.
It’s the kind of recipe where you can get the bacon frying while the potatoes are in the microwave, making the most of every second.
Since this recipe makes 14 individual skins (from 7 medium potatoes), it’s the perfect size for a family of four or a small group of friends. If you’re looking for something more substantial to serve alongside these, you might want to try a Roasted Potatoes Recipe if you have some extra spuds, though these skins are usually the star of the show.
| Component | Science Role | Pro Secret |
|---|---|---|
| Russet Potatoes | High starch content | Scrub them until the water runs clear to remove excess surface dirt. |
| Bacon Fat | High smoke point/Flavor | Filter it through a small sieve to remove burnt bits before brushing. |
| Sharp Cheddar | Protein fat emulsion | Grate it yourself from a block to avoid the anti clumping powders. |
Using block cheese is a hill I will die on. Those pre shredded bags are coated in potato starch or cellulose to keep them from sticking together in the bag. That stuff is the enemy of a velvety melt.
When you grate it fresh, the cheese flows together into a molten blanket that clings to every nook and cranny of the potato skin. It makes a world of difference in the final texture.
Essential Components for the Ultimate Comfort Food Snack
When you’re gathering your ingredients, think about quality over quantity. Because there are so few elements in Loaded Potato Skins, each one needs to pull its weight. I always opt for the heaviest Russets I can find because they usually have the most developed starch profile.
- 7 medium Russet potatoes: These are the classic choice because their skin is thick enough to stand up to the high heat. Why this? Higher starch means a fluffier interior and a crispier, crunchier fried skin.
- 2 tbsp neutral oil or melted bacon fat: I always use bacon fat if I have it. It’s what my grandma did. Why this? Bacon fat adds a savory depth that oil just can't match.
- 1 tsp fine sea salt: Don't use table salt if you can help it. Why this? Fine sea salt sticks better to the oiled skin for even seasoning.
- 1.5 cups sharp cheddar cheese: Go for the sharpest you can find. Why this? The sharpness cuts through the richness of the potato and fat.
- 6 slices thick cut bacon: Cook it until it’s just shy of burnt. Why this? It needs to stay crunchy even after a second trip to the oven.
- 0.5 cup sour cream: Full fat is the only way to go here. Why this? It provides a cool, tangy contrast to the hot, salty potato.
- 0.25 cup fresh chives: Thinly sliced into tiny little rings. Why this? They provide a necessary hit of freshness and onion like bite.
If you find yourself out of bacon fat, a good neutral oil like avocado or grapeseed works perfectly fine. Just avoid extra virgin olive oil for the roasting stage, as the 450°F heat can make it taste a bit bitter and it might start smoking in your kitchen.
We want a clean, crisp flavor that lets the potato shine.
Minimal Tool Kit for Maximum Potato Crispiness
You don't need a fancy kitchen to make the best Loaded Potato Skins. Honestly, the simpler the better. I’ve made these in tiny apartment kitchens and big farmhouse ones, and the results are always the same as long as you have the basics.
You’ll need a sturdy baking sheet and, ideally, a wire cooling rack. Putting the potatoes on a rack allows the hot air to circulate entirely around the skin. If you put them directly on the pan, the side touching the metal can sometimes get greasy rather than crispy.
The rack is the secret to that 360 degree crunch.
You also need a good spoon for scooping. I find a metal teaspoon with a slightly sharp edge works best. It gives you more control than a large tablespoon, so you’re less likely to poke a hole through the bottom of your "boat." A pastry brush is also helpful for getting an even coating of fat, but if you don't have one, just use your hands or a folded paper towel.
Mastering the Technique for Golden Brown Potato Shells
- Prep the potatoes. Scrub 7 medium Russet potatoes under cold water and prick them several times with a fork. Note: Pricking prevents the potatoes from exploding in the microwave.
- Initial cook. Microwave the potatoes on high for 10-12 minutes, turning them halfway through. They should be tender when pierced.
- Cooling period. Let them rest for 5 minutes. Note: This makes them easier to handle and helps the starch set slightly.
- Slice and scoop. Halve the potatoes lengthwise. Scoop out the white flesh, leaving a 1/4 inch border against the skin.
- Prep the oven. Preheat your oven to 450°F (230°C). This high heat is essential for the "shatter" effect.
- Coat with fat. Brush both sides of the skins with 2 tbsp of neutral oil or bacon fat and sprinkle with 1 tsp of sea salt.
- First roast. Place the skins cut side down on a wire rack over a baking sheet and bake for 10 minutes until the edges are mahogany colored and stiff.
- The loading phase. Flip the skins over and fill the cavities with 1.5 cups of cheddar and 6 slices of crumbled bacon.
- The final melt. Bake for an additional 3-5 minutes until the cheese is bubbling and golden.
- Garnish and serve. Top each with a dollop of sour cream and a sprinkle of 0.25 cup chives. Serve immediately.
Chef's Tip: Save the scooped out potato flesh! You can use it to make a small batch of Creamy Mashed Potatoes or use it as a thickener for a potato soup. Never let good starch go to waste.
One thing I've learned the hard way is that you should never rush the "cut side down" roasting step. That 10 minute window is where the actual structure of the potato skin is built. If you flip them too early, they'll be floppy and won't hold up when you try to pick them up with your hands.
Patience in those ten minutes pays off in a major way.
Avoiding Common Pitfalls for the Most Reliable Results
One of the most frustrating things that can happen is when the skins stick to the rack or the pan. This usually happens if you haven't used enough fat or if the oven wasn't fully preheated. Make sure that oven is screaming hot before those potatoes go in.
If the temperature is too low, the fat will just soak into the potato instead of frying the surface.
Another common issue is "soggy bottom" syndrome. This happens if you leave too much potato flesh inside or if you don't use a wire rack. That quarter inch border is the "sweet spot." Any more, and it holds too much moisture. Any less, and the skin becomes a cracker that breaks as soon as you bite it.
Why Your Potato Skins Are Floppy
If your skins aren't standing up straight or they feel limp, it’s almost always a moisture issue. Potatoes are mostly water, and our goal is to drive that water out. If you find they aren't getting crispy, try extending the first roasting time by 2-3 minutes.
| Problem | Root Cause | Solution |
|---|---|---|
| Skins are chewy | Oven temperature too low | Ensure oven is at 450°F and use a thermometer to check. |
| Tearing when scooping | Potato is overcooked | Reduce microwave time by 1-2 mins; use a smaller spoon. |
| Cheese is oily | Pre shredded cheese used | Grate fresh sharp cheddar from a block for a better melt. |
To make sure you get it right every single time, I’ve put together a little mental checklist I use whenever I’m making these for a crowd. It keeps me on track and ensures the quality stays high even when I'm distracted.
- ✓ Dry the potatoes completely after scrubbing to ensure the oil sticks.
- ✓ Don't skip the 5 minute cooling rest; it prevents the skins from tearing.
- ✓ Always roast cut side down first to seal the interior surface.
- ✓ Use a wire rack for 360 degree airflow and maximum crunch.
- ✓ Grate your cheese while the potatoes roast to save time and ensure freshness.
Simple Ways to Adapt This Recipe for Everyone
The beauty of Loaded Potato Skins is how versatile they are. While I love the classic bacon and cheddar combo, there are so many ways to switch it up. If you're looking for something a bit heavier, you can try loaded potato skins with ground beef. Just brown the beef with some taco seasoning and use it instead of or alongside the bacon.
For a vegetarian loaded potato skins version, omit the bacon and swap the bacon fat for avocado oil. I like to add some sautéed mushrooms or black beans to give it that savory "umami" hit that you’d normally get from the meat.
You can even use a dairy-free cheese and vegan sour cream to make these plant based.
| Servings | Potato Count | Cheese Amount | Bacon Amount |
|---|---|---|---|
| 4 People | 4 potatoes (8 skins) | 1 cup | 4 slices |
| 7 People | 7 potatoes (14 skins) | 1.5 cups | 6 slices |
| 14 People | 14 potatoes (28 skins) | 3 cups | 12 slices |
If you want to go the "healthier" route, you can use sweet potatoes. They have a different starch structure, so they won't get quite as "shatter crispy" as Russets, but they develop a beautiful caramelized edge that is fantastic with some black beans and lime crema.
Keeping Your Leftovers Fresh and Perfectly Reheated
Storing these can be a bit tricky because they are at their absolute peak about 2 minutes after they leave the oven. However, life happens, and sometimes you have leftovers. You can keep these in the fridge for up to 3 days in an airtight container.
To reheat, never use the microwave. It will turn your beautiful, crispy skins into rubbery sadness. Instead, put them back on a rack in a 400°F oven for about 5-8 minutes. This will crisp the skin back up and remelt the cheese without overcooking the potato.
If you want to freeze them, do it after the first roast but before adding the toppings. Freeze them in a single layer on a sheet pan, then transfer to a freezer bag. They'll last for about a month.
When you're ready to eat, just add the toppings and bake from frozen at 425°F for about 12-15 minutes.
Creative Pairings to Turn Appetizers Into a Meal
While these are usually served as a snack, you can easily turn them into a full meal. I love serving them alongside a big, crisp green salad with a sharp vinaigrette. The acidity of the dressing cuts right through the richness of the potato and cheese.
- The Chili Boat: Fill the skins with leftovers from a hearty beef chili.
- The Breakfast Skin: Top with a fried egg and a dash of hot sauce.
- The Buffalo Style: Use shredded chicken, buffalo sauce, and blue cheese crumbles.
One of my favorite myths is that you need to soak potatoes in cold water to get them crispy. While that works for French fries, it's actually counterproductive for potato skins. We want the starch to stay exactly where it is to provide that structural "crunch." Soaking just adds unnecessary moisture that we'd have to work twice as hard to evaporate later.
Another thing people often get wrong is the temperature of the sour cream. Always serve it cold! That temperature shock between the piping hot, crispy potato and the chilled, velvety cream is half the fun of eating them.
It’s that contrast that keeps you coming back for "just one more" until the whole plate is gone. Trust me, I’ve seen it happen more times than I can count. Right then, let's get those potatoes in the oven!

Recipe FAQs
How to make the potato skins extra crispy?
Brush the skins thoroughly with bacon fat or oil and place them cut-side down on a wire rack. Using a wire rack allows hot air to circulate underneath the potatoes, ensuring a uniform, shatter crisp texture across the entire surface.
Is it true I must boil the potatoes before roasting them?
No, this is a common misconception. Microwaving the potatoes for 10 12 minutes is far more efficient and prevents the potatoes from becoming waterlogged, which is essential for achieving the perfect mahogany colored crust.
How to prepare these skins in advance for a party?
Scoop and roast the empty shells up to 24 hours ahead of time. Once cooled, store them in the refrigerator, then simply add the cheese and bacon and complete the final 3 5 minute bake when your guests arrive.
Can I swap the cheddar for another topping?
Stick to the sharp cheddar for the best melt and flavor profile. If you enjoy balancing savory fats with a tangy finish, try serving these alongside our silky and tangy dip to create a full appetizer spread.
How to ensure the potato shells hold their shape when filled?
Maintain a 1/4 inch border of potato flesh when scooping out the center. This structural support prevents the thin skins from collapsing under the weight of the cheese and bacon crumbles.
How to tell when the potatoes are ready to be scooped?
Test for doneness by piercing the center with a fork after the initial microwave cycle. The potatoes should be tender enough to yield easily without crumbling, which makes the scooping process clean and efficient.
How to achieve the best flavor in the crispy skin?
Use rendered bacon fat instead of neutral oil for a deeper, smokier finish. The salt and rendered fat create a crust that enhances the savory depth of the potato, perfectly complementing the creamy sour cream and fresh chives.
Loaded Potato Skins

Ingredients:
Instructions:
Nutrition Facts:
| Calories | 147 kcal |
|---|---|
| Protein | 5.1 g |
| Fat | 8.8 g |
| Carbs | 12.1 g |
| Fiber | 1.2 g |
| Sugar | 0.7 g |
| Sodium | 298 mg |
