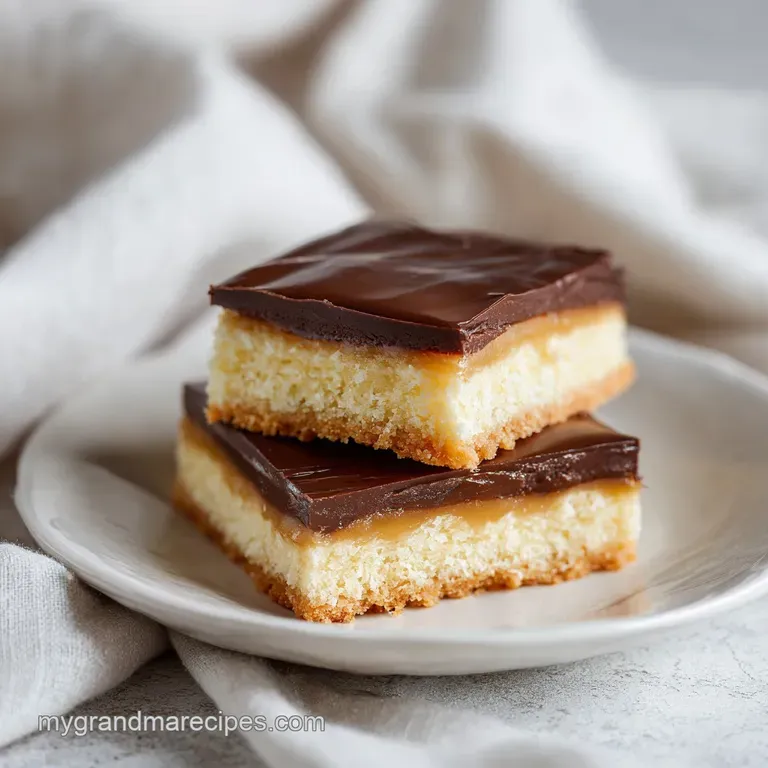
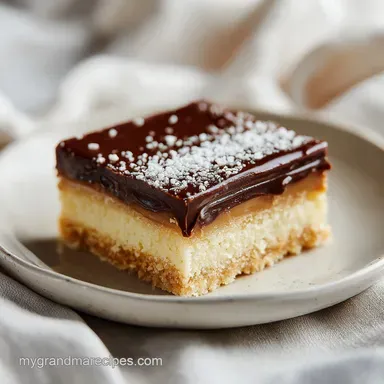
Millionaire Shortbread: Buttery and Rich
- Time: Active 20 minutes, Passive 45 minutes, Total 65 minutes
- Flavor/Texture Hook: Buttery shortbread meets velvety salted caramel with a firm chocolate snap.
- Perfect for: Holiday gifting, Tennessee potlucks, or an impressive weekend baking project.
- Master the Golden Layers of Homemade Millionaire Shortbread
- Essential Metrics for Perfect Three Layer Dessert Bars
- Choosing Quality Components for Rich Caramel and Shortbread
- Reliable Kitchen Tools for Consistent Layered Baking Results
- Step by Step Guide to Achieving Bakery Quality Bars
- Resolving Texture Issues and Preventing Baking Failure
- Flavor Variations for Customizing Your Caramel Shortbread Treat
- Proper Storage Methods and Smart Scraps Utilization Tips
- Perfect Pairings for Your Finished Millionaire Shortbread Slices
- Scaling Guidelines for Different Batch Sizes
- Recipe FAQs
- 📝 Recipe Card
Master the Golden Layers of Homemade Millionaire Shortbread
There is nothing quite as heartbreaking as pulling a tray of dessert bars out of the fridge only to have the chocolate shatter into a million jagged pieces while the caramel oozes out the sides like a slow moving Tennessee mudslide. I remember the first time I tried making these in my grandma’s kitchen back home.
I thought I could eyeball the caramel, and I ended up with a tray of what essentially looked like a delicious soup that required a spoon rather than a napkin. It was a sticky, messy disaster that taught me one very important lesson, which is that patience and temperature are the two most important ingredients in a baker's arsenal.
The secret to a truly great tray of these bars isn't just in the sugar, it is in the structural integrity of every single layer. We are looking for a shortbread that holds its own without being hard as a rock, a caramel that is chewy but doesn't stick to your teeth like industrial glue, and a chocolate topping that gives you that satisfying auditory "snap" when you bite into it.
If you have ever struggled with soggy bottoms or caramel that refuses to set, you are in the right place because we are going to walk through the exact steps to keep those layers distinct and beautiful.
We've all been there, staring at a recipe and wondering if we can just skip the chilling time or if the type of syrup actually matters. Trust me, after years of trial and error in my own kitchen, I have found that the small details make the biggest difference.
We are going to use a heavy bottomed pan, a little bit of salt to cut through the sweetness, and a touch of oil in the chocolate to make sure your knife glides through those bars like a hot iron through silk. Let's get into the nitty gritty of why this works so you can bake with confidence.
Essential Metrics for Perfect Three Layer Dessert Bars
Starch Hydration: Baking the shortbread until it reaches a light amber hue ensures the flour is fully cooked and the butter has bound with the sugar for a crisp, sturdy base.
Fat Emulsification: Constant stirring while boiling the condensed milk and butter creates a stable bond that prevents the fat from separating and becoming greasy.
Thermal Stability: Boiling the caramel for exactly 5-8 minutes allows the sugars to reach a stage where they will set firm at room temperature but remain chewy.
Surface Tension: Adding a small amount of oil to the melted chocolate reduces the surface tension, allowing it to remain flexible enough to slice without cracking.
| Method | Total Time | Texture | Best For |
|---|---|---|---|
| Classic Oven | 65 minutes | Crisp base, chewy center | Traditional texture seekers |
| No Bake Base | 40 minutes | Crumbly, digestive style | Summer days/No oven access |
| Slow Cooker Caramel | 4 hours | Dark, deeply toasted | Hands off prep lovers |
When we talk about traditional baking in a Tennessee kitchen, we often rely on visual cues rather than just the clock. You'll know that shortbread is ready when the kitchen starts smelling like toasted nuts and the edges look like a sun faded gold.
If you pull it out too early, the caramel will soak into the crust and you'll lose that beautiful definition between the white, gold, and brown layers. It's all about that contrast in every single bite you take.
Choosing Quality Components for Rich Caramel and Shortbread
| Ingredient | Science Role | Pro Secret |
|---|---|---|
| Unsalted Butter | Provides structure and fat | Use high-quality European style for a higher fat content and less water. |
| Condensed Milk | Creates the creamy base | Ensure it is "Sweetened Condensed" not evaporated, as the sugar is vital for the set. |
| Golden Syrup | Prevents crystallization | This inverted sugar keeps your caramel silky smooth and prevents graininess. |
When it comes to the ingredients for your Millionaire Shortbread, quality really does matter. For the base, you'll need 1 cup (225g) of unsalted butter, softened to room temperature so it creams perfectly with the 1/2 cup (100g) of granulated sugar.
Then we fold in 2 cups (250g) of all purpose flour and 1/4 tsp of salt. Why this? The flour to butter ratio creates a short, tender crumb that doesn't crumble under the weight of the caramel.
For that iconic middle layer, grab 1 can (14 oz / 397g) of sweetened condensed milk, 3/4 cup (170g) of unsalted butter that you've cubed up, 3/4 cup (150g) of light brown sugar, and 2 tbsp of golden syrup or light corn syrup. Don't forget the 1/2 tsp of flaky sea salt for that perfect finish.
Why this? Brown sugar adds a deep molasses note that granulated sugar just can't provide.
Finally, the topping requires 7 oz (200g) of milk or dark chocolate, chopped finely, and 1 tbsp of vegetable oil or coconut oil. Why this? The oil is the secret weapon that keeps the chocolate from shattering when you cut the bars.
If you don't have golden syrup on hand, you can easily use light corn syrup, though the flavor will be a bit more neutral. If you're out of brown sugar, dark brown sugar works in a pinch, but it will make the caramel much darker and give it a stronger molasses flavor.
For the chocolate, I usually lean toward a 50/50 mix of milk and dark chocolate to satisfy everyone at the table.
Reliable Kitchen Tools for Consistent Layered Baking Results
You don't need a high tech kitchen to make these, but having a few specific tools will make your life a whole lot easier. First and foremost, you need a 9x9 inch square baking pan. I prefer metal pans over glass because they conduct heat more evenly and give you those nice sharp corners.
You will also want a good roll of parchment paper. This is non negotiable. You need to create a "sling" by letting the paper overhang the sides so you can lift the entire block of shortbread out of the pan once it's set.
A heavy bottomed saucepan is your best friend for the caramel. If your pan is too thin, the condensed milk will scorch on the bottom before the rest of the mixture even gets warm. Think of it like a cast iron skillet, you want that steady, even heat. I also highly recommend an offset spatula.
It’s one of those tools that seems unnecessary until you try to spread hot caramel into the corners of a pan with a regular spoon. It makes the surface as smooth as a frozen pond.
Finally, a sharp chef's knife and a tall glass of hot water are essential for the final step. When it comes time to slice your Millionaire Shortbread, dipping your knife in hot water and wiping it dry between every single cut is the difference between a jagged mess and professional looking squares.
It sounds like a lot of work, but when you see those perfect layers, you'll know it was worth every second of effort.
step-by-step Guide to Achieving Bakery Quality Bars

Shortbread Base Preparation
- Preheat your oven to 350°F (180°C) and line your 9x9 inch pan with parchment paper, leaving an inch of overhang on the sides.
- In a large bowl, cream 225g of softened butter and 100g of granulated sugar until the mixture is pale and fluffy.
- Fold in 250g of all purpose flour and 1/4 tsp of salt using a spatula until a soft dough forms. Note: Don't overmix, or the base will become tough rather than tender.
- Press the dough firmly and evenly into the bottom of the prepared pan.
- Use a fork to "dock" or prick holes across the entire surface of the dough. Note: This prevents the base from puffing up or bubbling during the bake.
- Bake for 18-22 minutes until the edges are light amber and the center feels set.
- Remove from the oven and allow the base to cool completely in the pan.
Caramel Emulsion Mastery
- In your heavy bottomed saucepan, combine the 14 oz can of condensed milk, 170g of cubed butter, 150g of light brown sugar, and 2 tbsp of golden syrup.
- Place the pan over medium low heat and stir constantly with a silicone spatula until the butter and sugar have completely melted.
- Increase the heat slightly to bring the mixture to a gentle, bubbling boil.
- Continue stirring vigorously for 5-8 minutes until the caramel thickens and turns a deep, rich amber. Note: The mixture should start to pull away from the sides of the pan slightly.
- Remove from heat and immediately stir in the 1/2 tsp of flaky sea salt.
- Pour the hot caramel over the cooled shortbread and spread it to the corners with an offset spatula.
- Leave the pan at room temperature for 1-2 hours until the caramel is firm and no longer jiggles.
Perfect Chocolate Finish
- Chop 200g of chocolate into small, uniform pieces to ensure even melting.
- Place the chocolate and 1 tbsp of oil in a heatproof bowl and melt using a double boiler or 30 second bursts in the microwave.
- Stir the chocolate until it is completely velvety and glossy.
- Pour the chocolate over the set caramel layer and tilt the pan to ensure it covers every inch.
- Place the pan in the refrigerator for 1-2 hours until the chocolate has fully hardened.
Professional Slicing Techniques
- Lift the shortbread out of the pan using the parchment paper sling and place it on a sturdy cutting board.
- Run a large chef's knife under hot water, wipe it dry, and make one long, clean cut through the block.
- Repeat the heating and wiping process for every single slice to create 16 perfect bars.
Resolving Texture Issues and Preventing Baking Failure
If you find that your shortbread is crumbling before you even get it out of the pan, you might have been a little too light handed with the pressing. You really have to pack that dough down into the corners to make sure it forms a solid foundation.
On the flip side, if your caramel is grainy, it usually means the sugar didn't dissolve properly before the mixture started boiling. Keeping the heat low at the start is the best way to ensure a silky texture.
Why Your Caramel Refuses to Set
This is the most common issue people face. If the caramel stays liquid even after cooling, it simply wasn't boiled long enough. The mixture needs to reach a stage where the water has evaporated sufficiently, leaving behind a concentrated sugar and fat emulsion.
If you’re worried, you can use a candy thermometer; you’re looking for about 235°F to 240°F (the "soft ball" stage).
| Problem | Root Cause | Solution |
|---|---|---|
| Greasy Caramel | Fat separation | Stir more vigorously and keep heat at medium low to maintain the emulsion. |
| Chocolate Cracking | Brittle topping | Always add 1 tablespoon of oil to the chocolate to keep it flexible. |
| Soggy Shortbread | Underbaked base | Bake until the base is truly golden; pale shortbread absorbs moisture from the caramel. |
One mistake I once made was trying to rush the cooling process by putting the hot caramel directly into the freezer. Don't do that. It causes the fat to seize and can lead to a weird, rubbery texture. Let it sit on the counter and do its thing naturally.
Common Mistakes Checklist
- ✓ Always line the pan with parchment paper to avoid the bars getting stuck.
- ✓ Pat the shortbread dough firmly into the corners for an even base.
- ✓ Never stop stirring the caramel, as condensed milk burns in a heartbeat.
- ✓ Let the caramel set at room temperature before adding the chocolate to prevent the layers from mixing.
- ✓ Use a warm knife for slicing to ensure the chocolate doesn't splinter.
- ✓ Don't skip the salt; it's essential for balancing the richness of the sugar and butter.
Flavor Variations for Customizing Your Caramel Shortbread Treat
If you want to move away from the classic version, there are so many ways to play with this recipe. For a "White Gold" version, you can use white chocolate for the topping and add a bit of vanilla bean paste to the shortbread.
It makes for a very elegant looking bar that is perfect for wedding showers or spring parties. If you’re a fan of the salty sweet combo, try adding a layer of crushed pretzels between the shortbread and the caramel for an extra crunch.
For those who need a gluten-free option, you can swap the all purpose flour for a high-quality 1:1 gluten-free baking blend. Since shortbread doesn't rely on gluten for rise, it's actually one of the easiest things to convert.
Just be sure to add an extra 2 minutes to the bake time, as gluten-free flours sometimes take a little longer to brown and set.
| Original Ingredient | Substitute | Why It Works |
|---|---|---|
| Golden Syrup | Honey | Provides a similar thickness. Note: Will add a distinct floral honey flavor to the caramel. |
| Milk Chocolate | Dark Chocolate (70%) | Same melting properties. Note: Significantly reduces the sweetness of the overall bar. |
| AP Flour | Almond Flour | High fat content. Note: Results in a much softer, nuttier base that is more fragile. |
If you are feeling particularly adventurous, you can turn these into Pecan Pie Bars by stirring toasted pecans into the caramel layer before pouring it over the crust. It adds a wonderful earthiness that complements the brown sugar perfectly.
Proper Storage Methods and Smart Scraps Utilization Tips
Millionaire Shortbread is actually one of those rare desserts that tastes better after a day or two. You can keep these bars in an airtight container in the refrigerator for up to 7 days. I actually prefer eating them straight from the fridge because the caramel has a better "chew" when it's cold.
If you're stacking them, put a piece of parchment paper between the layers so the chocolate doesn't scuff or stick.
You can also freeze these bars for up to 3 months. Wrap them individually in plastic wrap and then put them in a freezer bag. When you're ready for a treat, just let one sit on the counter for about 20 minutes. As for zero waste, don't throw away the "ugly" edge pieces from your slicing.
Those scraps are absolute gold when crumbled over vanilla bean ice cream or stirred into a batch of brownies. I've even been known to fold the leftover crumbs into a cheesecake crust for a little extra surprise.
If you find yourself with leftover melted chocolate, don't let it go to waste. Dip some dried apricots or potato chips into it. My grandma always said that in a kitchen as busy as ours, nothing should ever hit the trash can if it still had a bit of sweetness left in it.
Perfect Pairings for Your Finished Millionaire Shortbread Slices
These bars are incredibly rich, so they pair best with something that has a bit of acidity or bitterness to cleanse the palate. A strong, dark roast coffee or a cup of Earl Grey tea is the classic choice. The tannins in the tea cut through the fat of the butter and the sugar of the caramel beautifully.
If you're serving these at a dinner party, a small glass of tawny port or a nutty sherry is a sophisticated way to end the meal.
For a kid friendly option, you can't go wrong with a cold glass of whole milk. There’s something about the combination of shortbread and milk that feels like a warm hug from the inside out.
If you're putting together a dessert platter, try pairing these with some tart fruit like raspberries or sliced green apples. The sharpness of the fruit provides a necessary break from the decadence of the bars.
The "Afternoon Tea" Pairing
If you're hosting a formal tea, serve these alongside some savory cucumber sandwiches. The contrast between the light, fresh sandwiches and the heavy, sweet bars makes for a very balanced spread. Just remember to slice the bars into smaller "two bite" pieces so they aren't too overwhelming for a tea setting.
The "Dessert Platter" Pairing
When I'm making a big spread for the holidays, I love to put these next to something citrusy, like a lemon tart or orange zest cookies. The citrus helps to brighten up the heavy caramel and chocolate, making it easier for people to go back for seconds (or thirds, we don't judge here).
Whatever you choose, these bars are sure to be the star of the show.
Scaling Guidelines for Different Batch Sizes
If you find yourself needing to feed a larger crowd, you can easily double this recipe and bake it in a 9x13 inch pan. However, when you double the caramel, you need to be careful with the boiling time. A larger volume of caramel takes longer to heat through and longer to reach the correct thickness.
You might need to add an extra 3-4 minutes to your boiling time, but keep a close eye on the color and consistency rather than just the clock.
For a smaller batch, you can halve the ingredients and use an 8x4 inch loaf pan. This will give you thicker layers, which I personally love. When halving the recipe, reduce the bake time for the shortbread by about 5 minutes, as the smaller surface area will cook a bit faster in the oven.
One common myth is that you can't make caramel in a microwave. While you can technically do it, I strongly advise against it for this recipe. Microwave heating is uneven, and you risk the condensed milk exploding or scorching in certain spots while staying raw in others.
Stick to the stovetop where you have total control over the heat. Another myth is that you need expensive "baking chocolate." While high-quality chocolate tastes better, a standard bag of chocolate chips will work just fine as long as you add that tablespoon of oil to help with the melt and the snap.
Making Millionaire Shortbread is a labor of love, but once you take that first bite of the crisp base and the smooth, salty caramel, you'll realize why it’s been a staple in kitchens like mine for generations.
It’s about taking simple ingredients butter, sugar, and flour and turning them into something that feels truly special. Happy baking, and may your caramel always set perfectly!

Recipe FAQs
What is the difference between Millionaire Shortbread and billionaire shortbread?
Billionaire shortbread is simply a more decadent variation that adds extra layers or toppings. While Millionaire Shortbread sticks to the classic shortbread, caramel, and chocolate trio, the billionaire version often incorporates additional ingredients like nuts, fudge, or thicker chocolate ganache to
increase the richness.
What do Americans call Millionaire Shortbread?
Most Americans refer to it as Caramel Shortbread or Caramel Squares. While the name Millionaire Shortbread is becoming more widely recognized, these descriptive names are much more common in United States bakeries.
Is Twix the same as Millionaire Shortbread?
No, they are distinct, though they share similar flavor profiles. A Twix bar is a mass produced candy bar with a thinner, crispier cookie base, while homemade Millionaire Shortbread features a thicker, richer buttery shortbread base and a much higher caramel-to-chocolate ratio.
What is the 321 rule for shortbread?
It refers to the classic ratio of 3 parts flour, 2 parts butter, and 1 part sugar by weight. This ratio provides the perfect structure for the base, ensuring it remains sturdy enough to support the heavy caramel and chocolate layers without crumbling apart.
How to keep the chocolate layer from cracking when slicing?
Mix one tablespoon of vegetable or coconut oil into your melted chocolate before pouring. Additionally, always use a warm, sharp knife to score and slice the bars, as this prevents the hardened chocolate from splintering under pressure.
How to fix the caramel if it feels too runny?
Extend the boiling time by an extra minute or two while stirring continuously. The caramel must reach a deep amber color and a thick consistency during the 5-8 minute boiling window to ensure it sets properly at room temperature for 1-2 hours.
Is it true I can use a standard fridge to speed up the caramel setting process?
No, this is a common misconception. You must allow the caramel to set at room temperature for at least 1-2 hours before adding the chocolate layer, otherwise the temperature difference can cause the layers to mix or the chocolate to set with an unappealing bloom.
Homemade Millionaire Shortbread
Ingredients:
Instructions:
Nutrition Facts:
| Calories | 451 kcal |
|---|---|
| Protein | 4.2 g |
| Fat | 27.1 g |
| Carbs | 49.7 g |
| Fiber | 0.8 g |
| Sugar | 34.4 g |
| Sodium | 144 mg |
