Heavenly Oreo Dessert: No Bake Layers
- Time: Active 20 minutes, Passive 4 hours, Total 4 hours 20 mins
- Flavor/Texture Hook: Fudgy chocolate layers against a velvety cream base and shattering cookie crust
- Perfect for: Potlucks, humid summer days, or when the oven is occupied with Sunday roast
Making The Iconic Heavenly Oreo Dessert
I still remember the first time I saw this dish at a church social back home in Tennessee. My neighbor, Mrs. Gable, brought it in a glass dish that was sweating from the summer heat, but the inside stayed perfectly layered and cool.
I watched her cut into it, and that distinct sound of the Oreo crust giving way a soft, muted crunch was enough to make me skip the main course entirely. It’s the kind of old-fashioned comfort food that doesn't need a fancy name to tell you exactly how good it’s going to be.
Since then, I've made this more times than I can count, usually in my own kitchen with the radio humming in the background. I’ve learned the hard way that you can't rush the chill time.
One year, I tried to serve it after only an hour, and it was a delicious soup, but it certainly wasn't a "slice." You want those layers to stand tall and proud when they hit the plate. It's about patience and using the right ingredients to get that velvety finish we all crave.
We're going for something that feels lighter than a heavy cheesecake but richer than a standard pudding cup. By using Neufchâtel cheese instead of standard full fat cream cheese, we get a slightly higher moisture content that keeps the middle layer from becoming stiff.
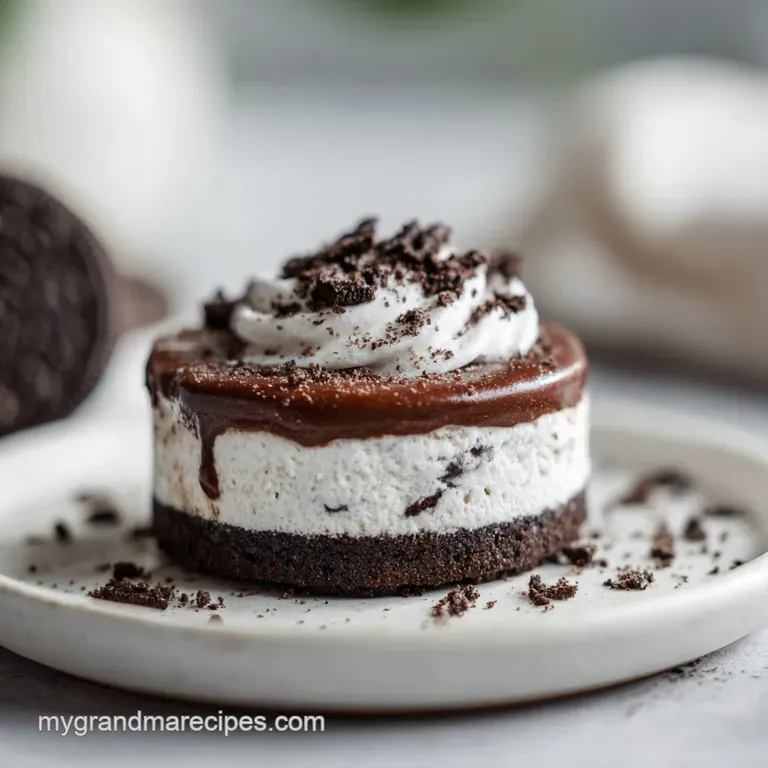
It stays airy, like a cloud trapped between chocolate. Trust me, once you see those black and white layers through the side of the glass, you'll understand why this has been a staple in my family for decades.
The Physics of the Firm Set
Starch Gelatinization: The instant pudding mix contains modified cornstarch that thickens immediately when it hits the proteins in the cold skim milk. This creates a stable, viscous structure that supports the weight of the whipped topping without collapsing.
| Premium Choice | Budget Alternative | Flavor Impact | Savings |
|---|---|---|---|
| Name brand Oreos | Store brand chocolate sandwiches | Slightly less cocoa punch | Save $1.50-2.00 |
| Pure Vanilla Paste | Imitation Vanilla Extract | Lose the visible bean specks | Save $4.00-6.00 |
| Neufchâtel Cheese | low-fat cream cheese | Similar texture, slightly tangier | Save $0.50 |
Working with these ingredients is like building a house; the cookies are your foundation, and if that isn't solid, the rest will crumble. I always tell my friends to press the crust down firmly with the back of a measuring cup.
If you just use your fingers, you'll get uneven spots where the pudding will seep through and make things soggy. We want a distinct line between the dark crust and the white cream.
Essential Specs For Success
Before you start crushing cookies, you need to know what you're getting into. This isn't a "whip it up 5 minutes before dinner" kind of situation. It’s a labor of love that happens mostly in the refrigerator. If you're looking for something a bit quicker but still festive, you might enjoy making a Strawberry Roses with recipe which hits those sweet notes much faster. But for the full Oreo experience, stick with me here.
| Component | Science Role | Pro Secret |
|---|---|---|
| 36 Oreo Cookies | Structural Base | Pulse until they look like wet sand; too large and the crust falls apart. |
| Neufchâtel Cheese | Emulsifying Agent | Ensure it's truly room temp to avoid tiny "cheese pebbles" in your cream. |
| Cold Skim Milk | Hydration Source | Use it ice cold to trigger the pudding thickeners instantly. |
Chef's Note: I always toss my mixing bowl and whisk attachment in the freezer for 10 minutes before starting the whipped layers. A cold bowl helps the whipped topping maintain its volume and prevents it from "melting" while you fold in the sugar.
The salt in the crust is also a non negotiable for me. Most folks skip it, but that 1/4 teaspoon of sea salt cuts through the heavy sugar of the cookies and makes the chocolate flavor pop. It’s the difference between a dessert that’s just "sweet" and one that people keep coming back for another sliver of.
Core Components To Gather
Getting your ducks in a row makes this process feel like a breeze. You'll want to make sure your Neufchâtel is sitting out on the counter for at least an hour. If it's even a little bit cold, it won't play nice with the powdered sugar, and you'll end up with a lumpy mess that ruins the velvety vibe we're aiming for.
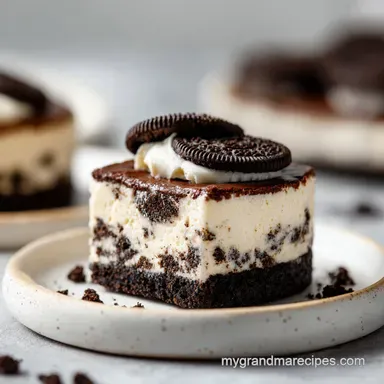
- 36 standard Oreo Cookies (400g): These provide the cocoa rich base and the garnish.
- 6 tbsp (85g) unsalted butter: Melted to bind the crumbs.
- 1/4 tsp sea salt: To balance the richness. Why this? Salt intensifies the chocolate notes and prevents cloying sweetness.
- 8 oz (226g) Neufchâtel cheese: Softened. Why this? It's softer than cream cheese, making the layer extra airy.
- 1/2 cup (60g) powdered sugar: Sifted to ensure smoothness.
- 3 cups (720ml) light whipped topping: Divided into layers.
- 1 tsp pure vanilla bean paste: For deep flavor and pretty flecks.
- 2 packages (3.9 oz each) chocolate pudding: Use instant, not cook and-serve.
- 2 3/4 cups (650ml) cold skim milk: To set the pudding firmly.
- 1/4 cup mini chocolate chips: Optional, but they add a nice textural contrast.
If you find yourself short on chocolate, you can actually pivot this toward a Valentine's Black Chocolate recipe style by adding a touch more dark cocoa powder to the pudding mix, though the standard packages usually do the trick for that classic "heavenly" taste.
Tools For A Smooth Process
You don't need a professional pastry kitchen for this, but a few specific tools will make your life much easier. I always reach for my 9x13 inch glass baking dish. Why glass? Because seeing those layers from the side is half the fun! It makes the "wow" factor much higher when you set it on the table.
A food processor is your best friend for the crust. You want those cookies pulverized. If you don't have one, a gallon sized freezer bag and a rolling pin work, but it takes some elbow grease. You're looking for a uniform crumb so the butter can coat every single piece.
If the crumbs are too big, the crust will shatter when you try to serve it.
Finally,, a sturdy offset spatula is a game changer. It allows you to spread the cream and pudding layers all the way to the edges without dragging the layer underneath it. If you use a regular spoon, you risk mixing the white and brown layers together, and we want those sharp, clean lines for that professional look.
Assembling The Velvet Layers

- Process the cookies. Pulse 36 Oreos in a food processor until they resemble fine, dark sand.
- Bind the base. Mix the crumbs with 6 tbsp melted butter and sea salt. Note: The salt is the secret to making the chocolate taste expensive.
- Press the crust. Firmly pack the mixture into a 9x13 dish until the surface is flat and even.
- Chill the foundation. Place the dish in the freezer for 10 minutes. Note: This prevents the next layer from picking up loose crumbs.
- Cream the cheese. Beat 8 oz Neufchâtel with 1/2 cup powdered sugar and vanilla bean paste until completely silky.
- Fold the topping. Gently stir in 1 cup of whipped topping until no white streaks remain.
- Spread the middle. Layer this over the chilled crust until it reaches every corner.
- Whisk the pudding. Combine 2 pudding packs with 2 3/4 cups skim milk; whisk for 2 minutes until it starts to thicken.
- Layer the velvet. Pour the pudding over the cream layer and smooth it out.
- Finalize and chill. Top with remaining 2 cups of whipped topping and mini chips; refrigerate 4 hours until the dish is fully set.
| Layer | Desired Texture | Visual Cue |
|---|---|---|
| Cookie Base | Compressed/Solid | No loose crumbs when tilted |
| Cream Layer | Airy/Smooth | Holds a soft peak when swirled |
| Pudding Layer | Glossy/Firm | Jiggles slightly but doesn't run |
Fixing Common Layering Issues
We've all been there you go to serve a beautiful dessert and the bottom layer stays stuck to the pan, or the pudding is too runny to hold its shape. Most of the time, it's a temperature issue. If your kitchen is hot, your whipped topping will lose its air faster than a popped balloon.
Preventing A Rock Hard Crust
If you find the crust is too hard to cut through, it usually means the butter was too hot or you pressed it down with the force of a thousand suns. You want it firm, not concrete. If this happens, let the dish sit at room temperature for 10 minutes before slicing.
The butter will soften just enough to let the knife glide through.
Fixing A Runny Pudding Layer
If the pudding doesn't seem to be setting, you likely used too much milk or the milk wasn't cold enough. Instant pudding is finicky. You can try putting the whole dish in the freezer for 20 minutes to jump start the setting process.
Just don't forget it in there, or you'll end up with an Oreo ice cream cake (which isn't the worst mistake, honestly!).
| Problem | Root Cause | Solution |
|---|---|---|
| Lumpy Cream Layer | Cheese was too cold | Microwave cheese for 10 seconds and re whisk vigorously |
| Searing Sweetness | Missing the salt | Sprinkle a tiny bit of flaky salt over the top garnish |
| Bleeding Layers | Spreading too fast | Chill the dish for 10 minutes between every single layer |
Common Mistakes Checklist
- ✓ Never use "Cook and Serve" pudding; it won't set without heat and will ruin the crust.
- ✓ Avoid over mixing the whipped topping into the cheese; fold it gently to keep the air.
- ✓ Don't skip the sifting step for powdered sugar; those little white lumps are hard to get out later.
- ✓ Use a clean knife for every slice to keep the layers looking sharp and professional.
- ✓ Ensure the skim milk is ice cold; room temp milk leads to a soft, grainy pudding.
Creative Swaps And Substitutions
One of the reasons I love this heavenly oreo dessert recipe is how easily it adapts to what you have in the pantry. If you aren't a fan of skim milk, you can use whole milk, but you'll need to reduce the amount by about 2 tablespoons to keep the thickness consistent since whole milk has more fat solids.
For a completely different vibe, you can try a Nutella Smores Dessert recipe if you're in the mood for toasted marshmallows, but if you want to stay within the Oreo family, the variations are endless. I've seen people use Golden Oreos with lemon pudding for a "Heavenly Lemon" version that is absolutely refreshing in the spring.
| Original Ingredient | Substitute | Why It Works |
|---|---|---|
| Chocolate Pudding | White Chocolate Pudding | Creates a "Double White" look with a milder cocoa flavor. |
| Whipped Topping | Stabilized Whipped Cream | Note: Richer taste but less stable in warm temperatures. |
| Mini Choc Chips | Crushed Peppermint | Adds a seasonal crunch; perfect for the holidays. |
- Downsizing (1/2)
- Use an 8x8 inch square pan. The layers will be slightly thicker, so increase the final chill time by 30 minutes.
- Upsizing (2x)
- Honestly, don't try to double this in one pan. It becomes too heavy and the bottom crust will struggle to hold the weight. Use two separate 9x13 dishes instead.
- The "Protein" Pivot
- You can swap the pudding for a high protein version and use Greek yogurt in place of Neufchâtel, but the texture will be much denser and less "heavenly."
Preserving Freshness And Flavor
This dessert is actually better on day two. The cookies in the crust soften just a tiny bit, taking on a texture similar to a thin brownie, while the pudding and cream layers meld together. It's the ultimate make-ahead treat for busy weeks.
Storage Guidelines Keep this dish covered tightly with plastic wrap or a lid in the refrigerator. It will stay fresh and delicious for up to 4 days. After that, the whipped topping starts to "weep" (release water), which can make the crust soggy.
Freezing Instructions You can freeze this! It actually makes a fantastic frozen treat. Wrap the dish in a double layer of foil and freeze for up to 2 months. To serve, let it thaw in the fridge for about 2 hours so it's soft enough to slice but still holds that ice cream like chill.
Zero Waste Tip If you have leftover Oreo crumbs that didn't make it into the crust, don't throw them out! Store them in a jar and use them as a topping for morning oatmeal or stir them into a bowl of vanilla yogurt. Even the "dust" at the bottom of the cookie bag is pure gold.
Best Ways To Serve
When it comes time to plate this up, I like to go the extra mile. If I'm serving this at a family dinner, I'll pull it out of the fridge at the last possible second. The contrast between the cold cream and a hot cup of coffee is just perfection.
It reminds me of those long Sunday afternoons in Tennessee where dessert was the main event.
Choosing Your Toppings
While the mini chocolate chips are great, you can really make this your own. A drizzle of salted caramel right before serving takes it into "decadent" territory. If you want to keep it classic, just save 2 or 3 Oreos from the pack, crush them coarsely, and sprinkle them on top.
It gives people a hint of the "shatter" they are about to experience in the crust.
Slicing For Success
To get those clean, Instagram worthy squares, dip your knife in hot water and wipe it dry between every single cut. This melts the fats in the pudding and cheese just enough to let the blade slide through without dragging the layers.
It takes an extra minute, but the look on your guests' faces when they see those perfect stripes is well worth the effort.
Debunking Dessert Logic
One myth I hear all the time is that you have to bake the cookie crust to make it stay together. That's just not true! The high fat content in the Oreo filling acts as a secondary binder once it's chilled. Baking it can actually make the sugar in the cookies turn bitter.
Trust the cold; it's doing all the heavy lifting for you.
Another one is that "low-fat" ingredients ruin the set. We're using Neufchâtel and skim milk here specifically because they provide a cleaner flavor profile that lets the chocolate shine. You don't need the extra heavy cream to get a rich mouthfeel if you balance your ratios correctly.
It's all about the science of the set, not just the fat content.

Recipe FAQs
What is the absolute minimum chilling time required for this dessert to slice correctly?
No less than four hours. This duration allows the instant pudding starches to fully hydrate and create a stable structure that supports the cream layer.
How do I ensure the Neufchâtel cheese layer remains velvety and not lumpy?
Bring the cheese to full room temperature before mixing. Cold cheese will not emulsify smoothly with the powdered sugar, leading to small, stiff cheese pebbles in the cream.
Is it true that I can bake the Oreo crust instead of chilling it?
No, baking is unnecessary and potentially harmful to the flavor. The natural fat in the crushed Oreos binds the crust when chilled; baking can cause the sugar to caramelize too much and turn bitter.
How to prevent the layers from mixing when spreading the subsequent topping?
Chill the preceding layer firmly for 10 minutes. Use a sturdy offset spatula to spread the next component gently, moving from the center outwards without digging into the base layer.
Can I substitute instant pudding mix with the 'cook and serve' variety?
No, never use cook and-serve pudding. This no-bake recipe relies on the immediate gelling action of modified cornstarch found only in instant pudding mixes when combined with cold milk.
What is the best liquid to use if I run out of skim milk for the pudding?
Use ice-cold whole milk, but reduce the quantity slightly. Whole milk has higher fat solids, so measure about 2 tablespoons less than the recipe calls for to maintain the correct pudding viscosity.
What should I do if I need to slice this dessert cleanly after it has set for over 24 hours?
Dip your knife in hot water and wipe it dry between every cut. This brief application of heat melts the fats on the blade, allowing it to pass through the firm layers without dragging or sticking.
Heavenly Oreo Dessert Recipe
Ingredients:
Instructions:
Nutrition Facts:
| Calories | 335 kcal |
|---|---|
| Protein | 4.1 g |
| Fat | 14.9 g |
| Carbs | 40.2 g |
| Fiber | 1.1 g |
| Sugar | 27.8 g |
| Sodium | 422 mg |
