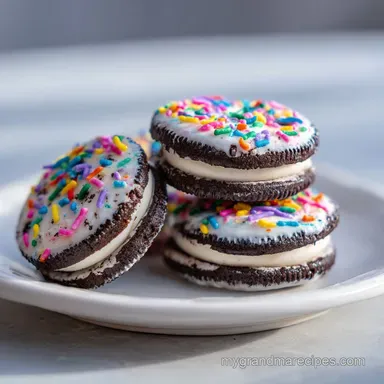
Oreo Balls: Creamy and Decadent Truffles

- Time: Active 20 minutes, Passive 60 minutes, Total 80 minutes
- Flavor/Texture Hook: A velvety, dark chocolate center encased in a thin, crisp chocolate shatter
- Perfect for: Holiday gift boxes, birthday parties, or low effort entertaining
- Creating the Easiest Oreo Balls Without Any Fancy Pastry Skills
- Technical Logic Behind the Three Ingredient Blend
- Essential Metrics for Perfectly Proportioned Chocolate Truffles
- Selecting Premium Elements for a Balanced Flavor Profile
- Necessary Kitchen Tools for Seamless Truffle Assembly
- Mastering the Progressive Phases of Truffle Execution
- Resolving Textural Inconsistencies for Professional Results
- Adapting Flavor Profiles for Festive Occasions and Diets
- Effective Methods for Long Term Storage and Freshness
- Polished Presentation Techniques for Entertaining and Gifting
- Recipe FAQs
- 📝 Recipe Card
Creating the Easiest Oreo Balls Without Any Fancy Pastry Skills
Forget the idea that you need a marble pastry slab or a professional degree to make a dessert that looks like it belongs in a boutique chocolate shop. There is a common myth that truffles require complex tempering or expensive tools, but the truth is that a food processor and your microwave are more than enough.
I remember the first time I brought a batch of these to a holiday party; I was convinced everyone would know I made them in my pajamas in under an hour, but the crowd was mesmerized by the "shatter" of the chocolate shell and the silky interior.
The magic happens when you realize that a cookie isn't just a snack it is a pre mixed bundle of flour, sugar, and fat that just needs a little help to become something more. By pulverizing the cookies into a fine sand, you're creating a base that can absorb the tang and creaminess of the cream cheese.
It’s a low stress, high reward project that works every single time as long as you respect the temperature of your ingredients.
You’re going to love how these feel in your mouth. That initial snap of the semi sweet chocolate gives way to a mahogany colored filling that is dense, rich, and just the right amount of sweet.
It's the kind of recipe that makes people ask for the secret ingredient, and you can just smile knowing it’s probably the easiest thing you’ve ever made.
Technical Logic Behind the Three Ingredient Blend
Fat Stabilization: The high fat content in the cream cheese acts as a binder, coating each individual cookie crumb to prevent them from becoming soggy or gritty. This creates that specific "melt in-your mouth" feel.
Moisture Migration: Allowing the dough to rest ensures the sugar in the cookies fully hydrates with the moisture from the cheese, resulting in a cohesive, smooth texture rather than a crumbly one.
Crystallization Control: Using melting wafers instead of standard chocolate chips ensures the coating sets firmly and stays shiny. Wafers are formulated with a specific ratio of fats that solidify quickly at room temperature without the need for tempering.
Cold Chain Management: Freezing the rolled spheres is not just for shape; it prevents the warm chocolate from melting the fats in the filling during the dipping process, which would otherwise cause the chocolate to clump and seize.
- If you want a crunchier texture: Pulse the cookies 5 times fewer to leave tiny pebble sized pieces.
- If you want a professional finish: Use a plastic fork with the middle tines snapped off for easier dipping.
- If you want a lighter flavor: Swap half of the semi sweet chocolate for white chocolate drizzle.
| Method | Time | Texture | Best For |
|---|---|---|---|
| Microwave | 2 minutes | Thin/Smooth | Quick batches and beginners |
| Stovetop (Bain Marie) | 10 minutes | Very Fluid | Large batches with constant heat |
| Oven (Residual Heat) | 15 minutes | Thick/Stable | Keeping chocolate warm while dipping |
While the oven is rarely the first choice for melting chocolate, placing a heat proof bowl in a low temp oven (around 175°F or 80°C) can keep the chocolate at a perfect dipping consistency for long periods.
However, for a single batch of these treats, the microwave is your best friend.
Essential Metrics for Perfectly Proportioned Chocolate Truffles
When we look at the components of this recipe, it’s all about the ratio of dry solids to fats. The cookie provides the structure, while the cream cheese provides the pliability.
| Component | Science Role | Pro Secret |
|---|---|---|
| Oreo Cookies | Structural Base | Pulse until no large white cream bits remain for a uniform dough. |
| Cream Cheese | Emulsifying Binder | Use the full fat brick version; the extra moisture in "light" versions makes the dough too sticky. |
| Melting Wafers | Protective Shell | Avoid overheating; chocolate scorched at 120°F (50°C) will become grainy and dull. |
The relationship between the sugar in the cookie and the lactic acid in the cheese creates a balanced flavor that isn't cloying. If you’re interested in how similar textures work in other desserts, checking out my Heavenly Oreo Dessert recipe might give you more insight into managing cookie to cream ratios.
Selecting Premium Elements for a Balanced Flavor Profile
To get the best results, you need to be picky about your starting materials. Not all cookies or cheeses are created equal when it comes to the chemistry of a truffle.
- 36 Original Oreo Cookies (14.3 oz package): These are the backbone. Why this? The ratio of chocolate wafer to cream filling is mathematically perfect for this dough.
- 8 oz brick cream cheese, softened to room temperature: Use the block, not the tub. Why this? Tub cheese is aerated and has more water, which ruins the structural integrity.
- 12 oz semi sweet chocolate melting wafers: Brands like Ghirardelli or Wilton work best. Why this? They contain more vegetable oil/cocoa butter for a smoother flow.
- 2 Oreo cookies, finely crushed (optional for garnish): For that classic look.
| Original Ingredient | Substitute | Why It Works |
|---|---|---|
| Original Oreos | Golden Oreos | Same structure but offers a vanilla/butterscotch flavor profile. |
| Cream Cheese | Mascarpone | Higher fat content (80% vs 33%) creates an even richer, silkier filling. |
| Semi sweet Wafers | Dark Chocolate (60%+) | Higher cocoa solids reduce sweetness and provide a more sophisticated "snap." |
Necessary Kitchen Tools for Seamless Truffle Assembly

You don't need much, but having the right tools makes the process go from a sticky mess to a streamlined operation. A good food processor is the real hero here because it ensures the cookies and cheese are fully emulsified.
If you try to do this by hand, you’ll end up with pockets of white cheese and dark crumbs that don't hold together as well.
A small cookie scoop (about 1 tablespoon capacity) is also a life saver. It keeps every single one of your 38 servings exactly the same size, which means they’ll all chill at the same rate and look uniform on a platter. Finally, parchment paper is non negotiable.
If you place dipped chocolate on a bare metal pan or a plate, it will stick, and you’ll end up breaking the bottom of your beautiful shell when you try to move them.
Mastering the Progressive Phases of Truffle Execution
Phase 1: Pulverizing the Base
- Place 36 cookies into a food processor. Note: Do not remove the cream filling; it’s essential for the flavor and moisture levels.
- Pulse the cookies until the mixture resembles fine, dark sand. Stop when no large chunks are visible.
Phase 2: Binding the Filling
- Add the 8 oz of softened cream cheese to the processor.
- Pulse again until a heavy, mahogany colored dough forms and pulls away from the sides of the bowl. It should hold its shape firmly when you squeeze a small amount in your hand.
Phase 3: The Cold Cure
- Line a large baking sheet with parchment paper to prevent sticking.
- Using your small scoop, portion the dough and roll it between your palms into 1 inch spheres.
- Place the balls on the parchment and freeze for 30 to 45 minutes until they are very firm to the touch.
Phase 4: The Chocolate Enrobing
- Place the 12 oz of melting wafers in a microwave safe bowl.
- Microwave in 30 second intervals, stirring between each, until the chocolate is smooth and glossy. Note: This usually takes 2 or 3 intervals.
- Using two forks, dip each chilled ball into the chocolate. Lift it out, tap the forks against the bowl to remove the excess, and slide it back onto the parchment paper.
Phase 5: The Finishing Touch
- Immediately sprinkle the 2 crushed garnish cookies over the wet chocolate before it sets.
- Let the coating sit at room temperature for 10 minutes until it is completely hard and matte.
Resolving Textural Inconsistencies for Professional Results
The most common frustration with this recipe is the "sweating" or cracking of the chocolate shell. This usually happens because of a temperature shock between the frozen center and the warm chocolate. If your balls are too cold, the chocolate sets too fast and can't expand, leading to hairline fractures.
Fixing Soft Filling Issues
If your dough is too sticky to roll even after pulsing, your cream cheese might have been too warm or contained too much moisture. You can fix this by adding more crushed cookies or simply chilling the entire bowl of dough for 20 minutes before you try to form the spheres.
Solving Chocolate Clumping Problems
If your chocolate starts to get thick and "sludgy" halfway through dipping, it’s likely because moisture got into the bowl or it has cooled down too much. A tiny drop of water can cause chocolate to seize instantly. Keep your workspace dry and pop the bowl back in the microwave for 10 seconds if it starts to resist your dipping. If you've ever dealt with seizing while making air-fried Oreos, you know that heat management is everything.
| Problem | Root Cause | Solution |
|---|---|---|
| Shell Cracking | Extreme temp difference | Let frozen balls sit at room temp for 5 mins before dipping. |
| Chocolate Pooling | Too much coating | Tap the fork 5-10 times against the bowl rim to drain excess. |
| Lumpy Filling | Cold cream cheese | Ensure cheese is soft enough to spread like butter before mixing. |
Common Mistakes Checklist:
- ✓ Pat the food processor bowl dry before starting (prevents seizing).
- ✓ Use a deep, narrow bowl for melting chocolate (makes dipping easier).
- ✓ Don't skip the freezer step; warm dough will fall apart in the chocolate.
- ✓ Use two forks to lift the truffles - it lets the extra chocolate drip through.
- ✓ Work in small batches; keep half the balls in the freezer while you dip the first half.
Adapting Flavor Profiles for Festive Occasions and Diets
One of the best things about this base is how easily it takes on new personalities. You can change the entire vibe of the dessert just by swapping the cookie variety or the coating color. For a holiday version, you could use Peppermint Oreos and top them with crushed candy canes.
Strategic Scaling Guidelines
- Cutting the batch in half: Use 18 cookies and 4 oz of cream cheese. You can still use the microwave for the chocolate, but reduce the melting time to 20 second intervals since there is less mass to heat.
- Doubling the batch: If you’re making 76 truffles, work in batches for the dipping. Keep half of the rolled balls in the freezer while you work on the first 38. This prevents the centers from getting too soft while you’re busy dipping. For the spices and salt, use only 1.5x the original amount to avoid overwhelming the palate.
Vegan Adaptations for dairy-free Guests
You can actually make these vegan fairly easily. Most Oreo cookies are "accidentally vegan," so you just need to swap the cream cheese for a plant based almond or cashew based brick cheese. For the coating, look for dairy-free dark chocolate wafers.
The texture will be slightly softer due to the different fat structures in vegan cheese, so an extra 10 minutes in the freezer is recommended.
Effective Methods for Long Term Storage and Freshness
Because these contain cream cheese, they cannot be left out on the counter for more than a few hours. The sugar in the cookies helps preserve the cheese to some extent, but safety first!
Fridge Storage: Keep them in an airtight container for up to 2 weeks. I recommend putting a piece of parchment paper between layers to prevent the chocolate shells from scuffing each other.
Freezer Storage: These freeze beautifully for up to 3 months. To serve from the freezer, let them thaw in the fridge for about 30 minutes. If you eat them straight from the freezer, the center will have a texture similar to fudge filled ice cream.
Zero Waste Tip: If you have leftover melted chocolate and cookie crumbs, stir them together and spread the mixture thin on parchment paper. Let it harden to create "Oreo Bark." You can break it into shards and use it as a garnish for ice cream or just snack on it while you clean up.
Polished Presentation Techniques for Entertaining and Gifting
When it comes to serving, these little truffles benefit from a bit of contrast. Since they are very dark and rich, placing them in white or gold mini cupcake liners instantly makes them look like a professional gift.
If you want to get fancy, you can use a contrasting chocolate drizzle think white chocolate over the dark shell to give them more visual depth.
Strategic Arrangement for Parties
Avoid stacking them in a high pyramid unless the room is very cool. The weight of the top truffles can sometimes crack the shells of the bottom ones if they sit too long. A flat, marble or ceramic platter is best because it stays cool and provides a clean background for the mahogany colored treats.
Strategic Garnish Timing
The garnish is your visual cue for the flavor inside. If you’ve made a variation using peanut butter cookies, a tiny drizzle of melted peanut butter or a single chopped nut on top tells the guest exactly what to expect.
Always apply the garnish while the chocolate is still "wet" (within 30 seconds of dipping) so it becomes part of the shell rather than just sitting on top and falling off later.
Final Numerical Checkpoints
- Consistency Check: Each ball should weigh approximately 15-18 grams before dipping.
- Temperature Check: The chocolate should feel warm but not hot to the touch (around 90°F or 32°C).
- Yield Check: You should get exactly 38 1 inch balls from one standard package and one block of cheese.

Recipe FAQs
What do you need for Oreo balls?
You only need four ingredients: 36 Original Oreo cookies, an 8-ounce brick of softened cream cheese, 12 ounces of semi sweet chocolate melting wafers, and optional crushed cookies for a garnish.
Why are my Oreo balls so greasy?
This usually happens if the cream cheese was too warm or over processed. If the fats separate, the dough becomes oily; ensure your cream cheese is just soft enough to blend without turning into a liquid state.
What chocolate is best for Oreo balls?
high-quality semi sweet melting wafers are the gold standard. These are specifically formulated to melt into a smooth, thin consistency that provides a clean crisp shell without needing extra additives.
How long in advance can I make Oreo balls?
Prepare the dough centers up to 48 hours before dipping. Keep them chilled in the refrigerator or freezer until you are ready to coat them in the melted chocolate.
How to ensure a smooth chocolate coating?
Melt your wafers in 30-second intervals, stirring thoroughly between each burst to maintain an even temperature. Using two forks to dip the chilled balls allows the excess chocolate to drip off quickly before you set them back on the parchment paper.
Is it true I must freeze the dough balls before dipping?
Yes, this is essential for structural integrity. Freezing them for 30 to 45 minutes firms up the fats, preventing the balls from falling apart or melting when they hit the warm chocolate coating.
How to tell if the cookie mixture is ready?
Stop blending once the dough forms a heavy, mahogany colored mass that holds its shape when squeezed. If you can roll it into a 1 inch sphere without it sticking excessively to your hands, it has reached the perfect consistency.
Easy No Bake Oreo Balls
Ingredients:
Instructions:
Nutrition Facts:
| Calories | 114 kcal |
|---|---|
| Protein | 1.2 g |
| Fat | 6.7 g |
| Carbs | 13.2 g |
| Fiber | 0.7 g |
| Sugar | 10.4 g |
| Sodium | 68 mg |
