Creme Brulee: Creamy and Caramelized
- Time: Active 15 minutes, Passive 45 minutes, Total 1 hours
- Flavor/Texture Hook: Rich vanilla bean custard with a satisfying sugar shatter
- Perfect for: Impressing dinner guests or a focused weekend baking project
- Achieving a Silky Smooth Homemade Creme Brulee
- Time Metrics for Custard Success
- Selecting Your Custard Base Components
- Required Equipment for Modern Kitchens
- Detailed Preparation and Baking Steps
- Fixing Common Texture and Finish
- Creative Flavor Swaps and Variations
- Myths Regarding the Custard Process
- Storage Tips and Using Whites
- Elegant Pairings for Your Dessert
- Recipe FAQs
- 📝 Recipe Card
Achieving a Silky Smooth Homemade Creme Brulee
The first time I heard that distinctive "clink crack" of a spoon hitting a caramelized sugar topping, I was sitting in a tiny bistro, convinced that such a thing was impossible to recreate at home. It seemed like a magic trick reserved for chefs with fancy degrees and expensive equipment.
I used to think the custard would surely turn into scrambled eggs or that I’d end up setting my kitchen on fire with a torch. But here is the secret I’ve learned: it is actually one of the simplest desserts you can make because it relies on just a few basic ingredients and a bit of patience.
When you pull that first ramekin out of the oven, the edges are set but the middle still has a playful jiggle, like a little wave in a pool. The aroma of warm cream and vanilla fills the kitchen, and it’s a moment of pure accomplishment.
You don't need a professional kitchen to get that perfectly flat, amber colored crust that shatters like a thin sheet of ice under your spoon. It’s all about the gentle heat and the way those egg yolks transform when they meet the heavy cream.
We are going to focus on making this less intimidating by breaking down the steps into manageable chunks. If you’ve ever been nervous about tempering eggs or using a water bath, don't worry.
I’ve made all the mistakes, from boiling the cream too hard to forgetting the water in the pan, so you don’t have to. Let's get into why this method works so well and how you can get that velvety texture every single time.
Time Metrics for Custard Success
Understanding the "why" behind the technique helps you feel more confident as you move through the recipe. Cooking is really just a series of physical changes, and with custard, we are managing how proteins react to heat.
- Low Temperature Coagulation: Egg proteins start to bond and thicken at low temperatures. By keeping the oven at 300°F (150°C), we ensure the proteins mesh together slowly into a smooth grid rather than clumping into rubbery bits.
- Evaporation Control: The water bath (bain marie) acts as a thermal buffer. Since water cannot exceed 212°F (100°C) at sea level, it prevents the ramekin walls from getting hot enough to overcook the outer edges of the custard before the center is ready.
- Sugar Hygroscopy: Using superfine sugar for the topping is a choice based on how quickly it melts. Smaller crystals have more surface area relative to their volume, allowing them to liquefy and caramelize before the heat from the torch can penetrate and melt the cold custard underneath.
| Method | Time | Texture | Best For |
|---|---|---|---|
| Standard Oven | 45 minutes | Velvety and uniform | Traditional results |
| Toaster Oven | 35 minutes | Slightly firmer edges | Small batches for two |
| Sous Vide | 60 minutes | Perfectly consistent | High precision cooks |
When choosing your method, consider how many you are serving. The standard oven is most reliable for a batch of four, providing enough space for the water bath to circulate heat evenly. If you are looking for a different kind of sweet treat that uses a layering technique, you might enjoy reading about this Strawberry Layer Cake recipe which also focuses on building delicate textures.
Selecting Your Custard Base Components
The beauty of this dish lies in the simplicity of the components. Because there are so few, the quality of each really stands out in the final bite.
| Component | Science Role | Pro Secret |
|---|---|---|
| Heavy Cream | Provides the fat structure for a silky mouthfeel | Use a cream with at least 36% milkfat for maximum stability |
| Egg Yolks | Act as the primary thickening agent via protein bonding | Ensure yolks are room temperature to prevent the cream from cooling too fast |
| Granulated Sugar | Sweetens and interferes with egg protein bonding to keep it soft | Whisk with yolks immediately to prevent "burning" the yolks with sugar |
| Vanilla Extract | Adds aromatic depth and complexity | Use a high-quality extract or real bean paste for those beautiful black specks |
The Importance of Fat Content
Using heavy cream is non negotiable for the classic texture. If you try to use lower fat milk, the custard won't have enough structure to hold itself up, and you'll end up with something more like a thin pudding. The fat coats the tongue and balances the sweetness of the burnt sugar topping.
The Power of Room Temperature Eggs
When you use eggs straight from the fridge, they can shock the warm cream during the tempering process. Taking them out 30 minutes before you start ensures a much smoother emulsion. It's a small step, but it makes a massive difference in how the liquid incorporates.
Required Equipment for Modern Kitchens
You don't need a garage full of gadgets, but a few specific tools make the process much smoother.
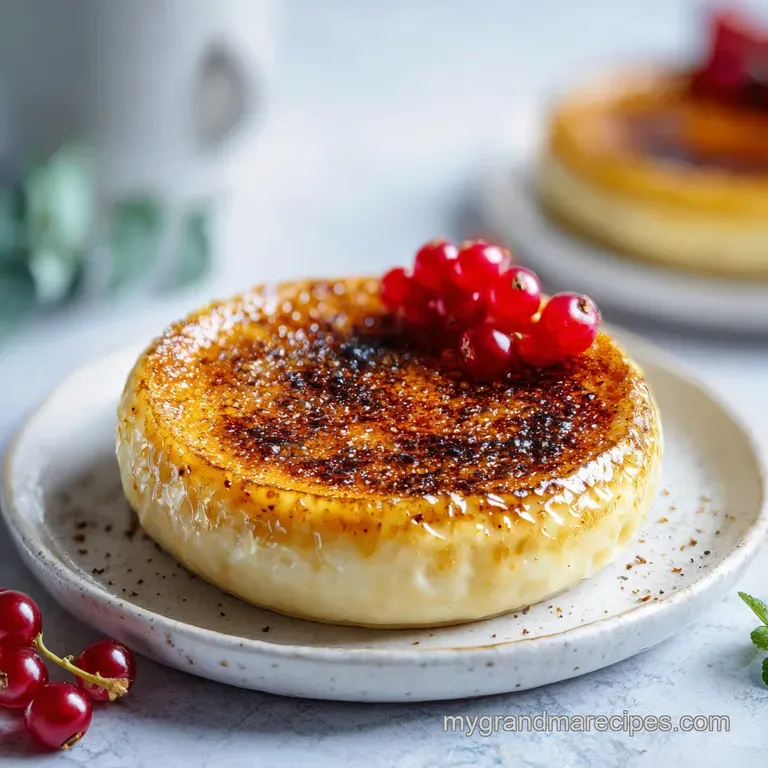
- Four 6 ounce Ramekins: Shallow ramekins are better than deep ones because they provide more surface area for that delicious sugar crust.
- Deep Baking Pan: This needs to be deep enough to hold water that reaches halfway up the sides of your ramekins. A 9x13 inch cake pan usually works perfectly.
- Fine Mesh Sieve: This is the secret to a professional finish. It catches any tiny bits of cooked egg or bubbles that would ruin the "velvety" texture.
- Kitchen Torch: While you can use a broiler, a torch gives you much more control. You can find small, affordable ones at most kitchen supply stores.
- Small Saucepan: For heating the cream. A heavy bottomed one is best to prevent scorching.
Chef's Tip: If you don't have a kitchen torch, you can use the oven's broiler, but you must watch it like a hawk. Place the ramekins on the very top rack and rotate them every 30 seconds to ensure the sugar browns evenly without melting the custard below.
Detailed Preparation and Baking Steps
- Heat the base. Preheat your oven to 300°F (150°C). Pour 2 cups (480ml) heavy cream and 1/8 tsp salt into a saucepan. Heat over medium until it reaches a gentle simmer. Stop before it boils to keep the fat from separating.
- Prep the yolks. In a medium bowl, whisk 5 large egg yolks and 1/2 cup (100g) granulated sugar. Whisk until the mixture is pale and thick, which usually takes about 2 minutes of vigorous work.
- Temper the eggs. Slowly drizzle the hot cream into the yolk mixture in a very thin stream. Whisk constantly during this step. Note: This slowly raises the temperature of the eggs so they don't scramble.
- Add flavor and strain. Whisk in 1 tsp vanilla extract. Pour the entire mixture through a fine mesh sieve into a clean pitcher. This removes bubbles and any rogue egg bits.
- Set up the bath. Place your four ramekins in the deep baking pan. Divide the custard liquid evenly among them.
- Add the water. Place the pan on the oven rack. Carefully pour boiling water into the pan until it reaches halfway up the sides of the ramekins. Be careful not to splash any water into the custard.
- Bake the custard. Bake for 35 to 45 minutes. You are looking for the edges to be set while the center still jiggles slightly when the pan is nudged.
- Chill thoroughly. Remove the ramekins from the water bath and let them cool to room temperature. Cover and refrigerate for at least 4 hours, or overnight.
- Prepare the topping. Just before serving, sprinkle 1 tbsp superfine sugar evenly over each custard. Shake the ramekin gently to level the sugar.
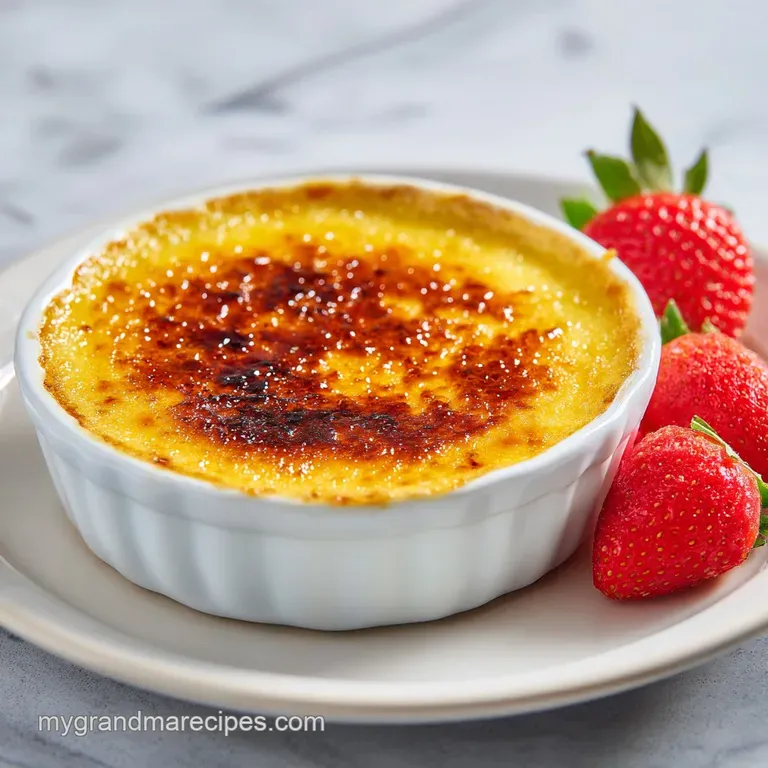
- Torch the top. Use your kitchen torch to caramelize the sugar. Move the flame in small circles until the sugar melts and turns dark amber. Let it sit for 2 minutes to harden into a brittle crust before serving.
| Original Ingredient | Substitute | Why It Works |
|---|---|---|
| Heavy Cream (2 cups) | Half and Half | Creates a lighter, less dense custard. Note: Result will be softer. |
| Superfine Sugar | Granulated Sugar | Can be used for topping if pulsed in a blender for 5 seconds to refine. |
| Vanilla Extract | Vanilla Bean | Adds intense flavor and visible specks. Use 1/2 bean scraped into cream. |
While we are talking about substitutions, if you find yourself wanting to try another savory sweet balance, these Sweet Potato Stacks recipe are a great way to use similar baking techniques with a completely different flavor profile.
Fixing Common Texture and Finish
Even with the best intentions, things can go a bit sideways in the kitchen. The most common issues usually involve the texture of the custard or the quality of the sugar crust.
Why Your Custard Is Still Liquid
If you pull your ramekins out and they are completely liquid after 45 minutes, the oven temperature might be running low, or the water in your bath wasn't hot enough to start. It needs that consistent ambient heat to set the proteins.
Check your oven with a thermometer to ensure it's truly hitting 150°C.
Tiny Bubbles on the Surface
Those pesky little bubbles usually come from whisking too vigorously at the end or skipping the straining step. If you see bubbles before baking, you can lightly run the flame of your torch over the surface of the raw custard to pop them. This ensures a glass smooth finish once the sugar is applied.
The Sugar Won't Caramelize
This usually happens if the sugar layer is too thick or if you are using a sugar with too much moisture. If the sugar is just melting into a syrup instead of browning, try using less sugar per ramekin. A thin, even layer is much easier to torch than a thick pile.
| Problem | Root Cause | Solution |
|---|---|---|
| Grainy texture | Eggs curdled from heat | Strain through a finer sieve and temper more slowly next time. |
| Weeping sugar | Topping was torched too early | Only torch the sugar right before you plan to eat the dessert. |
| Rubbery custard | Overbaked in the oven | Remove from oven when the center still has a noticeable "jiggle." |
Common Mistakes Checklist
- ✓ Pat the top of the chilled custard dry with a paper towel before adding sugar (removes moisture).
- ✓ Ensure the water bath water is already boiling when you pour it into the pan.
- ✓ Don't skip the straining step; it is the difference between "good" and "pro" results.
- ✓ Let the custard cool completely at room temperature before putting it in the fridge.
- ✓ Use room temperature egg yolks to prevent "shocking" the mixture during tempering.
Creative Flavor Swaps and Variations
Once you have the classic version down, it's fun to play with the flavor profile. The base of cream and eggs is like a blank canvas.
Espresso Infusion
For a sophisticated twist, add 1 tablespoon of instant espresso powder or two crushed coffee beans to the cream while it heats. Strain the beans out before tempering the eggs. It gives a deep, roasted flavor that pairs beautifully with the burnt sugar.
Easy Creme Brulee with Milk
If you want a slightly lighter version, you can replace 1/2 cup of the heavy cream with whole milk. It won't be as "unctuous," but it still carries the vanilla flavor well. Be aware that the baking time might decrease by 5 minutes since there is less fat to stabilize.
Scaling the Recipe
- Down (2 servings): Use 2-3 yolks and 1 cup of cream. Use a smaller baking dish so the water bath level stays correct.
- Up (8 servings): Double all ingredients exactly. You may need to use two separate baking pans to ensure the ramekins aren't touching, which would prevent even heat circulation.
- Baking Large Batches: If doubling, ensure your oven has enough airflow. You might need to rotate the pans halfway through the 45 minute bake.
Myths Regarding the Custard Process
There are a few "rules" floating around the internet that aren't actually true. Let's clear those up so you can cook with more freedom.
Myth 1: You must use a vanilla bean for it to be authentic. While vanilla beans provide a lovely look and intense flavor, a high-quality vanilla extract or paste works perfectly well. Most people cannot tell the difference in a blind taste test once the sugar is caramelized.
Myth 2: The water bath is optional if you lower the heat. Even at very low temperatures, the direct dry heat of an oven can cause the edges of the custard to overcook and become rubbery before the center sets. The water bath provides steam and consistent temperature that dry air simply cannot match.
Myth 3: You can't make this without a torch. As mentioned earlier, the broiler works! It’s just more stressful. The key is to get the oven as hot as possible and keep the custards very close to the heating element for a very short amount of time.
Storage Tips and Using Whites
Because this is a dairy and egg based dish, proper storage is key for safety and flavor.
Storage: Keep the baked (but not torched) custards in the fridge for up to 3 days. Cover them tightly with plastic wrap to prevent them from absorbing any fridge odors.
Do not torch the sugar until you are ready to serve, as the sugar will absorb moisture from the custard and turn into a sticky syrup within an hour.
Freezing: Surprisingly, you can freeze the baked custard. Wrap them very securely in foil and plastic. Thaw them in the fridge for 24 hours before torching. The texture might be slightly less silky, but it’s still very good.
Zero Waste Tip: You will have 5 egg whites left over from this recipe. Don't throw them away! You can use them to make a healthy omelet, or if you're feeling ambitious, a batch of meringues or a pavlova.
They stay fresh in a sealed container in the fridge for up to 4 days or can be frozen for up to 2 months.
Elegant Pairings for Your Dessert
Since this is such a rich, heavy dessert, it often benefits from something bright or acidic to balance the palate.
- Fresh Berries: A handful of raspberries or tart blackberries on the side cuts through the richness of the cream.
- Shortbread Cookies: The buttery crunch of a simple cookie provides a nice texture contrast to the soft custard.
- Dessert Wine: A chilled glass of Sauternes or a Late Harvest Riesling complements the caramel notes of the topping beautifully.
- Strong Coffee: A dark roast or a shot of espresso is the classic way to end a meal featuring a rich custard.
Enjoy the process of making this. It’s one of those recipes that makes you feel like a real chef once you hear that first crack of the sugar. It’s simple, elegant, and honestly, much better when made at home where you can ensure the custard is perfectly chilled and the topping is freshly shattered.

Recipe FAQs
What is the secret to crème brûlée?
Patience and precision are the secrets. Straining your custard through a fine mesh sieve is the vital step that distinguishes home results from professional quality by removing bubbles and solids.
How to make super easy crème brûlée?
Whisk the egg yolks and granulated sugar until pale before slowly tempering them with hot cream. Following this sequence prevents the eggs from scrambling and ensures a smooth, silky texture every time.
How to basic crème brûlée?
Preheat your oven to 300°F (150°C) and prepare a water bath. Bake your ramekins in a deep pan filled halfway with boiling water for 35 45 minutes until the centers exhibit a slight, consistent jiggle.
How difficult is it to make crème brûlée?
It is straightforward if you manage the temperature transitions carefully. Most difficulty stems from rushing the tempering process, so drizzle the hot cream slowly while whisking constantly to keep the mixture stable.
Is it true I must torch the sugar immediately after baking the custard?
No, this is a common misconception. You must chill the custard for at least 4 hours first; if you torch while the custard is warm, the heat will ruin the set of your dessert.
How to fix a weeping or sticky sugar crust?
Pat the top of the chilled custard completely dry with a paper towel before sprinkling your superfine sugar. Excess moisture on the surface is the primary cause of sugar failing to form a crisp, brittle shell.
How long can I store prepared crème brûlée?
Keep the baked, un-torched custards in the refrigerator for up to 3 days. Cover them tightly with plastic wrap to prevent them from absorbing refrigerator odors, and only apply the sugar crust right before serving.
Classic Homemade Creme Brulee

Ingredients:
Instructions:
Nutrition Facts:
| Calories | 618 kcal |
|---|---|
| Protein | 7 g |
| Fat | 48 g |
| Carbs | 41 g |
| Fiber | 0 g |
| Sugar | 38 g |
| Sodium | 119 mg |
