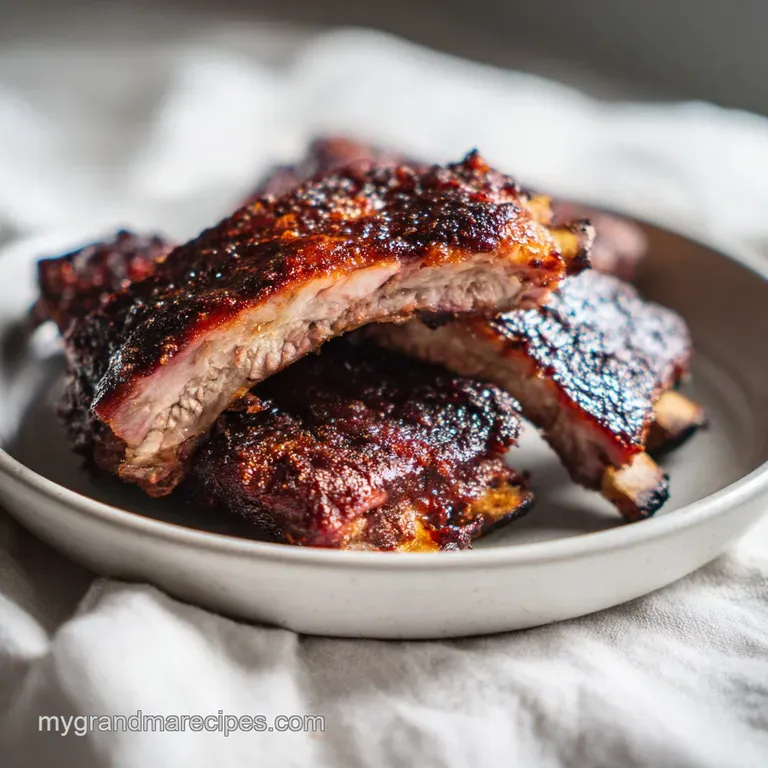
Smoked Ribs: Traditional Slow-Cooked Pork
- Time: Active 20 minutes, Passive 6 hours, Total 6 hours 20 minutes
- Flavor/Texture Hook: Shatteringly crisp mahogany bark with a velvety, melt in-your mouth interior
- Perfect for: Sunday dinner gatherings and traditional backyard celebrations
- The Magic of Smoked Ribs
- The Tradition Behind the Smoke
- Essential Components for Success
- Tools for the Pitmaster
- Step-By-Step Smoking Guide
- Backyard Pitmaster Success Strategies
- Regional Flavor Adjustments
- Storage and Zero Waste
- Plating Like a Pro
- Myths About Smoking
- Critical Sodium Alert!
- Recipe FAQs
- 📝 Recipe Card
The Magic of Smoked Ribs
Forget everything you have ever heard about boiling your ribs before they hit the grill. There is a persistent myth that pre boiling or par boiling "speeds things up" or "tenderizes" the meat. In reality, you are just washing away the flavor and turning the texture into something resembling wet cardboard.
My grandmother would have chased me out of her Louisiana kitchen with a wooden spoon if I even suggested such a thing. In our house, smoking was a sacred Sunday ritual. We didn't take shortcuts because the time spent over the smoke was where the soul entered the food.
You want a rib that has a gentle tug, not one that falls off the bone like mush.
The air in the backyard used to get heavy with the scent of cherry wood and spice rub long before we ever sat down to eat. I remember the specific "tink tink" sound of the smoker lid closing and the way the humidity would make the smoke hang low over the grass.
This recipe isn't just about food; it's about that specific feeling of waiting for something truly worth having. We are looking for that contrast between the savory, salt crusted exterior and the rich, sweet fat that has rendered down into liquid gold.
It's about the bark that shatters when you bite, revealing the pink smoke ring hidden just beneath the surface.
We are going to use the classic "3-2-1" foundation but with a few tweaks that I've learned from years of tending the fire. We will skip the generic salt and pepper approach and build a rub that honors our roots, using dark brown sugar and smoked paprika to create a crust that looks like polished mahogany.
You don't need fancy equipment or a chemistry degree, just a little patience and a respect for the wood. We’re aiming for a result that makes everyone at the table go quiet after the first bite.
The Tradition Behind the Smoke
The beauty of this method lies in the slow transformation of the connective tissue. When you keep the temperature at a steady 225°F, you aren't just cooking meat; you are performing a slow motion magic trick.
- The Collagen Conversion Process: At low temperatures, the tough collagen in the ribs slowly melts into gelatin, which is what gives the meat that velvety, succulent feel that leaner cuts lack.
- Bark Formation Mechanism: The combination of the rub's sugar and the smoke creates a "bark." This isn't just a crust; it’s a complex layer where the spices dehydrate and bond with the proteins on the surface.
- Smoke Ring Creation: The pink ring you see isn't undercooked meat. It's a reaction between the nitrogen dioxide in the wood smoke and the myoglobin in the pork, a visual badge of honor for any pitmaster.
- Moisture Retention Strategy: By wrapping the ribs in the middle of the cook, we create a small steam chamber. This softens the bark just enough to make it bite through tender without losing the structure of the rack.
| Thickness | Internal Temp | Rest Time | Visual Cue |
|---|---|---|---|
| 1.5 inches | 165°F (Wrap) | N/A | Bark is set and doesn't rub off |
| 1.5 inches | 195-203°F | 15 minutes | Meat pulls back 1/4 inch from bone |
| 2 inches | 195-203°F | 20 minutes | The "bend test" shows cracks in bark |
Success with this dish is all about these small visual cues. If you've ever worked with a Prime Rib recipe, you know that internal temperature is king, but with ribs, the way the meat moves is just as important as what the thermometer says. The fat should feel like it has completely softened, offering no resistance when you press it.
Essential Components for Success
Selecting the right ingredients is the difference between a mediocre cookout and a legendary one. We use yellow mustard as a binder, not for the flavor which actually disappears during the long cook but because the vinegar helps the rub adhere and slightly tenderizes the surface.
| Component | Role | Pro Secret |
|---|---|---|
| Dark Brown Sugar | Carmelization | Use dark sugar for the extra molasses, which creates a deeper, darker bark than light sugar. |
| Smoked Paprika | Color & Depth | This provides the "red" hue that makes the ribs look professional before the smoke even hits them. |
| Yellow Mustard | Surface Binder | Apply a very thin layer. It acts as a "glue" for the spices without altering the final pork flavor. |
| Apple Juice | Humidity | Spritzing adds a thin layer of sugar and moisture that prevents the edges from becoming too brittle. |
Every spice in the rub serves a specific purpose. The coarse black pepper provides a sharp contrast to the sweetness of the sugar, while the cayenne adds a back end warmth that lingers without being overwhelming. If you find yourself in a rush and want that beefy flavor without the 6 hour commitment, you might prefer a pan seared ribeye instead, but for those of us who live for the smoke, there is no substitute for this process.
Selecting the Pork
Start with two racks of St. Louis style pork ribs, approximately 5.5 lbs in total. This cut is more uniform than baby back ribs, which means they cook more evenly. Look for racks that have good "marbling" those small white streaks of fat within the muscle because that is where the moisture comes from during a six hour cook.
Crafting the Dry Rub
- 1/4 cup dark brown sugar, packed
- 2 tbsp smoked paprika
- 1 tbsp kosher salt
- 1 tbsp coarse ground black pepper
- 1 tsp garlic powder
- 1 tsp onion powder
- 1/2 tsp cayenne pepper
- Why this? The sugar carmelizes while the salt penetrates the meat for deep seasoning.
The Liquid Components
- 2 tbsp yellow mustard (to bind the rub)
- 1/2 cup apple juice
- 1/4 cup apple cider vinegar (for the spritz)
- 1 cup BBQ sauce (for the final glaze)
- 2 tbsp unsalted butter (for the foil wrap)
Tools for the Pitmaster
You don't need a thousand dollar setup, but a few specific tools make the job much easier. I always use a spray bottle for my spritz because it gives a much finer mist than a brush, ensuring I don't wash away my precious rub.
- Pellet Grill or Offset Smoker: Whether it's a Traeger or a Pit Boss, you need something that can hold a steady 225°F.
- Heavy Duty Aluminum Foil: Don't use the thin stuff; it will tear when you try to wrap the bones, and you'll lose all the moisture.
- Instant Read Thermometer: Crucial for checking that 165°F wrap point and the final 200°F finish.
- Spray Bottle: For the apple juice and vinegar mixture.
- Paper Towels: Essential for gripping that slippery silverskin membrane on the back of the ribs.
Chef's Tip: If you find the silverskin membrane is being stubborn, use a butter knife to get it started at one end, then grab it with a dry paper towel. It should peel off in one satisfying piece.
step-by-step Smoking Guide
- Remove the silverskin membrane from the bone side of the ribs using a paper towel for grip. Pat the meat dry on all sides. Note: Removing this allows the rub and smoke to actually reach the meat on the bottom.
- Apply a thin layer of yellow mustard to both sides of the racks to act as a binder.
- In a small bowl, combine brown sugar, smoked paprika, salt, pepper, garlic powder, onion powder, and cayenne. Generously coat the ribs with the rub and allow them to rest at room temperature for 30 minutes. Wait until the rub looks "wet" or absorbed before moving to the smoker.
- Preheat your smoker to a steady 225°F (107°C) using fruitwood pellets or chunks like apple or cherry.
- Place the ribs bone side down on the smoker grates. Close the lid and smoke for approximately 3 hours.
- Mix the apple juice and apple cider vinegar in a spray bottle. Every 45-60 minutes, lightly spritz the ribs until the surface looks glistening but not dripping.
- Once the bark is set and the internal temperature reaches approximately 165°F, wrap the ribs in heavy duty aluminum foil with pats of unsalted butter. Return to the smoker for 2 hours. Note: This is the "Texas Crutch" method that ensures tenderness.
- Unwrap the ribs, brush with BBQ sauce, and place back on the grates for 30-60 minutes until the sauce is tacky and bubbling.
- Perform the "bend test": lift the rack from one end with tongs. The rack should bend significantly and the bark should start to crack in the center.
- Remove from the heat and let the meat rest for 15 minutes before slicing between the bones.
Backyard Pitmaster Success Strategies

Even the most seasoned cooks run into trouble sometimes. The biggest issue usually comes down to the "stall" that period where the temperature of the meat just stops rising. Don't panic; it's just moisture evaporating from the surface, cooling the meat down. That's why we wrap.
The Problem of Dry Edges
If the ends of your ribs feel crunchy or hard, your smoker might have a hot spot. I've made the mistake of leaving the ribs too close to the firebox. To fix this, rotate the racks every hour so the same side isn't always facing the heat source.
Managing the Bark Texture
If your bark is too soft, you might be wrapping too early or using too much liquid in the foil. The bark should be firm to the touch before you even think about the foil. If you touch it and the rub comes off on your finger, it isn't ready.
| Problem | Root Cause | Solution |
|---|---|---|
| Mushy meat | Wrapped for too long | Reduce foil time by 30 mins next time; check at 90 mins. |
| Grey/Pale color | Not enough smoke or sugar | Use more paprika in the rub and ensure the wood is smoldering. |
| Tough/Chewy | Didn't reach 195°F | Keep them on the heat. Connective tissue needs time to break down. |
Common Mistakes Checklist
- ✓ Never skip the membrane removal; it blocks flavor and stays chewy.
- ✓ Don't peek! Every time you open the lid, you lose 15-20 minutes of cooking heat.
- ✓ Keep the water pan full if your smoker has one; humidity helps the smoke stick.
- ✓ Use fruitwoods (apple/cherry) for pork; heavy woods like mesquite can be too bitter.
- ✓ Let the ribs rest. Slicing immediately causes the juices to run out, leaving the meat dry.
Regional Flavor Adjustments
While this recipe is rooted in my family's Southern traditions, there are many ways to tweak the flavor profile to match your favorite style. The base method remains the same, but the "finish" can change everything.
Tangy Vinegar Variation
If you prefer a North Carolina style, swap the heavy BBQ sauce glaze for a thin mixture of apple cider vinegar, red pepper flakes, and a touch of salt. Brush this on during the final 30 minutes. It cuts through the rich fat of the pork brilliantly.
Low Carb Alternatives
For a sugar-free version, replace the brown sugar with a monk fruit or erythritol based brown sugar substitute. Note: These substitutes won't carmelize quite as deeply as real sugar, so your bark might be a shade lighter.
Scaling for a Crowd
- For 12 people (4 racks): Keep the rub and liquid ratios the same. You may need to increase the total cook time by about 30-45 minutes as the cold meat will drop the smoker's temperature initially.
- For 3 people (1 rack): Cut the rub ingredients in half. You can reduce the apple juice spritz, but keep the cooking times the same. Ribs cook based on the thickness of the individual rack, not the total weight in the smoker.
Storage and Zero Waste
Leftover ribs are a gift. Don't let them go to waste by reheating them in the microwave, which turns the meat rubbery and ruins the bark we worked so hard to build.
- Fridge: Store in an airtight container for up to 4 days.
- Freezer: Wrap individual portions in plastic wrap and then foil. They will stay good for up to 3 months.
- Reheating: Wrap the leftovers in foil with a splash of apple juice. Heat in a 300°F (150°C) oven until warmed through. This mimics the "wrap" phase of the cook and restores the moisture.
- Zero Waste: If you have leftover meat, pull it off the bone and use it for "BBQ Breakfast Tacos" or stir it into a pot of beans. The bones themselves can be simmered with collard greens or cabbage to add a deep, smoky undertone to the pot.
Plating Like a Pro
The way you present the ribs says a lot about the care you put into the cook. I like to serve mine on a large wooden board to keep that rustic, Sunday dinner feel.
Slicing with Precision
Use a sharp chef’s knife or a slicing knife. Turn the rack bone side up so you can see exactly where the bones are. Slice in one smooth motion between the bones. If you saw back and forth, you'll tear the tender meat away from the bark.
Pro Presentation Ideas
Create a "fan" effect by overlapping the ribs slightly on the platter. Garnish with a few fresh pickled jalapeños or a side of sliced white bread and pickles the traditional Texas way. The contrast between the dark mahogany meat and the bright green pickles is a visual cue that a feast is about to begin.
| Method | Time | Texture | Best For |
|---|---|---|---|
| Smoker | 6 hours | Deep bark, smoky | Traditional results |
| Oven | 4 hours | Soft, tender | Rainy days/No smoker |
| Stovetop | N/A | Tough, uneven | Do not attempt |
The oven method is a valid backup if the weather turns. You won't get the smoke ring or the specific wood flavor, but by using the same rub and the foil wrap technique at 225°F in your oven, you can still achieve a very respectable result.
Just add a drop of liquid smoke to your spritz if you really miss the woodfire taste. But really, nothing beats the smell of that cherry wood drifting through the neighborhood on a Sunday afternoon. It's the scent of home.
Myths About Smoking
There are a few "old wives' tales" in the BBQ world that just won't die. Let's clear the air so you can focus on what actually matters.
Searing meat before smoking "seals in the juices." This is a total myth. Moisture loss happens regardless of whether the surface is seared. In fact, a raw surface absorbs smoke much better than a seared one. The "seal" is an illusion; the bark is what we want, and that happens slowly.
The "Smoke Ring" determines the flavor. While we all love to see that beautiful pink ring, it actually has no flavor of its own. It's purely a chemical reaction between the smoke and the meat's protein.
You can have a rib with no smoke ring that tastes incredible, and a rib with a deep ring that tastes like lighter fluid. Focus on the bark and the tenderness first.
Soaking wood chips makes more smoke. Soaking your wood actually just creates steam until the water evaporates. It lowers the temperature of your fire and can lead to "dirty" white smoke, which tastes bitter. Use dry, seasoned wood for a clean, blue smoke that provides a delicate flavor.

Critical Sodium Alert!
1280 mg 1280 mg (56% 56%)
To maintain heart health, aim for less than 2,300mg of sodium per day, as recommended by the American Heart Association.
Personalized Tips to Slash Sodium in Your Ribs
-
Halve the Kosher Salt-25%
Reduce the 1 tbsp kosher salt to 0.5 tbsp. Kosher salt is a primary sodium source in this recipe. This is a significant sodium saver.
-
Opt for Low-Sodium Brown Sugar-5%
While brown sugar itself is low in sodium, some commercial versions can have added salt. Look for unsalted or low-sodium dark brown sugar if available, though this is a minor reduction.
-
Boost Natural Flavors
Increase the use of garlic powder and onion powder, and add other dried herbs like oregano or thyme to compensate for reduced salt. These add flavor without sodium.
-
Choose Low-Sodium Apple Juice & Vinegar-3%
Ensure you are using unsalted apple juice and check your apple cider vinegar for any added sodium. Most vinegars are low in sodium, but it's good practice to verify.
-
Use Unsalted Butter-2%
Confirm you are using unsalted butter. Salted butter contributes a small but unnecessary amount of sodium to the recipe.
Recipe FAQs
What is the 3 2 1 rule for smoking ribs?
This is a timing technique where you smoke for 3 hours, wrap for 2 hours, and finish unwrapped for 1 hour. It ensures the meat is fully tenderized by the wrap phase and the bark is firmed up by the final hour on the grates.
How long to smoke pork ribs on a smoker?
Plan for 6 hours of total cooking time at 225°F. This includes the initial smoke, the two-hour foil wrapped stage, and the final hour for setting the glaze.
Should I smoke ribs at 250 or 300?
Stick to 225°F for the best texture. Higher temperatures can cause the exterior to dry out or burn before the connective tissues have enough time to break down properly.
Is it true I can substitute apple cider vinegar with lemon juice?
No, this is a common misconception. You must use the listed ingredients to maintain the specific flavor profile, though if you enjoyed the acidity balance here, you can see how we apply the same glaze technique in other recipes.
How to remove the rib membrane?
Slide a butter knife under the membrane at one end of the rack to create a gap. Use a paper towel to grip the slippery edge and pull it firmly across the length of the bones in one steady motion.
How to know when ribs are finished cooking?
Perform the "bend test" by lifting the rack with tongs from one end. The meat should flex and the surface should crack slightly, indicating the collagen has successfully rendered.
How to reheat leftover ribs without drying them out?
Wrap the ribs in foil with a small splash of apple juice before placing them in a 300°F oven. This creates a steam like environment that restores moisture to the meat and keeps the bark from turning rubbery.
Authentic Smoked Ribs
Ingredients:
Instructions:
Nutrition Facts:
| Calories | 1042 kcal |
|---|---|
| Protein | 66g |
| Fat | 72g |
| Carbs | 24g |
| Fiber | 1.2g |
| Sugar | 21g |
| Sodium | 1280mg |
